

Brunch Charcuterie Board Layout: A Practical Step-by-Step Guide
What makes an inviting brunch spread isn’t necessarily more food. A good brunch charcuterie board layout gives each item a sensible place, feels generous without looking crowded, and lets guests reach the berries or bagels without moving half the spread. Plan for how people will serve themselves, not just how the board looks in a photo.
If choosing foods that belong together or balancing open space feels tricky, a simple layout process can help. Start with the largest items, group foods by how they’re served, then use color and texture to fill open spaces while keeping serving paths clear. Bowls can contain small or juicy foods, with room nearby for serving utensils and replenishing. A handcrafted wooden board can be a practical serving surface, but the layout matters more than having a particular board. This guide walks through a repeatable approach to planning the food, arranging it for easy access, and keeping the spread balanced from the first guest to the last.
Key Takeaways
- Build your brunch charcuterie board layout around guest flow so appealing food stays easy to reach.
- Set out bowls and larger anchor foods first to give the rest of the spread practical boundaries.
- Choose clusters for a relaxed feel, rows to separate food types, or zones to organize the spread by serving needs.
- Leave clear space for hands, serving utensils, and dishes that need to sit apart from the board.
- Use the board’s shape, grain, and color as part of the presentation, then check balance and access before serving.
Brunch Charcuterie Board Layout: Start with the Gathering and Serving Space
A brunch spread should feel generous, but filling every inch of the table can leave guests reaching over one another or shifting dishes to get to the food. A brunch charcuterie board is a shareable arrangement of brunch foods, brought together so people can serve themselves comfortably. It might include pastries, fruit, cheeses, bagels, or other favorites. The right combination depends on the meal and how you plan to serve it. For background on the history and components of charcuterie boards, see Wikipedia’s overview.
Before arranging anything, consider three things: how many people will gather, how much room the serving area offers, and what the menu includes. These help you decide what belongs on the board, what needs a separate dish, and whether one surface is enough. Plan for the people, the surface, and the food, and the layout will follow.
How to match board size to the brunch setup
Write down the menu and serving dishes first. Mark which foods can sit directly on the board and which need bowls, plates, or their own serving space. Drinks usually belong elsewhere, too. This quick inventory gives you a more realistic sense of the room you need than choosing a board by appearance alone. A wooden board can anchor the spread, but usable surface matters more than an impressive outline.
If the board feels cramped, use a second serving surface rather than stacking or squeezing foods together. A nearby plate or small side table can hold extra pastries, drinks, or dishes that need their own space. This keeps the main board easy to reach and gives you a place to replenish from without rearranging the spread.
Choose a layout style that suits the occasion
A single-board spread keeps the food together and works well when the menu is compact and there’s room around the table. Pairing a board with small serving dishes gives you more flexibility for spreads, toppings, or foods best kept separate. Either way, leave open space around bowls so guests can lift them without nudging nearby food.
On a narrow table or countertop, arrange foods in a line, placing dishes along the length and keeping serving tools accessible. If there’s more room, a loose cluster can feel relaxed. Group related foods together, with small gaps between groups so guests can see what goes together. The brunch charcuterie board layout should suit the setting, not force a crowded surface into a shape that doesn’t fit.
Think of the board as one part of the serving setup, not the whole table. Once you’ve accounted for guests, dishes, and room to reach the food, you can choose an arrangement that feels abundant and works comfortably in use.
How to Build a Brunch Charcuterie Board Layout in a Clear Sequence
A clear order keeps the board from turning into a game of food Tetris. Build the arrangement from the largest, least flexible pieces toward the small finishing touches. That gives bowls room to sit flat, keeps food groups easy to recognize, and leaves space for serving.
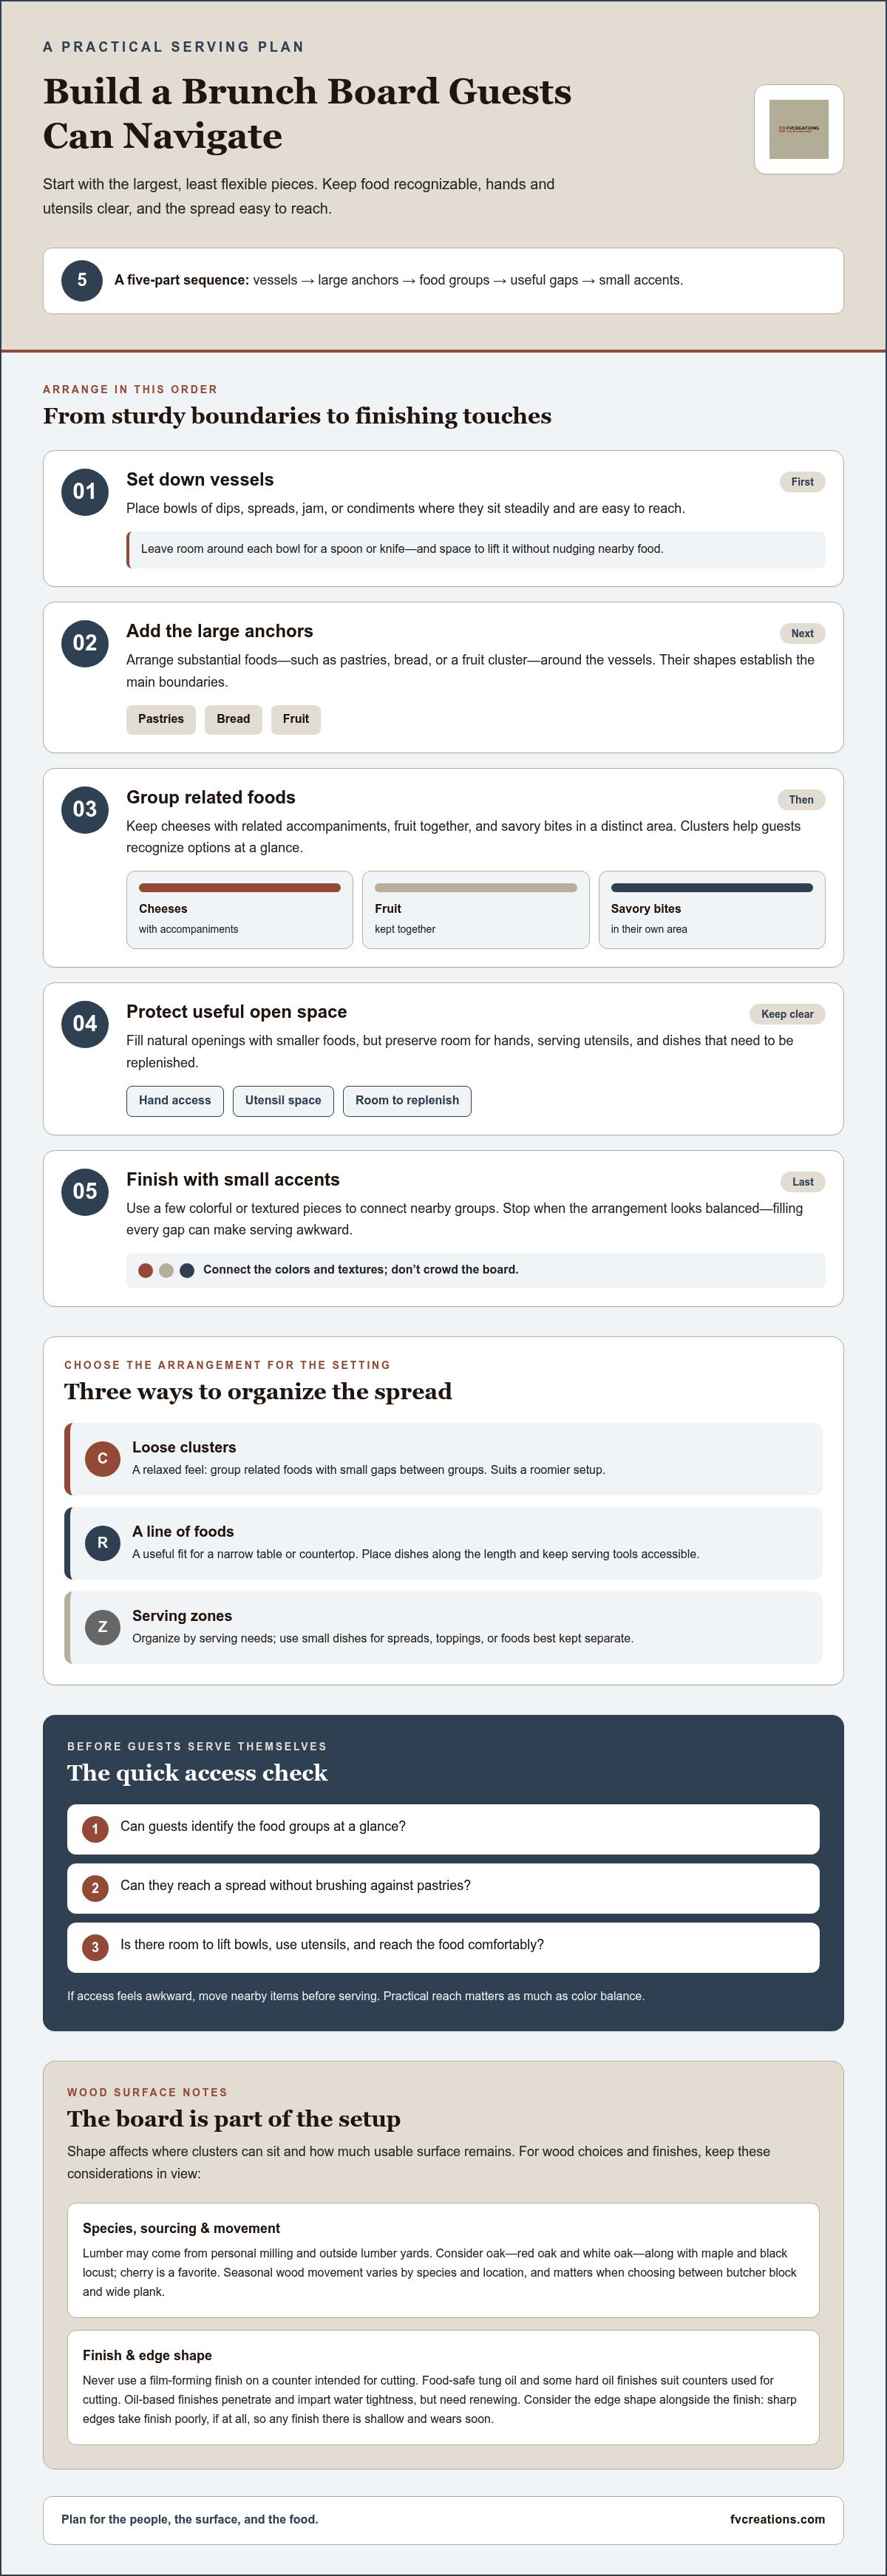
Place the largest anchors first, and the smaller foods will have natural places to land. Use this sequence as a starting point, then adjust it to suit your menu:
- Set down vessels. Position bowls of dips, spreads, jam, or other condiments first. They need a stable spot and room for guests to reach in with a spoon or knife.
- Add the larger anchors. Place substantial items such as pastries, bread, or a cluster of fruit around the vessels. These shapes establish the main boundaries of the arrangement.
- Group the remaining foods. Put cheeses with related accompaniments, fruit together, and savory bites in a distinct area. Guests can quickly see their options and take food without disturbing other groups.
- Fill open areas thoughtfully. Add smaller pieces where they fit naturally, but keep gaps for serving utensils and hands. Empty space can be useful, not unfinished.
- Finish with small accents. Add a few colorful or textured items to connect nearby groups. Stop when the board looks balanced. Filling every last opening can make serving awkward.
Place bowls and larger brunch anchors first
Start by setting bowls where they’ll be easy to reach, not wedged into whatever space remains. Leave a clear margin around each one so a guest can hold it steady while serving. Next, position larger foods where they support the arrangement without blocking access. A fruit cluster can add color at one end, while bread or pastries can anchor another side.
Fill the layout with contrasting food groups
Arrange cheeses, fruit, pastries, and savory bites in distinct but connected clusters. Contrast helps each group stand out: pair soft shapes with crisp edges, or bright fruit with more neutral foods. Keep items together enough to be recognizable, but don’t pack them tightly. Leave room for a utensil or a hand, and preserve space where a serving dish can be replenished.
View the board from the guests’ side. Can someone identify the food groups at a glance? Can they reach a spread without brushing against pastries? If not, move the nearest items before the board is in use. Practical access matters as much as color balance.
The board itself is part of the setup: its shape affects where clusters can sit and how much usable surface remains. If you’re considering a wooden serving surface, browse handcrafted charcuterie boards to see how board shape and food placement work together. Finish the layout with only the small accents that make the spread feel connected.
Brunch Board Layouts Compared: Clusters, Rows, and Zones
The same foods can feel casual, orderly, or carefully separated depending on how you arrange them. Choose a layout by looking at the menu and how guests will reach the board, not by trying to copy a picture. Clusters make a spread feel connected, rows make choices easy to scan, and zones suggest where different kinds of food belong. Each can work. The best brunch charcuterie board layout makes the menu clear while leaving room to serve.
The best layout suits your food variety and lets guests reach each group without disturbing the rest. Here’s how the options compare:
- Clusters: Neighboring groups create a relaxed, abundant appearance. They work well on a broad surface where guests can approach from different sides, but need enough room between groups for hands and utensils.
- Rows: Lines of similar foods look tidy and make several options easy to compare. They can use a narrow surface efficiently, though long, tightly packed rows may be harder to reach from the sides.
- Zones: Loose areas for sweet, savory, or other menu groupings help guests understand the spread. Zones need enough space to stay distinct, but shouldn’t look like separate compartments with hard borders.
When a clustered layout works best
Choose clusters for a relaxed brunch where foods naturally pair or overlap. Place a cheese group near fruit, or let pastries sit close to a small dish of jam, while keeping each food recognizable. Vary color, shape, and texture to make the arrangement feel full without making it hard to read. Keep piles low: tall stacks can hide smaller choices and make individual pieces awkward to lift.
Clusters are useful when the board has an irregular shape or when people will gather around more than one edge. They’re flexible, too. If one group is popular, nearby foods can be moved or replenished without preserving a strict line. Leave a little breathing room between unlike foods so guests can tell where one choice ends and another begins.
When rows or serving zones make more sense
Rows suit a narrow countertop or a menu with several similar options, such as different pastries, cheeses, or cut fruit. A line lets guests scan the choices and take one without reaching across unrelated foods. For sweet and savory items, try gentle zones: keep each group in its own area, then use a shared color or nearby accompaniment to connect the spread.
Keep those divisions loose. A bowl or a small patch of open board can hint at a boundary without making the layout feel boxed in. Consider where guests will stand and where serving tools need to rest, especially if people will reach from both sides. If a row blocks access or makes someone reach over another group, shorten it or break it into smaller sections. The arrangement should guide the eye, not dictate a single path through the food.
You can combine approaches: use a row for pastries, clusters for fruit and cheese, and a soft savory zone on the opposite side. Let the menu set the pattern, then adjust for the board’s usable surface. A little structure helps guests choose; flexibility keeps the gathering comfortable.
Make the Board Practical: Food Placement, Wood, and Serving Flow
A beautiful arrangement still needs to work once guests gather around it. Leave clear paths for hands and serving utensils, and consider where a bowl can be lifted without bumping nearby food. Place often-chosen items where they’re easy to reach from the guest’s side. If people will approach from more than one direction, avoid putting all the most popular foods along a single edge.
Keep juicy, sticky, or strongly flavored foods in separate dishes where they won’t affect neighboring items. A small bowl can contain berries or preserves; a plate can hold food that needs its own space. Leave room beside dishes for spoons, tongs, or a knife. That space also makes it easier to top up a popular item without rebuilding the board.
Use wood tone and grain as part of the presentation
Think of the board as a background, not just a platform. Grain, color, and shape affect how the food reads: fruit may stand out against a darker surface, while light wood can make richer colors feel vivid. The brunch charcuterie board layout should work with the board’s outline, too. A long, narrow surface may suit a line of foods, while a wider shape can leave room for more than one reachable cluster.
Wood species bring different visual character. Red oak and white oak have distinct grain and color; maple is often lighter in appearance, while black locust can show warm golden tones. Cherry has a warm, rich look and is Farmer Vic’s favorite wood species. Each can inspire a different presentation, from the clear contrast of lighter maple to the distinctive grain of oak.
Seasonal wood movement is another factor when choosing a wood and surface design. Movement varies by species and location. For larger work surfaces, a butcher block and a wide-plank design respond differently to that movement, so the choice should account for the conditions where the surface will be used. Finish and edge shape matter, too. A surface meant to be cut on should not have a film-forming finish. Food-safe tung oil and some hard-oil finishes are options for cutting surfaces; oil-based finishes penetrate the wood and need renewing. Sharp edges take little finish, if any, so a shallow coating there can wear quickly. Consider the edge shape alongside the finish.
FVCreations handcrafts wooden goods, including charcuterie boards, using wood sourced from the owner’s property. The wood’s character can make each piece distinctive, while the board’s shape determines how much serving space it provides.
Keep the arrangement easy to reach and replenish
Before serving, look at the setup from each side guests might use. Can someone pick up a pastry without reaching over a bowl? Is there a clear place to rest a utensil? If an item runs low, can you add more without shifting a neighboring group? An irregular edge may call for a different arrangement than a straight-sided one, so use the surface you have rather than forcing a pattern onto it.
For broader guidance on board styles and care, explore FVCreations’ handmade charcuterie boards. Choose a board that fits the way you plan to serve, then leave enough room for guests to enjoy the food without constantly rearranging it.
Finish the Brunch Charcuterie Board Layout and Serve with Confidence
Before guests arrive, take one last look at the spread from the places they’ll sit or stand. A final check isn’t about filling every gap or fussing over every piece. It’s a chance to catch small things that make serving smoother: a hidden food group, a bowl without a spoon, or a popular item tucked behind another dish. The brunch charcuterie board layout is ready when it feels balanced and guests can help themselves comfortably.
A quick final check before guests arrive
- Check visibility and reach. Make sure guests can see each food group and reach it without moving another dish or reaching across the board.
- Give serving essentials a home. Set out bowls, utensils, plates, and napkins near the food, but outside the main eating area of the board.
- Keep the finishing touches useful. Add an accent only if it brings out a color or visually connects two groups. Remove decorations that block access or don’t suit the menu.
- Leave space for replenishing. Keep room around popular foods so you can add more in small batches without disturbing the board’s main groupings.
Small refills help the arrangement hold together as brunch goes on. Instead of bringing out all the remaining food at once, top up the group that needs it and keep its place on the board. If a bowl or plate needs replacing, lift it carefully and return it to the same spot. The layout will still make sense to guests after a few rounds of serving.
Choose a serving board that fits your next gathering
A board’s shape and usable surface affect how many food groups can sit comfortably and where guests can reach them. A long surface may suit a linear arrangement, while a broader shape can give clusters more room. Think about the foods you tend to serve and the table where they’ll be shared. The board should support the gathering rather than crowd it. There’s no single shape that suits every brunch.
FVCreations offers handcrafted charcuterie boards, with custom sizing available for a more tailored fit. Explore handcrafted wooden boards to find a serving surface for your next spread. A well-chosen board is useful beyond one brunch, and a thoughtful layout helps make the most of it.
Make Your Next Brunch Board Your Own
Your next spread doesn’t need to follow a template. Let the occasion guide you: a slow weekend brunch might call for a loose, easygoing arrangement, while a meal with several distinct dishes may benefit from clearer groupings. As you plan your brunch charcuterie board layout, think beyond the first impression. Picture guests reaching in, serving themselves, and enjoying the food without needing to rearrange the board.
That same practical approach can help you choose a serving surface for future gatherings. Consider the shape that suits your table and the way you like to serve, then build a layout around what feels comfortable and welcoming. A board can be part of the occasion, but the pleasure comes from sharing good food with people around it.
If you’re thinking about a wooden board for your next gathering, explore handcrafted wooden boards from FVCreations. Browse the available styles or request a custom size, then plan your layout around your menu and serving space.
Frequently Asked Questions
How much food should I plan for each person on a brunch charcuterie board?
Plan portions according to whether the board is the main meal or one part of a larger brunch. If guests will also have hot dishes, pastries, or a plated course, the board can offer a selection rather than carry the whole meal. Include both filling choices and lighter bites, and consider your guests’ appetites. Keep backup portions chilled or covered nearby so you can add more as needed instead of loading the board upfront.
Can I prepare a brunch charcuterie board the night before?
You can plan the arrangement and prepare suitable components ahead, but keep perishable foods stored safely until serving. Set out serving dishes and decide where each group will go, then add delicate or moisture-prone foods closer to brunch. If you assemble part of the board early, cover it and follow safe handling guidance for the foods you’re serving. A little advance planning saves time without leaving the finished spread looking tired.
What foods should be kept separate on a brunch charcuterie board?
Separate foods when their moisture, flavor, or serving style could affect nearby items. Syrup, jam, dips, and spreads are easier to manage in their own bowls, while strongly flavored foods can have a distinct place so their taste doesn’t carry into milder choices. Keep utensils with the foods they’re meant for, too. A dedicated spoon for a spread, for instance, helps guests serve neatly and keeps crumbs out of the bowl.
Is a wooden board suitable for serving brunch foods?
Yes, a wooden board can be a welcoming surface for serving brunch, provided it’s clean and cared for appropriately. Use small dishes for foods that are especially wet or messy, and set hot dishes on suitable serving ware rather than directly on the board. After brunch, follow the board maker’s care guidance for cleaning and drying. A board intended for serving is a useful base, not a substitute for separate dishes where they’re needed.
How do I keep fruit from making the rest of the brunch board soggy?
Dry washed fruit well and keep cut or especially juicy pieces away from crisp foods. Place berries that may release juice in a small dish, and add sliced fruit shortly before serving rather than letting it sit beside pastries. If fruit is particularly ripe, offer it in a separate bowl. Refill that bowl as needed from a covered reserve so the whole supply doesn’t soften nearby foods.
Can hot brunch foods go directly on a charcuterie board?
Use a separate heat-safe serving dish for hot brunch foods instead of placing them directly on a wooden board. A warm egg bake, for example, can sit in its own dish beside the board, leaving the board for foods served at room temperature. This gives guests a clear place to serve hot portions and helps keep the rest of the spread organized. Choose serving ware suited to the hot food you’re offering.
How do I make a brunch charcuterie board look full without overcrowding it?
Make the board feel full by arranging each food group intentionally instead of spreading small amounts thinly over the entire surface. Use serving dishes suited to the portions, and avoid oversized bowls that take up space without holding much food. A few visible sections of board can make the arrangement feel open and considered. Keep extra food nearby, then replenish the groups guests are enjoying most.