

How to Make a Charcuterie Board Look Full: 5 Artisan Styling Secrets
You don't need a mountain of expensive cured meats to solve the puzzle of how to make a charcuterie board look full. If you've ever stared at an awkward patch of bare wood, watching loose crackers slide around on a flat surface, you know the frustration of a spread that feels unexpectedly sparse. It's tempting to think buying heaps of specialty cheese is the only fix, but overspending needlessly at the grocery store isn't the answer.
True visual abundance comes from architectural layering and smart board proportions, not sheer volume. In my workshop, whether I'm milling timber from my own property or hand-selecting boards from trusted local lumber yards, I craft serving pieces to frame good food, not swallow it up. You can easily build a lavish, magazine-worthy display using everyday ingredients once you learn how to anchor bowls, build vertical texture, and cascade items across the grain. Here are five artisan styling secrets to help you turn any wooden board into a rich, overflowing centerpiece.
Key Takeaways
- Match your timber board dimensions directly to your guest count to eliminate awkward empty gaps before placing your first ingredient.
- Anchor the surface using odd-numbered ceramic ramekins and structural wedges of firm cheese to create natural retaining walls for loose items.
- Master how to make a charcuterie board look full by folding cured meats into rippled ribbons rather than laying slices flat against the wood grain.
- Weave sweeping arcs of mixed cracker textures alongside bunches of fresh produce to banish remaining blank spots and create rich visual movement.
- Preserve the food-safe finish and natural beauty of your handcrafted serving board with gentle post-party wash routines that protect against drying out.
Start with the Right Wooden Foundation and Scale
Most entertaining guides tell you to pull out the biggest platter in your kitchen cabinet. That single piece of advice is why so many home hosts struggle with how to make a charcuterie board look full. An oversized board creates massive swaths of empty territory that force you to buy endless groceries just to hide the base. Handcrafted timber is the architectural foundation of your entire presentation; its perimeter and natural edges should actively frame your food, not swallow it up.
Historically, French charcuterie originated as a practical method for preserving meats, celebrated for rich, hearty provisions. Serving these rustic items on a genuine timber surface honors that craft. When the board size complements your ingredient portions, the natural live edges and tight wood grains act as built-in visual borders. You end up highlighting the timber beneath instead of treating bare spots like design mistakes.
Choosing Hardwoods: Cherry, Maple, Oak, and Locust
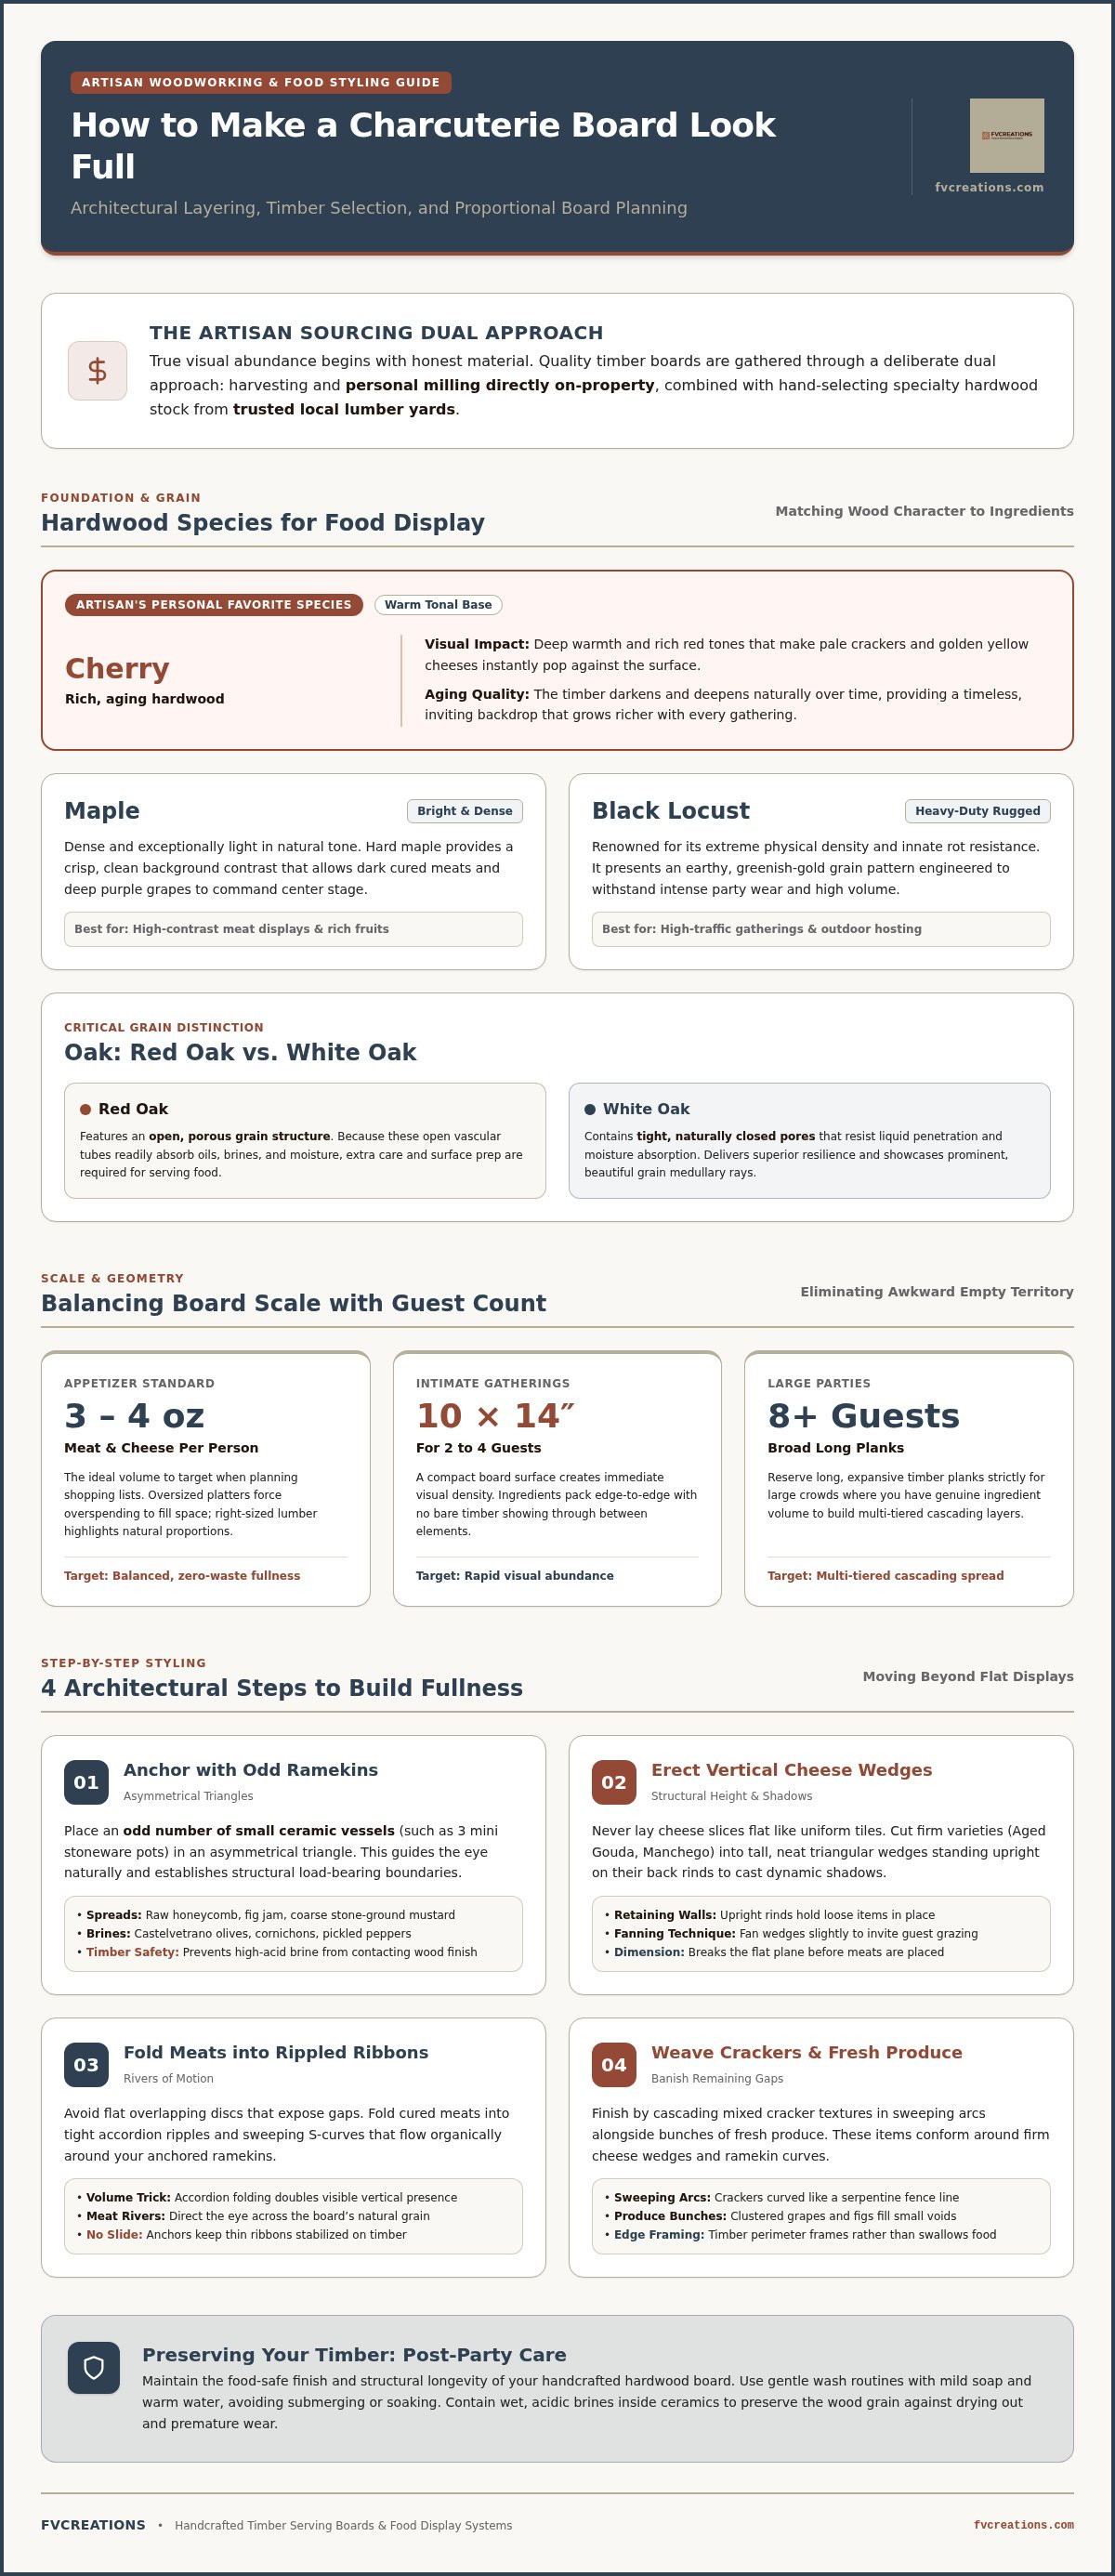
In the workshop, I use a dual approach to gather timber, sourcing logs through personal milling on my property while also partnering with trusted local lumber yards for specialty stock. Every wood species brings a distinct visual character to the table:
- Cherry: My absolute personal favorite species to work with. Cherry offers deep warmth and rich red tones that make yellow cheeses and pale crackers pop. It deepens naturally over time, providing an inviting backdrop.
- Maple: Dense and exceptionally light in color. Hard maple offers a clean, bright contrast that lets dark cured meats and purple grapes take center stage.
- Oak: We separate red oak from white oak for food service. Red oak has an open, porous grain that can absorb oils, whereas white oak features tight, naturally closed pores that resist moisture and display stunning grain rays.
- Black Locust: Known for extreme density and natural rot resistance. Black locust brings a rugged, greenish-gold grain that holds up to heavy party wear.
Balancing Board Dimensions with Guest Count
To master how to make a charcuterie board look full without needless grocery bills, tailor the board directly to your guest list:
- Appetizer Portions: Calculate about three to four ounces of cheese and meat per person.
- Intimate Gatherings (2 to 4 guests): Choose a compact board roughly 10 by 14 inches. A tight surface packs your items together easily, creating immediate visual density.
- Large Gatherings (8 or more guests): Reserve broad, long planks for true multi-tiered spreads where you genuinely have the volume to layer without stretching ingredients thin.
If you need a reliable timber base built with balanced proportions, explore our handcrafted cutting boards to find the ideal scale for your next gathering.
Anchor the Board with Ramekins and Structural Cheeses
Flat displays feel lifeless because everything sits on a single, uniform plane. When folks ask how to make a charcuterie board look full, the secret lies in building three-dimensional structure before a single slice of prosciutto touches the wood. You want fixed, solid anchors that give the entire spread architectural weight. Small ceramic ramekins and dense blocks of artisan cheese serve as your load-bearing pillars, creating boundaries that keep loose crackers and rolling fruit firmly in place.
Positioning Bowls to Prevent Food Runoff
Start by setting down an odd number of small vessels, such as three mini stoneware pots on an average board. Placing them in an asymmetrical triangle naturally draws the eye across the board surface instead of trapping focus in symmetrical corners. These ramekins are essential working components that hold wet items:
- Liquid Spreads: Raw honeycomb, fig jam, or coarse stone-ground mustard.
- Brined Provisions: Marinated castelvetrano olives, cornichons, or pickled peppers.
- Timber Protection: Keeping high-acid brines contained protects the food-safe oil finish on your hardwood board from premature wear.
Cutting and Pre-Arranging Cheeses for Visual Height
Professional food stylists often rely on culinary fundamentals like the expert food styling tips shared by Escoffier chefs, who emphasize contrasting geometric cuts. Cheese shouldn't simply sit as flat tiles. Instead, cut for verticality and texture to create shadows:
- Aged Gouda or Manchego: Cut into tall, neat triangular wedges and stand them upright on their back rinds, fanning them slightly like fallen dominoes.
- Sharp Cheddar: Never slice sharp white cheddar into lifeless cubes. Break it apart with a paring knife tip into jagged, rustic boulders to catch overhead light.
- Soft Wheels: Leave a wheel of Camembert or brie whole to anchor the board edge, cutting out just one neat wedge to invite your guests to dig in.
Spread these structural cheeses near your ramekins across the board, pairing dark aged cheeses against bright timber like maple or white oak. Building these vertical retaining walls is a practical step that makes everything you arrange afterward feel stacked, deliberate, and lavishly styled.
Build Rivers and Ribbons with Cured Meats
Laying meat flat on timber is the fastest way to make an expensive grocery run look underwhelming. Flat shingles of salami hug the grain, exposing broad gaps of wood between slices and making your spread appear skimpy. If you want to know how to make a charcuterie board look full, the secret is all about three-dimensional volume. Folding, bunching, and weaving your cured meats creates deep shadows, structural height, and natural visual movement.
Styling directly on the timber lets the food interact beautifully with the rich grain of cherry or maple. Since meats release natural oils, always ensure your board has a proper food-safe finish, and remember to follow standard food safety principles to safely clean your wood board once the party winds down.
The S-Curve Meat River Technique
Instead of stacking meat into isolated mounds, build an undulating charcuterie river that weaves across the board. An S-curve cuts gracefully between your anchored cheese blocks and ceramic ramekins, instantly guiding the eye:
- The Quarter-Fold Method: Take a slice of Genoa salami or soppressata, fold it in half, then fold it in half once more into a ruffled triangle.
- Interlocking Chains: Pinch the pointed base of each folded triangle and pack them snugly together in a continuous chain.
- Salami Rosettes: For extra vertical drama, layer round slices along the lip of a small champagne flute or tasting glass, pressing them over the rim. Invert the glass onto the board to reveal a self-standing, rose-shaped cluster.
Fluffing Prosciutto and Delicate Cured Cuts
Paper-thin cured meats require a gentler, more organic touch than firm salami. Tightly compressed bundles of prosciutto look heavy and uninviting, but loosely fluffed ribbons make a charcuterie board look full without demanding extra meat:
- Airy Nests: Pull prosciutto or jamón slices apart gently. Gather each strip accordion-style into a loose, airy nest before dropping it onto the board. The trapped air creates instant height.
- Structural Tucking: Tuck the base of delicate ribbons against firm cheese edges or heavy ramekins. This keeps the nests from sprawling or collapsing outward as guests pluck them.
- Color Contrast: Alternate deep, ruby-red bresaola with pale, marbled ribbons of sweet coppa. The shifting tones catch natural lighting and highlight the warm timber below.
Eliminate Bare Spots with Layered Crackers and Produce
Once your cheeses, ramekins, and meat ribbons are in position, you'll likely notice odd pockets of visible wood grain. Leaving a few strategic edges exposed lets the warmth of hardwoods like cherry or white oak shine through, but scattered gaps in the middle make a display look unfinished. Knowing how to make a charcuterie board look full without spending a fortune comes down to your filler strategy: using affordable carbs, seasonal produce, and garden herbs to pack every crevice with rich color and varied texture.
Cascading Cracker Formations
Ditch the rigid straight rows you see in grocery platters. Shingling crackers in organic lines prevents them from sliding across smooth timber finishes when guests pull a piece:
- Sweeping Arcs: Shingle round butter crackers or water wafers in graceful curves that follow the contours of your ramekins or meat rivers.
- Shape Contrasts: Pair long seeded flatbreads standing upright against firm cheese blocks with small artisan crisps fanned in tight half-moons.
- Side Baskets: Don't crowd the entire box of crackers onto the wood at once. Keep reserve crackers in a small side bowl to replenish your flowing arcs throughout the evening.
Clustering Fresh and Dried Produce
Produce acts as natural mortaring between your larger components. Instead of dropping large fruit whole onto the surface, break it down to fill specific voids:
- Snippet Bunches: Cut grape clusters into mini stems of two or three grapes using kitchen shears. Tuck them into corners so guests don't have to yank at a massive vine.
- Cross-Section Slices: Halve fresh figs or ripe strawberries lengthwise to expose their ruby centers. Place them seed-side up against pale cheeses.
- Cavity Fillers: Drop small handfuls of dried tart cherries, golden apricots, marcona almonds, or raw walnuts into lingering triangular gaps.
Finishing Touches with Fresh Herb Sprigs
Herbs provide that final artisan layer that elevates a homemade board into an abundant work of art. Tuck hearty, woody sprigs of fresh rosemary beneath the base of cheese wedges, letting the dark green needles drape outward toward the edges of the board. Nestle tender thyme branches and fresh sage leaves along the meat ribbons to establish organic movement and a subtle, welcoming fragrance. If you want a distinctive foundation to try these styling secrets on, browse our handcrafted collection of solid wood charcuterie boards to anchor your next spread.
Caring for Your Handcrafted Wood Board After the Party
After your guests head home and the celebration winds down, give your serving board the same care you gave your presentation. Learning how to make a charcuterie board look full means relying on natural hardwood as the foundational canvas for your spread. Whether that foundation is tightly grained white oak, durable black locust, or my personal favorite, rich cherry wood, proper cleaning preserves the grain and keeps the timber ready for the next event.
Safe Cleaning and Sanitizing Practices
Never let leftover cheeses or cured meats sit on timber overnight. Perishable foods release moisture and fats that can seep into the grain if left unattended:
- Gentle Scraping: Use a flat plastic bench scraper or a soft damp cloth to clear stubborn, dried cheese bits. Avoid sharp metal knives that score the hardwood fibers.
- Hand Washing Only: Wash both sides using warm water and a small drop of mild dish soap. Never submerge the board in a sink of water, and keep it far away from dishwashers. Excessive water causes solid lumber to warp and split along glue joints.
- Natural Sanitizing: Wipe the timber down with a splash of distilled white vinegar or rub half a fresh lemon across the surface to naturally neutralize lingering odors without harsh chemicals.
- Even Air Drying: Wipe off excess surface moisture with a clean towel, then stand the board upright on its long edge. Drying it flat traps moisture underneath, which pulls the wood unevenly as it dries.
Maintaining Timber Lustre Between Gatherings
Wood naturally gives up moisture to the surrounding air, especially after repeated washings. When the surface starts looking dry or chalky, rehydrate the timber pores with pure, food-grade mineral oil or a beeswax conditioner. Rubbing oil into cherry or maple restores the rich, glowing luster that makes your food arrangements stand out so cleanly.
A well-maintained board lasts generations and looks better with every gathering. If you are looking to add an artisan piece to your kitchen, take a look at the distinct styles in our cutting boards collection. Taking good care of handcrafted timber ensures your board stays ready to showcase abundant, beautiful spreads whenever friends and family gather around your table.
Bring Artisan Abundance to Your Next Table
Creating an impressive spread isn't about clearing out the specialty cheese aisle. Now that you understand how to make a charcuterie board look full, you can rely on smart architectural steps instead of endless food volume. Choosing a base that matches your gathering, anchoring the layout with stoneware bowls, and building winding ribbons of folded meats transforms basic pantry items into a rich, layered feast.
Every memorable display starts with a dependable piece of timber beneath it. In my shop, each board is crafted by hand, pairing sustainably milled timber from my own acreage with prime stock selected from trusted local lumber yards. From the glowing red depth of my favorite cherry wood to resilient white oak, every piece receives a protective, food-safe oil finish built for real gatherings. Explore our handcrafted charcuterie boards at fvcreations.com to find the right centerpiece for your next evening with good friends.
Frequently Asked Questions
How do you fill gaps on a charcuterie board without overspending?
You fill empty spaces affordably by relying on pantry staples like mixed nuts, dried cranberries, and sliced seasonal fruit. Instead of purchasing extra artisanal cheeses, scatter affordable bulk items like walnuts or pretzel crisps into bare pockets. Fresh rosemary sprigs from the garden also stretch across large gaps, adding lush greenery and height without inflating your grocery receipt.
What foods should you place on a charcuterie board first?
Always place your ceramic dip ramekins and largest cheese blocks on the board first. These solid items serve as physical anchors that dictate the flow of the entire arrangement. Once these heavy pieces establish your layout, you can weave meat ribbons around them and tuck loose crackers into the remaining channels without disturbing your main structure.
How many items do you need to make a grazing board look full?
You only need about seven to nine distinct ingredients to achieve a dense, bountiful look. The artisan secret behind how to make a charcuterie board look full lies in repeating those items across multiple small clusters rather than buying dozens of different foods. Dividing three cheeses, two meats, and four produce fillers across the surface makes standard quantities look twice as abundant.
What is the best wood species for a charcuterie board?
Dense, closed-grain hardwoods like cherry, maple, and white oak make the best serving boards. Cherry wood is my personal favorite because its warm reddish glow deepens with age, creating a vibrant backdrop for cheeses. White oak offers incredible water resistance due to its cellular structure, while rock maple provides a clean, pale surface that highlights darker cured meats.
Can you prepare a full charcuterie board several hours ahead of time?
You can assemble cheeses, cured meats, and sturdy fruits up to four hours in advance if you cover the board tightly with plastic wrap and refrigerate it. Leave crackers, toasted nuts, and crunchy garnishes off the wood until right before guests arrive. Chilling crackers alongside damp cheeses softens their texture, ruining the crisp snap your guests expect.
How do you keep crackers from getting soggy on a crowded board?
Keep your crackers crisp by isolating wet ingredients in ramekins and using dry, aged cheeses as physical buffer walls. Never rest crispbreads directly against juicy grapes, freshly cut berries, or soft cheeses like brie. If your board feels tightly packed, stack the bulk of your crackers in a complementary side basket and keep only small accent fans on the wood.