

How to Restore a Dry Wood Cutting Board: A Practical Guide
What if the first step in restoring a dry wood cutting board isn’t adding oil? A faded, rough surface can look worn out, but dryness, cracks, and lingering odors need different responses. If you’re wondering how to restore a dry wood cutting board without damaging its food-contact surface, first work out what the board needs.
It’s sensible to be cautious. Sanding too aggressively can change the board’s shape, and the wrong finish may not be suitable for food preparation. A board with ordinary dryness or light roughness often needs careful maintenance, not a drastic overhaul.
This guide explains how to assess the board, decide whether light sanding is appropriate, and renew the surface with a finish suited to food-contact use. You’ll also learn what to do about deeper cracks or persistent odors, and how simple care habits can help keep a board ready for everyday use.
Key Takeaways
- Learn how to restore a dry wood cutting board by assessing its condition before choosing a care step.
- Understand how washing, heat, and seasonal changes can affect a board, while keeping in mind that wood species and location matter.
- Choose between a maintenance refresh, light sanding, or a closer assessment of deeper damage. Oil won’t repair structural cracks or severe warping.
- Follow a careful sequence: clean and dry the board fully, sand only if needed, remove dust, then apply a suitable finish as directed.
- Maintain the surface with gentle cleaning, and renew the finish when use and condition call for it rather than following a fixed schedule.
How to Tell Whether Your Wood Cutting Board Is Actually Dry
A dull-looking cutting board usually needs a closer look, not an immediate trip to the rubbish bin. Surface dryness is often manageable, but appearance alone can’t tell you how much moisture is inside the wood. A dry-looking cutting-board surface may appear faded or feel rough, with less of its usual even sheen. Treat these signs as clues rather than a precise moisture test.
Wood naturally responds to moisture in its surroundings. The wood drying process helps explain how moisture changes can affect wood, but a board’s appearance alone can’t diagnose internal moisture or damage. Repeated washing followed by drying can leave the surface looking depleted over time, especially when care has been inconsistent.
What does a dry cutting board look and feel like?
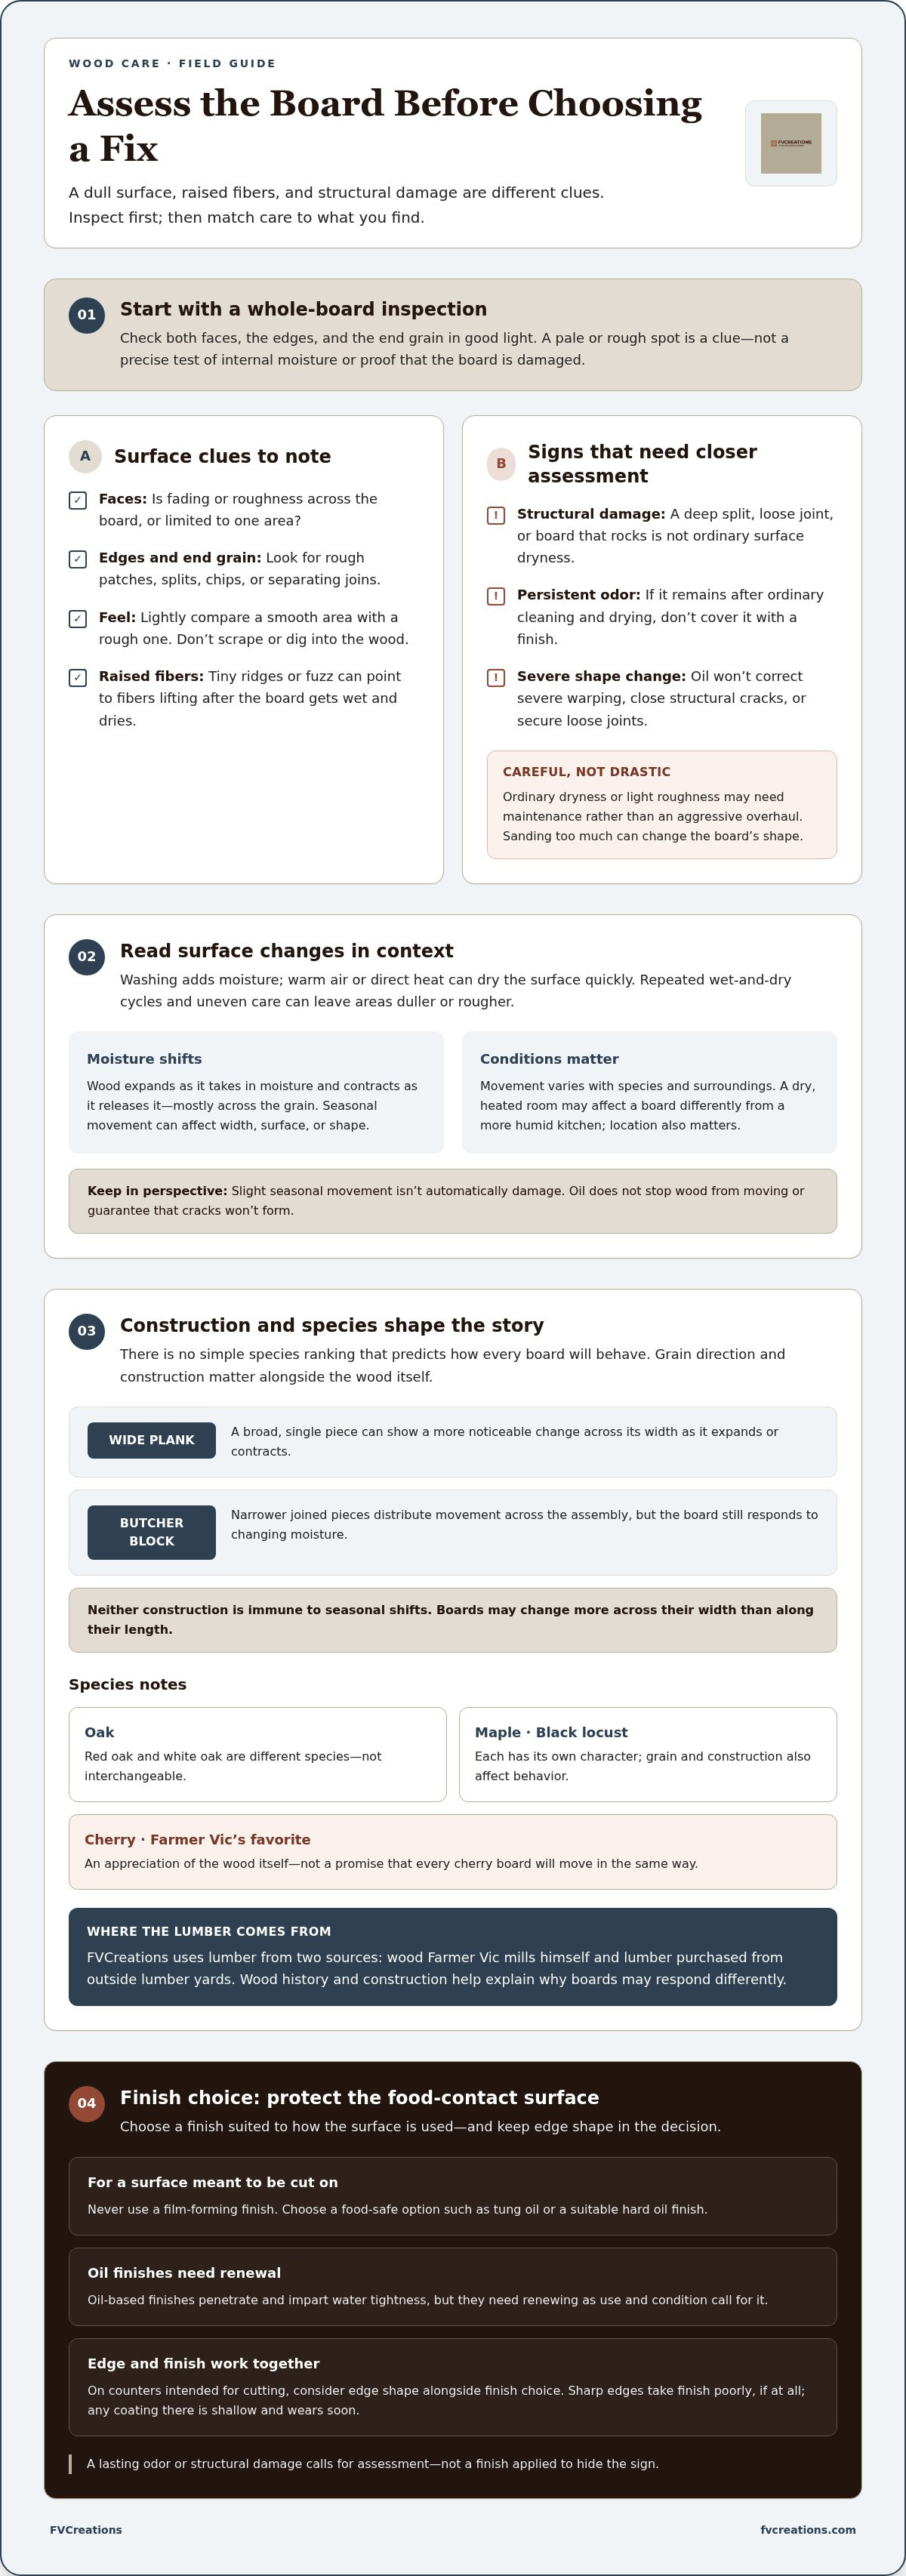
Look for a surface that seems dull or faded compared with areas less exposed to washing. Run clean fingers lightly across it. The wood may feel dry or slightly rough rather than smooth. A color change or rough feel doesn’t necessarily mean the board is damaged. Raised fibers feel more like tiny ridges or fuzz than a generally matte surface.
Before choosing a fix, turn the board over and inspect both faces, the edges, and the end grain. One side may look well cared for while the other shows uneven wear, rough patches, or a split starting at an edge. Check the whole board in good light rather than judging it by one pale spot.
- Faces: Note whether fading or roughness covers the board or is limited to one area.
- Edges: Look for splits, chips, or places where joined pieces seem to separate.
- End grain: Check the exposed wood at the ends for cracks or unusual roughness.
- Feel: Compare a smooth area with a rough one using a light touch. Don’t scrape or dig into the wood.
When is dryness a different problem?
Raised fibers suggest that the surface has lifted, not simply lost its sheen. This can happen after the board gets wet and then dries. Light surface roughness is different from a deep split, a loose joint, or a board that rocks because its shape has changed. These signs need closer assessment. Adding oil won’t close structural cracks, secure loose joints, or correct severe warping.
Persistent odor is another sign to take seriously, particularly if it remains after ordinary cleaning and the board has dried. Don’t try to hide a smell beneath a finish. First distinguish a surface that looks dry from one with a lasting odor or visible structural damage. If you’re unsure, pause before sanding. Removing substantial wood can change the board without solving the underlying problem. The safest first step in how to restore a dry wood cutting board is an honest assessment, not an aggressive fix.
Why Cutting Boards Dry Out, and How Wood Species Affect the Signs
A cutting board’s surface changes through ordinary kitchen use. Washing adds moisture, while warm air or direct heat can dry the surface quickly. Leaving a board wet for a long time, then repeating cycles of soaking and drying, can also affect its appearance. Uneven care may eventually leave some areas duller or rougher than others.
Wood also responds to moisture in the air. It expands as it takes in moisture and contracts as it releases it, mostly across the grain. Seasonal wood movement can gradually change a board’s width, surface, or shape as moisture conditions shift. The effects of drying on wood include dimensional changes and possible defects, but the amount of movement depends on the wood and its surroundings. A slight seasonal change isn’t automatically damage, and oil doesn’t stop wood from moving or guarantee that cracks won’t form.
How species and grain shape the board’s behavior
Species are part of the story, but there’s no simple ranking that predicts how every board will behave. Maple, black locust, and cherry each have their own character, and grain pattern and construction matter too. Cherry is Farmer Vic’s favorite species, an appreciation of the wood itself rather than a promise that every cherry board will move in the same way.
Oak deserves a closer distinction: red oak and white oak are different species, so they shouldn’t be treated as interchangeable. Their appearance and behavior can differ, just as boards made from maple, black locust, or cherry can. Grain direction matters as well. A board may change more across its width than along its length, so seasonal movement can show up as a change in fit or shape rather than length.
Why board construction and seasonal conditions matter
A wide-plank board and a butcher-block board don’t respond to movement in exactly the same way. A broad, single piece can show a more noticeable change across its width as it expands or contracts. Butcher-block construction joins narrower pieces, distributing movement across the assembly, but the board still responds to changing moisture. Neither style is immune to seasonal shifts.
Indoor conditions count. A board kept in a dry, heated room may respond differently from one in a more humid kitchen, and patterns vary by location and species. FVCreations uses lumber from two sources: wood Farmer Vic mills himself and lumber purchased from outside lumber yards. Whatever its source, the wood’s history and construction help explain why boards may not all respond alike.
This context can help you decide which wooden cutting board construction suits your kitchen. For restoration, focus on the board in front of you. Normal movement is different from a deep split, a loose joint, or a shape change that keeps the board from sitting steadily.
Oil, Sand, or Repair? Choose the Right Response for Your Board
Once you’ve inspected the board, match the fix to what you see. A sound board with a faded surface may need a maintenance refresh. A rough patch may call for light sanding. A deep crack or severe warp needs more than either. Adding oil can improve a dry-looking surface, but it can’t put damaged wood back together.
Oil is appropriate for a clean, structurally sound board that needs its finish renewed. It isn’t a complete repair for cracks, loose joints, or severe warping. If you’re deciding how to restore a dry wood cutting board, identify the problem before reaching for sandpaper or oil.
When oiling alone may be enough
Oiling may be enough when the board feels generally smooth, sits steadily, has no deep splits or loose joints, and mainly looks dull or faded. After cleaning and drying it fully, apply an oil-based finish suitable for food-contact use. These finishes penetrate the wood and help impart water resistance, but they wear with use and need renewing as the surface condition calls for it.
Food-safe tung oil and some hard-oil finishes are options for cutting surfaces. Follow the chosen product’s directions for application and readiness for use. Oil isn’t a cleaner: it won’t remove stuck-on food or persistent odor, and it shouldn’t go on a damp board. An oil finish also doesn’t prevent all wood movement or guarantee that cracks won’t develop.
Consider the board’s edges as well as its broad faces. Sharp edges accept little finish, if any, so the coating there is shallow and may wear away quickly. That’s not a reason to sand aggressively. It’s a reason to expect the finish to hold differently across surfaces with different shapes.
When sanding or further repair may be needed
Light sanding can help when wood fibers feel rough or raised across an otherwise sound surface. Work gently and evenly, removing only what’s needed to smooth the affected area. Sanding won’t fix a structural split, a loose joint, or serious warping. If a crack is deep or the board no longer sits securely, pause instead of sanding around the damage and removing more wood.
Be especially careful near corners, edges, and end grain. Heavy sanding can flatten a shaped edge, change the board’s profile, or remove useful material without fixing the cause of the problem. If the surface needs modest smoothing, choose suitable woodworking sandpaper and use a light hand. When damage goes beyond the surface, don’t treat a fresh coat of oil as a repair. Address the condition first, then decide whether the board remains suitable for everyday use.
How to Restore a Dry Wood Cutting Board Step by Step
Take the job one step at a time. Prepare the board properly, then sand and finish only as its condition requires. Keep the finish label nearby, and follow its drying and curing directions. A steady approach helps you avoid changing the board’s shape unnecessarily.
Prepare the board before sanding or oiling
Set the board on a stable surface and inspect both faces and all edges. Note any rough patches, stains, cracks, or unusual smells. If you find structural damage or a persistent odor, assess it separately rather than trying to hide it beneath a new coat.
Wash the board and let it dry completely before applying finish. Check for lingering moisture on the underside and around the edges. Sand only if the surface still feels rough after cleaning. Use light, even strokes over the affected area, following the grain where practical. Stop once the roughness is gone. There’s no need to remove sound wood simply to make the board look new.
Apply and renew a suitable food-safe finish
For a board meant for cutting, choose food-safe tung oil or an appropriate hard-oil finish. Confirm that the specific product is suitable for food-contact use, then follow its directions for application, handling excess, and curing. Don’t guess at curing time or return the board to food preparation before the maker’s instructions say it’s ready. A finish intended for furniture generally isn’t a substitute for one suited to a cutting surface.
- Inspect: Check both faces and edges. Decide whether the issue is surface roughness or damage that needs separate attention.
- Clean: Remove food residue and wash the board before refinishing.
- Dry: Let the whole board dry thoroughly, including its underside and edges.
- Sand if needed: Smooth only rough areas with a light touch. Skip this step if the surface is already smooth.
- Remove dust: Wipe away sanding residue so it won’t be trapped beneath the finish.
- Apply finish: Use a product suitable for food-contact surfaces and follow its application and curing directions.
Work carefully around corners and sharp edges. Apply the finish according to its directions rather than leaving excess pooled there. For modest smoothing, suitable woodworking sandpaper and a controlled hand are better than aggressive sanding. Once the finish has cured as directed, return the board to your kitchen routine.
Keep a Restored Cutting Board in Good Shape
Steady care helps a restored board stay pleasant to use. The goal isn’t to keep wood untouched by water or wear, but to avoid letting moisture, heat, and food residue linger. Everyday habits matter more than a rigid maintenance calendar.
Build a simple care routine after restoration
After using the board, wash it promptly and dry it thoroughly. Don’t leave it soaking in the sink or sitting wet on the counter. Let air reach both faces by standing the board on edge or positioning it so moisture isn’t trapped beneath it. Avoid drying it near direct heat, which can dry the surface unevenly.
Check the board now and then, including the underside and edges. If the surface starts to look depleted or feel dry again, consider renewing its oil-based finish. Follow the finish maker’s directions each time. How often the finish needs renewal depends on how frequently the board is used and its condition, so one schedule won’t fit every kitchen or board.
- Wash promptly: Clean away food residue instead of leaving it on the wood.
- Dry fully: Don’t store or stack the board while it’s still wet.
- Check its condition: Look for changes in sheen, feel, or shape rather than relying on a fixed date.
- Renew thoughtfully: Apply a suitable finish when the surface appears depleted, following its directions.
These simple steps support the work of how to restore a dry wood cutting board without making care complicated. They also make it easier to notice a new rough patch or crack before treating it as ordinary dryness.
Know when a board may need more than routine care
Good habits can limit avoidable wear, but they can’t reverse every kind of damage. A persistent odor, substantial crack, loose joint, or severe warp won’t be fixed by adding another coat of oil. Pause and assess the board rather than trying to cover up a warning sign with more finish or sanding.
For a handmade charcuterie board, use the same thoughtful approach: clean it after use, dry it well, and pay attention to its surface and shape. If a board is no longer suitable for your needs or you’re looking for another, browse FVCreations’ wooden cutting boards.
Restoration has its limits. A sound board with a tired surface may respond well to careful maintenance, while serious structural damage calls for a closer assessment. Take your time, choose a finish suited to the board’s purpose, and let the wood’s condition guide your next step.
Give Your Board a Thoughtful Next Chapter
A cutting board earns its place through everyday use, and caring for it is a practical way to keep that familiar piece in rotation. Let its actual condition guide your next step instead of aiming for a flawless, untouched surface. A few careful choices can make how to restore a dry wood cutting board feel less like a risky project and more like ordinary upkeep.
If you’re gathering supplies, FVCreations offers maintenance oils, waxes, and sanding paper personally approved by founder Farmer Vic, along with handcrafted wooden cutting boards. Choose supplies that suit your board and how you use it, then take your time with the work.
Explore handcrafted cutting boards and practical wood-care supplies from FVCreations, and choose the pieces that fit your kitchen and care routine.
Frequently Asked Questions
Can I restore a dry wood cutting board without sanding it?
Yes, if the board’s surface is sound. After cleaning and drying it, check whether the fibers feel smooth or catch on your fingertips or a clean cloth. A smooth board doesn’t need sanding just because its color has faded. Pay special attention to knife grooves and spots where food residue may collect. Treat stains or odor as separate concerns instead of sanding the whole board.
Is olive oil safe to use on a wooden cutting board?
Being edible doesn’t automatically make a cooking oil suitable as a wood finish. Choose a product intended for food-contact wood, such as food-safe tung oil or a suitable hard-oil finish, and read its label for use instructions. “Food-safe” here refers to the intended cutting surface. It isn’t a reason to use a general-purpose furniture finish on a board.
How often should I oil a wooden cutting board?
There’s no single interval that works for every board. One used for daily food preparation and frequent washing may need attention sooner than one used occasionally. Species and household conditions matter too. Instead of marking a recurring date, note how the clean, dry board looks and feels. That gives you a useful reference for spotting changes without assuming every board needs the same schedule.
Can a cracked wooden cutting board be restored with oil?
Oil won’t close a structural crack. First distinguish a shallow knife mark from a split that opens into the wood, then check whether the board still rests steadily on the counter. Don’t fill or coat a crack simply to make it less visible. If the split affects the board’s stability or working surface, pause food preparation and assess whether a proper repair is suitable for its intended use.
What should I do if my cutting board still smells after cleaning?
Let the board dry, then check whether the odor is limited to a knife groove, one patch, or the whole surface. A smell that persists after careful cleaning deserves more attention than a brief food odor. Avoid adding oil or another finish to mask it, and don’t rely on an improvised treatment to guarantee removal. If the source remains unclear, set the board aside while you assess its condition.
Can I use a film-forming finish on a cutting board?
No, not on a board intended for cutting. If you use the board for both food preparation and presentation, choose its finish for cutting use. Food-safe tung oil or a suitable hard-oil finish is more appropriate for that purpose. Check that the specific finish is intended for food-contact use, and follow its application and curing directions before preparing food on the board.