

How to Style a Charcuterie Board: Hosting Guide (2026)
Last Saturday, Sarah spent the morning picking out the perfect Prosciutto and a creamy wheel of Brie, but as she started laying them out, her heart sank because it just looked like a cluttered pile of snacks. It's a common fear for any host. You want to know how to style a charcuterie board so it looks like a professional work of art, but you're worried about making a mess or if the food is even safe on the wood. I've spent years milling my own lumber right here on the property and sourcing fine pieces from local yards to create boards that deserve a beautiful presentation.
I understand that pressure to perform when guests are coming over. Beyond the food, your personal style as a host can help you feel just as polished as your presentation; to browse high-end apparel for your next gathering, click here. That's why I'm sharing my artisan approach to arranging a spread that celebrates the natural character of the wood, whether you're working with the deep, warm tones of cherry, which is my personal favorite, or the distinct grains of maple, black locust, red oak, and white oak. This guide covers everything from meat and cheese pairings to essential food safety tips for your wood surfaces. We'll even dive into how to care for your handcrafted board so it stays a centerpiece for your table for years to come.
Key Takeaways
- Learn why your choice of wood matters, from my favorite cherry to the rugged grain of black locust, to set a beautiful color palette.
- Master the step-by-step process of how to style a charcuterie board by starting with structural anchors and layering seasonal flavors.
- Use the "Artisan Rule" to pick high-quality ingredients that match the character of property-harvested and yard-sourced lumber.
- Keep your board in top shape with essential care tips, like why you should never put your white oak or maple boards in the dishwasher.
- Discover how to create an inviting, rustic aesthetic that focuses on abundance and natural textures rather than stiff perfection.
Choosing Your Foundation: Why the Wood Species Matters
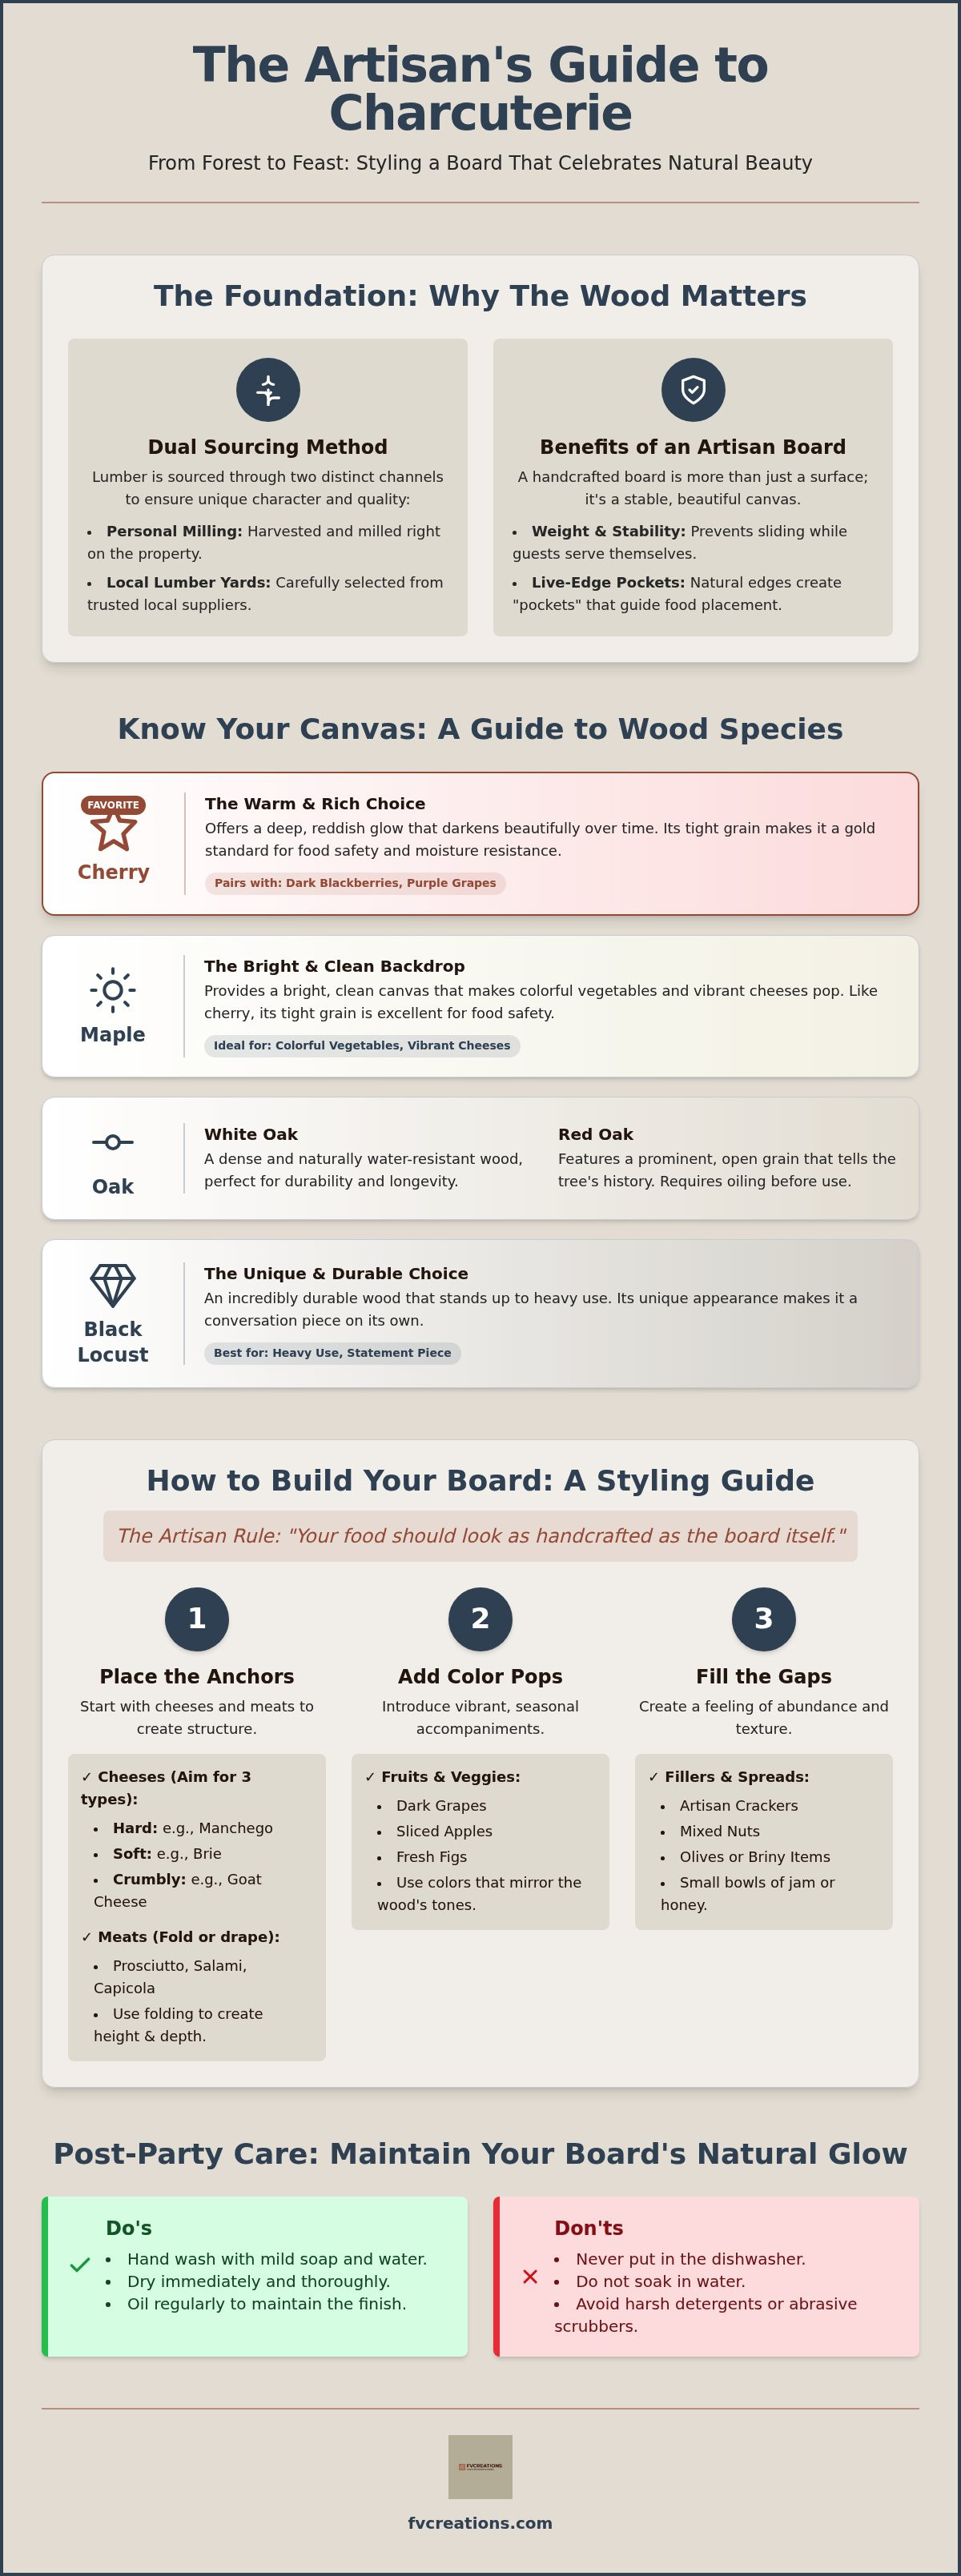
I've always believed that the wood isn't just a surface; it's the canvas for your entire meal. When you're deciding how to style a charcuterie board, the color and grain of that wood should dictate your food choices. I source my lumber through a mix of personal milling on my property and careful trips to local lumber yards. This dual approach lets me find unique character that you just won't see in mass-market products. A real artisan board has thickness and weight that provides stability, so it won't slide around while your guests are reaching for a slice of salami.
Before you start arranging, you might want to look into what is a charcuterie board and how its history influences modern hosting. A live-edge board is particularly helpful for beginners because the natural, irregular boundaries of the wood create "pockets" that guide your food placement. These organic edges act as natural fences, keeping your nuts and berries from rolling off onto the table. It makes the whole process feel less like a chore and more like a creative project.
The Warmth of Cherry and Maple
Cherry wood is my personal favorite species to work with. It offers a deep, reddish glow that only gets richer over time. I love seeing it paired with dark blackberries or deep purple grapes; the colors just seem to sing together. Maple, on the other hand, provides a bright and clean backdrop that makes colorful vegetables and vibrant cheeses pop. Both are tight-grained woods, which makes them the gold standard for food safety. They're naturally resistant to moisture, so you don't have to worry as much about juices from fruits or soft cheeses soaking into the fibers.
The Character of Oak and Black Locust
Oak and black locust bring a different kind of energy to the table. I often work with both red oak and white oak, each offering a distinct aesthetic for your home. White oak is dense and naturally water-resistant, while red oak has a more prominent, open grain that shows off the tree's history. Because of those open pores, I always suggest a fresh coat of oil before you begin your arrangement. If you want something truly unique, black locust is an incredibly durable choice that stands up to heavy use. It's a conversation piece all on its own and looks great in any setting. You can find many of these styles in my collection of handcrafted charcuterie boards, each one made with a focus on longevity and natural beauty.
The Artisan’s Shopping List: Selecting High-Quality Ingredients
When you've chosen a board with a deep reddish glow like cherry wood, you don't want to settle for mediocre ingredients. I follow what I call the "Artisan Rule": your food should look as handcrafted as the board itself. It's about finding that balance between salty, sweet, savory, and spicy flavors. This is the secret to how to style a charcuterie board that people actually want to eat, rather than just look at. You're building a flavor landscape that honors the effort I put into milling that white oak or maple, whether I harvested it from my own property or picked it out at the local lumber yard.
Cheeses and Meats: The Anchors
I recommend starting with three distinct types of cheese to give your guests variety in texture and taste. Pick a hard variety like Manchego, a soft one like Brie, and something crumbly like a fresh goat cheese. Don't forget to include one "approachable" option, like a sharp white cheddar, so everyone feels welcome at the table. For the meats, focus on items that fold or drape easily. Prosciutto, Salami, and Capicola are perfect for this. Prosciutto di Parma, for example, offers a delicate texture that pairs beautifully with the smooth finish of a maple board. If you're looking for a structured approach to your shopping list, NDSU's guide to creating a charcuterie board offers some great foundational steps for selecting these primary anchors.
When you're placing the meats, don't just lay them flat. Use folding techniques like the "salami rose" or ribbon-folding the prosciutto to add height. This creates shadows and depth on the board, making the grain of the wood peek through in interesting ways. It's these small details that make a spread look professional rather than thrown together at the last minute.
Accompaniments and Color Pops
Once your anchors are set, it's time for the color pops. Use seasonal fruits like dark grapes, sliced apples, or fresh figs to mirror the natural tones of the wood grain. Briny elements like olives or cornichons belong in small, rustic bowls; this keeps their juices from soaking into the wood fibers and preserves the finish. Finally, select crackers and breads in different shapes. Rounds, rectangles, and twists add a sense of movement to the spread. If you're still looking for that perfect foundation for your next gathering, feel free to browse my handcrafted charcuterie boards to see which wood species speaks to you.
How to Build Your Board: A Step-by-Step Styling Guide
I always tell folks that the prep work is just as important as the presentation. Before you even think about where the brie goes, make sure your board is clean and has a fresh coat of oil. I like using food-safe finishes to give the wood that deep, rich luster that really shows off the grain. Whether you're working with the fiery tones of cherry, which is my absolute favorite, or a sturdy piece of white oak I milled myself, that oil makes the colors pop and creates a protective barrier for the food. It's a simple step that honors the time I spent in the workshop and ensures your spread looks its best.
Learning how to style a charcuterie board is a lot like woodworking; you have to build a solid frame before you add the decorative trim. I start by placing my largest items first to create a structural map. This prevents that messy, cluttered look that happens when you just start piling things on. By working from largest to smallest, you ensure every piece of food has a dedicated home on the wood.
Step 1-3: Anchoring and Cheese Placement
First, place your small bowls for things like jams, honey, or olives. These are your anchors. I like to space them out across the board so they provide balance. Next, position your cheeses. I usually go for a triangular pattern. This guides your guests' eyes across the entire spread and keeps the board from feeling lopsided. Make sure you leave enough room around each cheese so people can actually get a knife in there. There's nothing worse than a beautiful board that's impossible to eat from. If you're using a lighter wood like maple, the white cheeses will blend in, so I suggest placing them near darker fruits to create contrast.
Step 4-5: The River of Meat and Fillers
Now comes the fun part. I like to create what I call a "salami river." It's a winding line of folded meat that flows between your anchor bowls. This adds a sense of movement and looks much more professional than a flat pile. Once the meat is down, look for any large gaps. Fill those in with clusters of grapes or small piles of walnuts. These fillers keep the board looking abundant and rustic. It reflects that grounded, natural feel I aim for with every piece of black locust or red oak I source.
Finally, add your crackers. I always save these for the very end. If you put them on too early, they'll soak up moisture from the cheese or fruit and lose their crunch. For a true workshop-to-table look, finish everything off with a few sprigs of fresh rosemary or thyme. It adds a wonderful scent and a pop of green that looks stunning against the natural wood grain.
Styling Secrets for a Rustic, Neighborly Aesthetic
I've spent a lot of time in my workshop, and I've learned that the best designs are the ones that feel natural. When you're figuring out how to style a charcuterie board, don't aim for perfection. A board that looks a little "lived in" and abundant is far more inviting than one where every almond is in a straight line. I like to call this the neighborly aesthetic. It's about creating a spread that says, "come on in and help yourself." One way I do this is by playing with height. I use small bowls for jams or honey, and I vary how I cut the food. Some cheeses get sliced into clean triangles, while others are crumbled into rustic chunks. This variety gives the eye something new to look at in every corner of the wood.
Texture play is another secret I use. I love placing a smooth, creamy cheese right next to a piece of rough-cut, crusty artisan bread. This contrast makes the board feel more tactile and interesting. When I'm working with cherry wood, my absolute favorite species, the deep reds and oranges of the grain provide a warm backdrop. I find that pairing these tones with bright green herbs like rosemary creates a visual balance that's hard to beat. Whether the wood was milled here on the property or sourced from a select lumber yard, the goal is to let those natural colors guide your food choices. If you're using red oak or white oak, you might find that the grain is more prominent, which means you can go a bit simpler with your food arrangement and let the wood do the talking.
Using Herbs for Freshness
I love tucking sprigs of rosemary or thyme into the small gaps. It gives the board a forest-inspired look that feels grounded. There's something special about the way fresh herbs interact with the natural scent of the property-harvested wood. For high-end summer gatherings, you can even use edible flowers. It adds a delicate touch that contrasts beautifully with the rugged grain of a black locust board or a bright piece of maple. If you're captivated by these natural patterns, Visibull Art and Design creates original artist prints from tree cross-sections that honor the same organic beauty.
A truly handcrafted board doesn't need fancy garnishes to shine. I like to let the live edge remain visible as part of the design. It's a reminder of the tree it came from. A thicker board provides a more premium hosting experience because it feels substantial and won't warp under the weight of your spread. If you want to see the difference a real artisan piece makes, you can shop my current selection of charcuterie boards today.
Post-Party Care: Maintaining Your Board’s Natural Glow
After the last guest leaves and you've successfully shown everyone how to style a charcuterie board that rivals a professional spread, your work isn't quite finished. Those beautiful slabs of cherry, white oak, or maple need a little gratitude for their service. I take immense pride in every board I create, whether I milled the timber right here on my property or hand-selected the lumber from a local yard. To keep that artisan quality intact, you have to follow a few simple rules. First and foremost, never, under any circumstances, put your board in the dishwasher or let it soak in the sink. High heat and standing water are the fastest ways to ruin the natural fibers I worked so hard to preserve.
Instead, use a bit of warm, soapy water and a soft cloth to wipe it down. Once it's clean, dry it immediately. This is especially important for species like red oak and maple, which can warp or develop small cracks if moisture sits on the surface for too long. I want these pieces to last for generations, not just a single season. A quick wipe and a thorough towel dry will keep the wood stable and ready for your next gathering.
Oiling and Conditioning
Your board will eventually tell you when it needs a little extra attention. If the wood starts to look dull or feels "thirsty" to the touch, it's time for a maintenance session. I personally use and recommend Outdoor Defense Oil for all my finishes. It's completely food-safe and provides a durable barrier against moisture. When you apply it, use a clean, lint-free cloth and work in the direction of the grain. This is particularly rewarding with cherry wood; the oil brings out that deep, reddish glow that makes it my favorite species. For a board used weekly, I suggest oiling it once a month to maintain its natural luster and protect the finish.
Storage and Longevity
How you store your board between parties matters just as much as how you clean it. I always recommend storing it upright. This allows for even airflow on both sides, which helps prevent the wood from bowing or developing uneven moisture levels. Keep your black locust or oak boards away from direct sunlight or harsh heat sources like a stovetop, as extreme temperature changes can cause the wood to expand and contract too quickly. If you're looking to add another piece to your hosting arsenal, you can browse our collection of artisan cutting boards to find a species and grain that fits your home perfectly. Proper care ensures that the next time you're deciding how to style a charcuterie board, your foundation is as beautiful and strong as the day it left my workshop.
Set the Stage for Your Next Gathering
Hosting shouldn't feel like a high-stakes test. It's really about bringing people together over a shared meal and a beautiful piece of craftsmanship. Now that you've learned how to style a charcuterie board by starting with structural anchors and layering in seasonal colors, you're ready to create a spread that feels both professional and welcoming. Remember to let the natural grain of the wood guide your arrangement. Whether you're working with a bright piece of maple or the deep, warm tones of my favorite cherry wood, the foundation makes all the difference.
Every board I make is property-harvested from sustainable timber or sourced from trusted local yards. I personally vet and hand-finish each one with food-safe natural oils to ensure it stays a centerpiece in your home for years. If you're looking for a board with real character and longevity, I'd love for you to find your perfect handcrafted charcuterie board in our shop today. I can't wait to see the beautiful spreads you create for your friends and family. Happy hosting!
Frequently Asked Questions
What is the best wood for a charcuterie board?
Hardwoods like cherry, maple, and black locust are the top choices for longevity. I personally prefer cherry wood for its warmth, but white oak and maple are also fantastic tight-grained options. I source these materials through a mix of milling trees on my own property and hand-selecting pieces from local lumber yards. This ensures every board has a unique character that mass-produced options just can't match.
How do I stop my wooden board from smelling like cheese or onions?
To keep your board fresh, always clean it right after your event. If odors from strong cheeses or onions linger, try a natural scrub made of coarse salt and a halved lemon. Rub the surface well, rinse with warm water, and dry it immediately. Maintaining a good finish with food-safe oils also helps. This creates a protective seal that prevents food juices from soaking into the wood fibers of your oak or maple boards.
Can I use a regular wooden cutting board for charcuterie?
You can certainly use a standard cutting board, but an artisan charcuterie board is designed specifically to elevate your presentation. When you're learning how to style a charcuterie board, having a thicker, handcrafted piece provides a more stable and premium feel for your guests. My boards are designed to transition from the workshop to your table, featuring the natural beauty of species like black locust and red oak that standard kitchen boards often lack.
Is cherry wood safe for food contact?
Cherry wood is completely safe and is actually my favorite species to work with for food surfaces. It's a tight-grained hardwood, which means it doesn't have large pores where bacteria can hide. I finish every cherry board with food-safe natural oils to ensure it's ready for your prosciutto and brie. Whether the wood was harvested from my land or a local yard, I personally vet every piece for quality and safety.
How many people will a standard charcuterie board serve?
A standard medium board generally serves about 4 to 6 people as a light appetizer. If you are hosting a larger crowd, I recommend one of my larger live-edge slabs, which can easily accommodate 10 or more guests. The serving capacity really depends on how you arrange your items. Using different heights and textures is a big part of how to style a charcuterie board to look abundant regardless of the board's physical dimensions.
Do I need to oil my board before the first use?
I finish every board with high-quality oils before shipping, but I still recommend a light application of food-safe oil before your first big party. This extra step ensures the wood is fully hydrated and ready to resist stains from fruits or meats. It's a simple maintenance habit that protects the unique grain of your white oak or maple board. Regular oiling keeps the wood from becoming thirsty and prevents long-term warping or cracking.
What is the difference between a cutting board and a charcuterie board?
The main difference lies in the design and purpose. Cutting boards are built for the heavy utility of chopping and prep work. Charcuterie boards are designed as serving showpieces, often featuring live edges or the striking grain patterns of black locust and cherry. While you can cut on them, their primary job is to provide a beautiful, stable canvas for your food. They are crafted to be the center of attention on your hosting table.
How do I clean a live-edge board without damaging the bark?
Cleaning a live-edge board requires a gentle touch. I usually remove the bark from my live-edge designs to ensure they are sanitary for food contact, leaving a smooth but organic edge. Use a damp cloth and mild soap to wipe the edges and the surface. Never submerge the board in water or use a dishwasher. Drying it immediately is vital for preventing the wood from warping, especially with species like oak that have a more open grain.