

How to Use Starbond Glue on Live Edge Slabs: The Artisan’s Guide
I remember standing over a stunning piece of Cherry I'd milled right here on the property, watching a hairline fracture threaten to split the whole board. It's a painful feeling when a valuable slab starts to fail. You want to save the character without leaving a messy, artificial looking repair. Learning how to use starbond glue on live edge slabs changed everything for me in the workshop. Whether I'm working with dense Black Locust or a piece of White Oak from the local lumber yard, these adhesives are my secret for keeping things together. I've tested these glues on everything from porous Maple to Red Oak, ensuring my favorite Cherry pieces get the care they deserve.
You probably know the frustration of glue ghosting on dark grains or watching bark peel away like old wallpaper. It's a common headache that can ruin a project's professional finish. This guide is going to show you how to master the techniques I use for stabilizing cracks, filling knots, and securing bark so your repairs look completely invisible. I'll walk you through picking the right viscosities for different grains and share my personal process for achieving structural stability on every piece I build.
Key Takeaways
- Pick the right viscosity for your specific wood. Thin glue is a specialist for wicking into hairline fractures, while the medium formula acts as a workhorse for general assembly.
- Master the professional steps for how to use starbond glue on live edge slabs. It's the secret to turning raw lumber from personal milling or the lumber yard into heirloom furniture.
- Tailor your adhesive strategy to the specific grain of your wood. Whether it's dense Black Locust or my personal favorite, Cherry, the right glue makes all the difference.
- Learn the "two-handed" application method. Using glue and accelerator together allows you to secure bark and fill knots with professional grade speed and precision.
- Discover how Starbond repairs react to various professional finishes. Using the right synergy between CA glue and natural oils ensures a durable, professional grade finish.
Why Starbond is Essential for Live Edge Slab Projects
Transitioning a raw slab into a finished heirloom piece of furniture is a journey. It often starts with a log I've personally milled right here on the property, or perhaps a unique find from one of the outside lumber yards I visit. Either way, those natural defects like knots and cracks are part of the wood's story. I don't want to hide them; I want to stabilize them. That's where Starbond comes in. It isn't just a generic adhesive; it's a structural stabilizer. While hardware store glues might work for a quick fix on a broken ceramic mug, they don't have the industrial strength needed for high-end woodworking. I trust Starbond Adhesives because they've been personally vetted in my workshop on everything from property-harvested cedar to my favorite species, Cherry.
Sourcing and Slab Stability
When I mill my own lumber, moisture is the biggest variable. Even after air drying, wood like Red Oak or Maple can be temperamental. If you've ever bought a slab from a yard, you know that "kiln-dried" doesn't always mean "perfectly stable" once it hits your shop's environment. Learning how to use starbond glue on live edge slabs gives you a first line of defense against checking and movement. It's about catching those tiny hairline fractures before they become structural failures. White Oak, for instance, is beautiful but can be stubborn. A quick application of thin CA glue can save a project from a disastrous split. This is especially true for property-harvested wood where the character is high but the tension in the grain is often unpredictable. For those looking to see how these stable, high-end wood elements are used in luxury home projects, Countertops and Cabinetry By Design showcases the stunning results of combining custom cabinetry with expert craftsmanship in modern bathroom renovations.
The Science of the Bond
The real magic happens because of how cyanoacrylate adhesives interact with wood fibers. Unlike standard glues that just sit on the surface, Starbond penetrates deep into the grain. This creates a permanent hold through polymerization. I always pay attention to shelf-life standards because fresh glue is vital for heavy slab repairs. If you are working with something incredibly dense like Black Locust, you need that deep penetration to ensure the repair stays put. While epoxy has its place for massive voids, I often prefer Starbond for faster workshop throughput. It allows me to keep moving on a build without waiting 24 hours for a resin to cure. It bridges the gap between raw-milled lumber and a professional-grade finish.
Choosing the Right Viscosity for Your Live Edge Slab
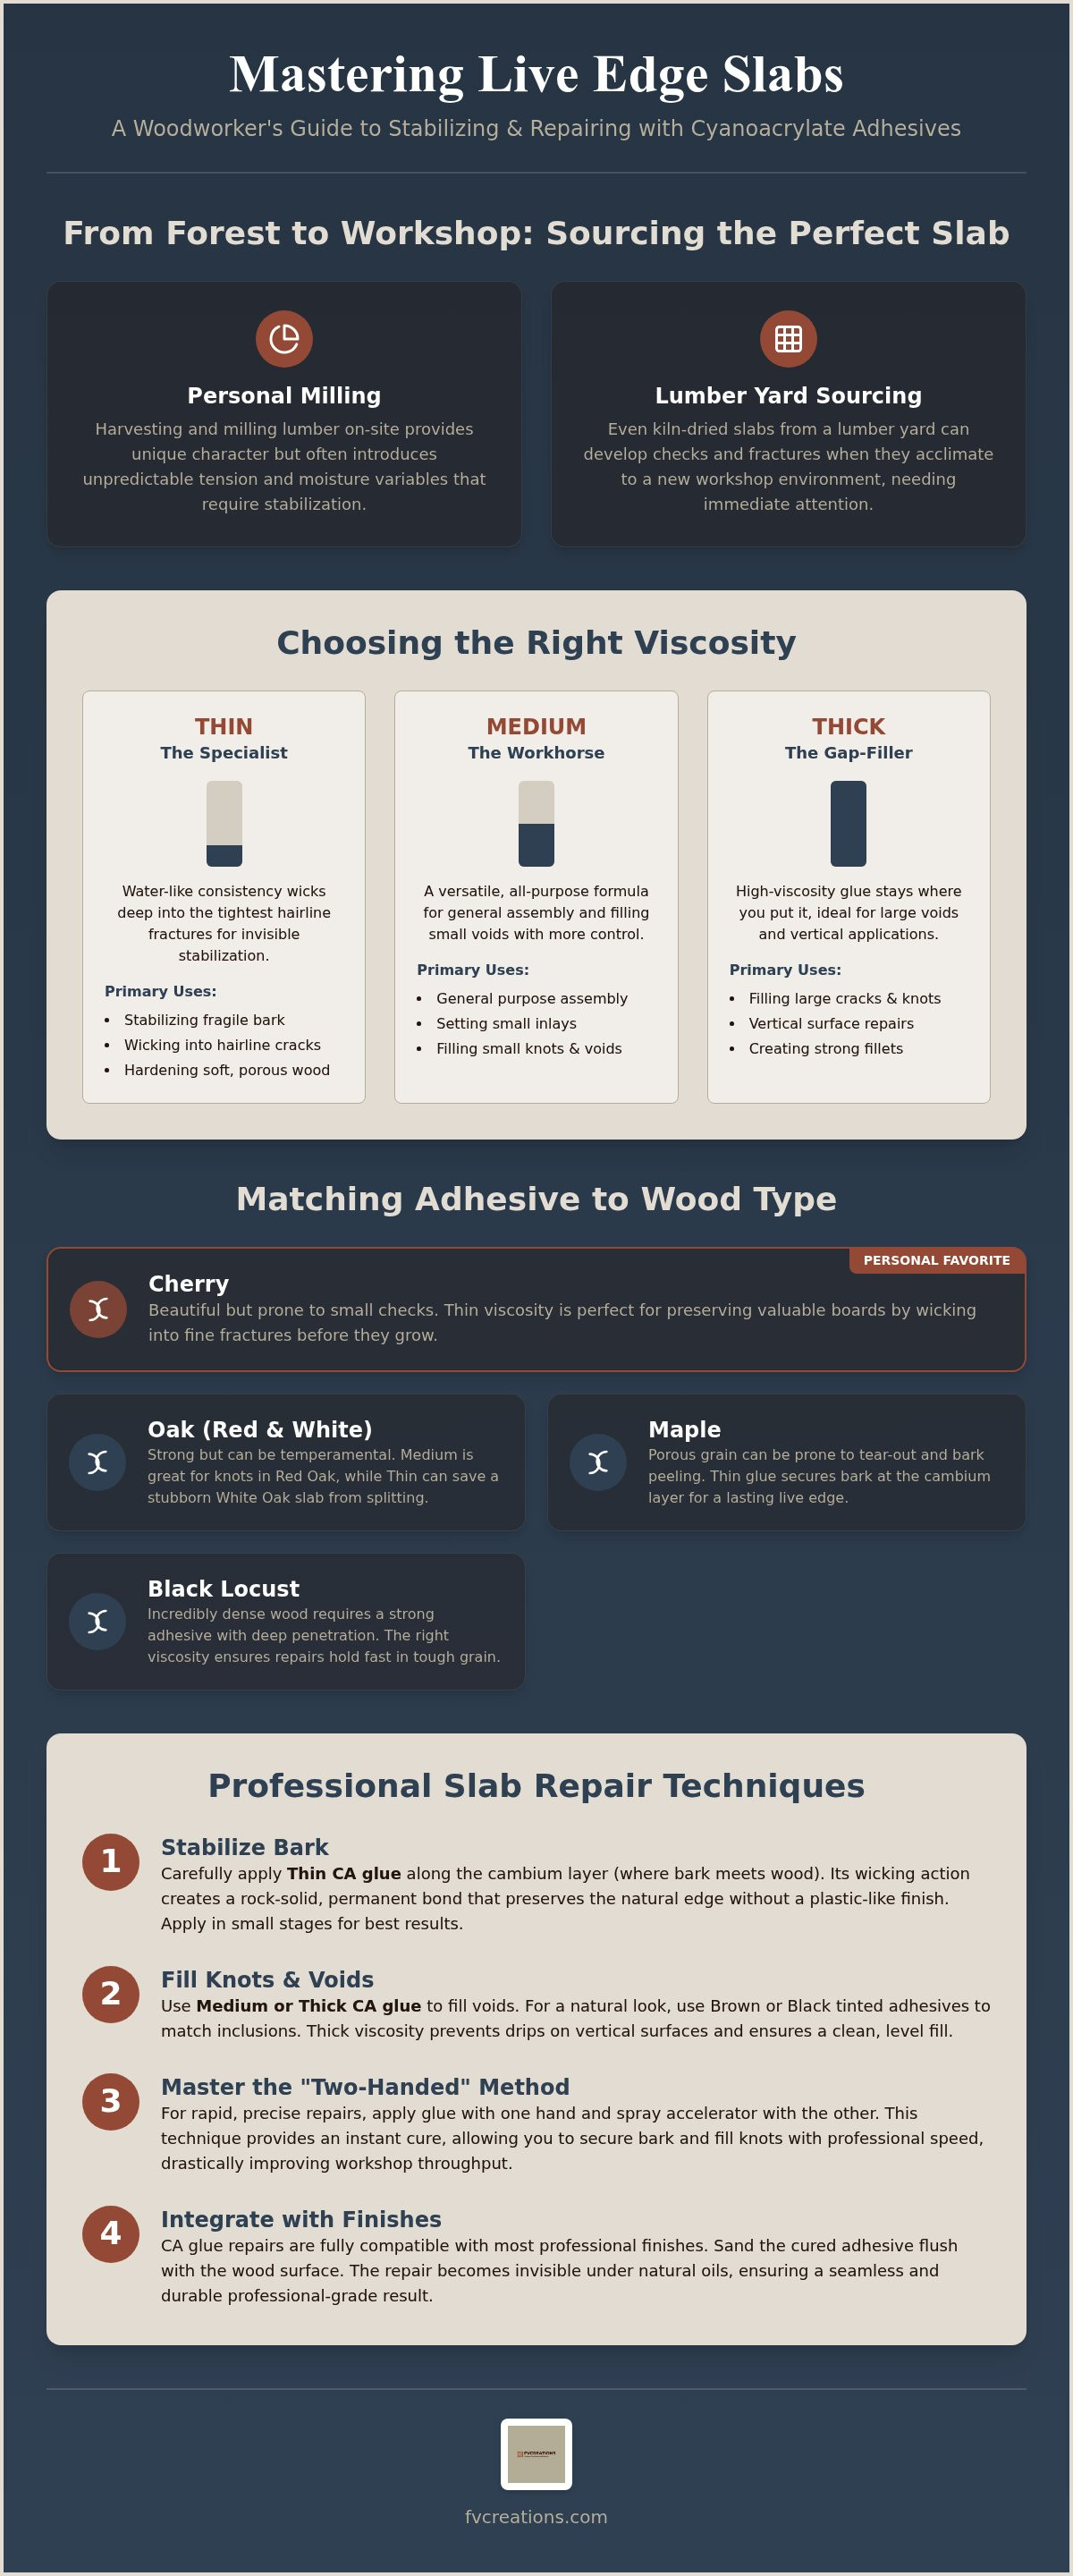
Every slab I bring into the shop has its own personality. Whether it's a piece of dense Black Locust I milled on the property or a slab of White Oak from a local yard, the wood's grain and "character" dictate my strategy. If you want to master how to use starbond glue on live edge slabs, you have to understand viscosity. It's the difference between a repair that disappears and one that looks like a hobbyist's mistake. I categorize these glues into three roles: the specialist, the workhorse, and the gap-filler.
The Thin viscosity is your specialist for wicking into hairline fractures that are too small for other glues to reach. It's almost like water, finding its way deep into the grain to stabilize soft spots before they become bigger issues. Then there's the Medium viscosity, which I consider my shop workhorse. It's perfect for small inlays or general assembly where you need a bit more control. Finally, the Thick viscosity is my go-to for managing large voids or vertical slab repairs where gravity is working against you. It stays where you put it, making it essential for professional slab repair techniques on complex pieces.
Stabilizing Bark with Thin CA Glue
The "live" in live edge is often the first thing to fail. Bark tends to dry out and peel away, especially on property-harvested cedar or Maple. To keep it secured permanently, I use the wicking action of Starbond Thin. By saturating the cambium layer, the glue creates a rock-solid bond between the bark and the heartwood. The trick is to apply it in small stages. You want to avoid that "plastic" look that comes from over-application. When done correctly, the bark stays put for decades, preserving the natural ruggedness of the slab without looking artificial.
Filling Knots and Voids with Medium and Thick
Knots are the beauty marks of woods like Red Oak and my personal favorite, Cherry. However, an open knot can collect dust or compromise the surface of a charcuterie board. I often use Starbond Black or Brown to match these natural inclusions. For vertical edges where run-out is a concern, Thick viscosity is the only way to go. It fills the gap and stays put while you hit it with an accelerator. Once it's cured, Selecting professional sandpaper for flush repairs is the next step to ensure the repair is perfectly level with the surrounding wood. If you are looking to get started, I've gathered the exact Starbond Adhesives I use for these repairs right here in the shop.
Matching Starbond to Wood: From Cherry to Black Locust
I've spent a lot of time standing over my sawmill and picking through stacks at local lumber yards. One thing I've learned is that wood species are as different as people. What works for a porous piece of Red Oak might fail on a dense slab of Black Locust. If you want to master how to use starbond glue on live edge slabs, you have to respect the grain. Density and pore structure dictate how the glue wicks in and how it looks once it's cured. I've personally vetted these Starbond Adhesives on every species that passes through my workshop to ensure the repairs hold up for a lifetime.
The Cherry Wood Specialist
Cherry is my absolute favorite species to work with. It has a warm, natural glow that only gets better with age. However, the heartwood is incredibly sensitive to staining. When I'm working on high-end charcuterie boards or custom furniture commissions, I always reach for clear Starbond. Using a colored glue on Cherry can sometimes look artificial if the match isn't perfect. I prefer the clear formula because it lets the natural character of the wood shine through without leaving a dark ring. My personal tip is to apply the glue in thin layers and avoid over-spraying the accelerator, which can occasionally cause a cloudy finish on this specific wood.
Oak, Maple, and Black Locust Techniques
Red Oak and White Oak might look similar, but they behave very differently under the bottle. Red Oak has large, open pores that can act like straws, sucking up thin glue faster than you can apply it. I often use Starbond Brown for Red Oak because it mimics the natural dark inclusions found in the grain. White Oak has a much tighter structure, so I stick with a thinner viscosity to ensure it actually penetrates. For the science-minded maker, research into repairing cracked wood shows that a deep bond is the only way to prevent future structural failure.
Regarding dense species like Black Locust, the surface can be almost stone-like. You need a glue that won't just sit on top. I use a multi-step approach with a thin primer layer followed by a medium filler. Maple presents a different challenge altogether. Because Maple is so light and clean, "ghosting" or a dark halo around the repair is a common headache. I've found that sealing the area around the crack with a light finish before gluing can help prevent the CA glue from soaking into the surrounding fibers, keeping your Maple slabs looking pristine and professional.
Professional Slab Repair: Step-by-Step Techniques
Mastering how to use starbond glue on live edge slabs starts long before you open a bottle. Preparation is 90% of the battle in my workshop. Whether I am working with a piece of White Oak I milled myself or a slab of Maple from a local yard, I start by cleaning the void thoroughly. I use a stiff brush and compressed air to remove every bit of loose debris. If the wood has any residual oils, a quick wipe ensures the bond is permanent. Once the prep is done, I use a "two-handed" technique. I keep the glue in one hand and the accelerator in the other, moving in a steady rhythm to fill defects without making a mess.
For deep voids, patience is your best tool. If you try to fill a large knot in a thick Red Oak slab all at once, you will end up with internal bubbles or "wet spots" that refuse to cure. I prefer layering the glue in 1/8 inch increments. This prevents the adhesive from becoming too hot and ensures a clear, solid repair. I also use Starbond as a sanding sealer on end-grain sections. It stabilizes those fragile areas on property-harvested cedar, preventing the wood from soaking up too much finish later on. If you are ready to stock your workbench, you can find the exact Starbond Adhesives I use for these professional repairs in our shop.
Using the Starbond Accelerator Safely
The accelerator is a game-changer, but you have to use it with respect. When I am working with dark, dense woods like Black Locust, I am careful not to over-spray. Too much accelerator can cause "white ghosting," which is a nightmare to sand out of dark grain. It is also important to remember that CA glue creates an exothermic reaction. It generates real heat as it cures. For large-scale repairs, I apply the accelerator from about 10 to 12 inches away. This keeps the reaction controlled and prevents the glue from boiling or cracking due to rapid temperature changes.
Sanding and Levelling Your Repairs
I usually wait about 10 to 15 minutes before I even think about touching a repair with a sander. Even if the surface feels hard, the core of a deep knot fill might still be "green." When I am finishing a commission featuring my favorite wood, Cherry, I want that repair to be perfectly flush. I start with a sharp chisel to take down the high spots, then I move to professional sandpaper to level everything out. To avoid clogging your paper, use a light touch and keep the sander moving. This prevents the heat from friction from softening the glue, ensuring a crisp, professional-grade finish that feels like a single piece of wood.
Finishing Your Slab: Integrating Starbond with Natural Oils
Once the dust settles from your final sanding pass, you are ready for the most rewarding part of the build. Whether your slab came from my own sawmill or a local lumber yard, the way you finish the wood is what truly brings out its character. When you master how to use starbond glue on live edge slabs, you'll notice that the cured adhesive is non-porous. This means it won't soak up oil or paint like the surrounding fibers of a piece of Red Oak or Maple. I've found that this actually works in your favor, creating a clean, stable surface for professional finishes like Real Milk Paint.
For outdoor projects or heavy-duty furniture, there is a beautiful synergy between CA glue repairs and Outdoor Defense Oil. The glue seals the cracks against moisture, while the oil penetrates the rest of the wood to provide deep protection. This is vital for property-harvested cedar or dense species like Black Locust that might live on a porch or patio. I've personally vetted this combination on countless commissions, ensuring that the structural repairs I made with Starbond Adhesives stay invisible and intact even under the elements.
A Complete Finishing Workflow
In my workshop, I often use Starbond on handcrafted charcuterie boards, especially those made from my favorite wood, Cherry. People often ask about food safety; once CA glue is fully cured, it is inert and safe for incidental food contact. This allows me to stabilize a stunning knot in a Cherry board without worrying about the final piece's utility. When applying a finish over a stabilized area, I always do a test spot first. On lighter woods like White Oak or Maple, the glue repair remains clear or matched to your chosen tint, maintaining that authentic artisan look while benefiting from modern industrial strength.
The Farmer Vic Endorsement
I don't believe in high-pressure sales, and I don't sell anything I don't use myself every single day. FVCreations stocks these supplies because they are essential for anyone dedicated to the slow-made movement. Sourcing your own lumber, whether through personal milling or careful selection at a yard, requires tools that respect the raw material. By using these techniques for repairs on everything from Maple to Black Locust, you are ensuring your work lasts for generations. I invite you to join our community, share your slab-working tips, and continue the tradition of manual craftsmanship with pride.
Bring Your Live Edge Vision to Life
Working with raw lumber is a journey that requires the right set of tools. Whether you are milling timber right on your property or hunting for the perfect slab of Maple or White Oak at a local yard, you deserve a finish that lasts. I've personally vetted every adhesive I sell because I use them daily on everything from property-harvested cedar to my absolute favorite species, Cherry. Learning how to use starbond glue on live edge slabs is the secret to stabilizing those beautiful, natural defects without losing the wood's character. This same appreciation for nature's unique forms is evident in the work of Taraxacum Orbis - Dandelion Sphere, who use resin to preserve the delicate structure of real dandelions. From filling deep pores in Red Oak to securing bark on Black Locust, these techniques ensure your work stands the test of time.
I only stock the supplies that I trust for my own high-end commissions. When you buy from us, you're getting artisan-vetted products with fast shipping from a working woodshop. It's about supporting the slow-made movement and building something you can be proud of. Shop the Starbond Collection at FVCreations today and get back to the workbench. I can't wait to see what you create with your next slab. Keep crafting and keep it authentic.
Frequently Asked Questions
Is Starbond CA glue food safe for cutting boards and slabs?
Starbond CA glue is considered food safe once it has completely cured. This is because the adhesive becomes inert after the polymerization process is finished. I use it all the time on the charcuterie boards I make from property-harvested Cherry. It's a great way to stabilize a beautiful knot without worrying about the final piece's safety. Just make sure you sand the repair flush and apply a food safe oil finish over the top.
How do I stop Starbond from ghosting on my Maple slab?
Ghosting happens when thin glue wicks into the grain of light woods like Maple. To prevent this, I recommend sealing the area around the crack with a light coat of finish or sanding sealer first. This blocks the pores so the CA glue stays where it belongs. It's a simple step that keeps your Maple slabs looking clean and professional, whether they came from your own mill or a local lumber yard.
Can I use Starbond to fix a crack in a live edge slab after it's been oiled?
You can't apply Starbond directly over an oiled surface because the oil prevents the adhesive from bonding to the wood fibers. If you find a crack after finishing, you must sand that area back to raw wood and clean it with solvent. Once the wood is clean and dry, you can proceed with the repair. Learning how to use starbond glue on live edge slabs correctly means getting the prep work right every time.
What viscosity of Starbond is best for stabilizing loose bark?
Starbond Thin is the best choice for stabilizing loose bark on a live edge. Its watery consistency allows it to wick deep into the cambium layer, creating a permanent bond without adding bulk. I use this technique on property-harvested cedar to keep that rugged look intact. Just apply it in small amounts and let it soak in. It secures the bark to the heartwood so it won't peel away as the slab ages in your home.
What is the difference between Starbond Black and Brown CA glues for Oak?
The main difference is how they blend with the natural inclusions of the wood. I typically use Starbond Brown for Red Oak because it mimics the warm, earthy tones of the grain. For White Oak or darker voids, Starbond Black provides a sharp, professional contrast that looks like a natural mineral streak. Both offer the same structural strength; the choice is really about which color best complements the specific character of the lumber you are working with.
How do I prevent my Starbond bottle tip from clogging in the shop?
Clogged tips are a common shop headache, but they are easy to avoid. After using the glue, tap the bottom of the bottle on your workbench to let the adhesive drain back down from the nozzle. I always wipe the tip clean with a cloth before putting the cap back on. Storing your bottles upright in a cool, dry place also helps. These simple habits will ensure your Starbond is ready to go the next time.
Can Starbond be used for outdoor live edge furniture repairs?
Yes, Starbond is excellent for outdoor live edge furniture repairs because it creates a waterproof, durable bond. I frequently use it on dense species like Black Locust that are destined for the garden. When you know how to use starbond glue on live edge slabs for outdoor use, you'll want to pair the repair with a high quality finish like Outdoor Defense Oil. This combination protects the wood from moisture and prevents cracks from expanding during the seasons.
How do I remove Starbond from my hands after a slab repair?
We've all ended up with a bit of glue on our fingers at some point. The quickest way to remove it is by using a little bit of acetone or nail polish remover, which dissolves the bond. If you prefer a gentler approach, soaking your hands in warm, soapy water and using a pumice stone will eventually peel the glue away. I try to wear gloves during big repairs, but having a bottle of deboner nearby is always helpful.