

Preventing Cracks in Live Edge Wood: Farmer Vic’s Guide to Lasting Slabs
You have spent weeks sanding a gorgeous slab, only to wake up and find a hairline fracture creeping across the grain. It is a gut-wrenching sight that makes any maker question their skills, but the truth is that wood is a stubborn, living material. Whether I am milling a fresh log here on my property or sourcing a kiln-dried piece from a local yard, preventing cracks in live edge wood is a constant battle against nature. We all want our handcrafted pieces to stay stable for decades, yet without the right approach, even the most expensive timber can pull itself apart.
I am going to share the professional secrets I have learned for stabilizing these slabs so they stand the test of time. I promise that by the end of this guide, you will have the confidence to choose the right materials and the knowledge to keep them from splitting. We will walk through the entire process, from managing moisture content to the final seal. I will also explain why species like my personal favorite, Cherry, require different care than Red Oak, Maple, or the incredibly dense Black Locust. It is time to take the guesswork out of your woodworking.
Key Takeaways
- I will show you how choosing between wood milled on my own property and kiln-dried slabs from a yard changes your stabilization strategy.
- Learn why my favorite species, Cherry, is more forgiving than stubborn Red Oak or dense Black Locust when it comes to seasonal movement.
- Master the art of preventing cracks in live edge wood by applying end-grain sealers within 24 hours of milling to slow down moisture loss.
- Discover how to use professional adhesives to lock bark in place and fill minor checks before they turn into structural splits.
- Find out how to maintain a stable indoor environment so your finished furniture does not warp or cup once it is inside your home.
Understanding Wood Movement: Why Live Edge Wood Cracks
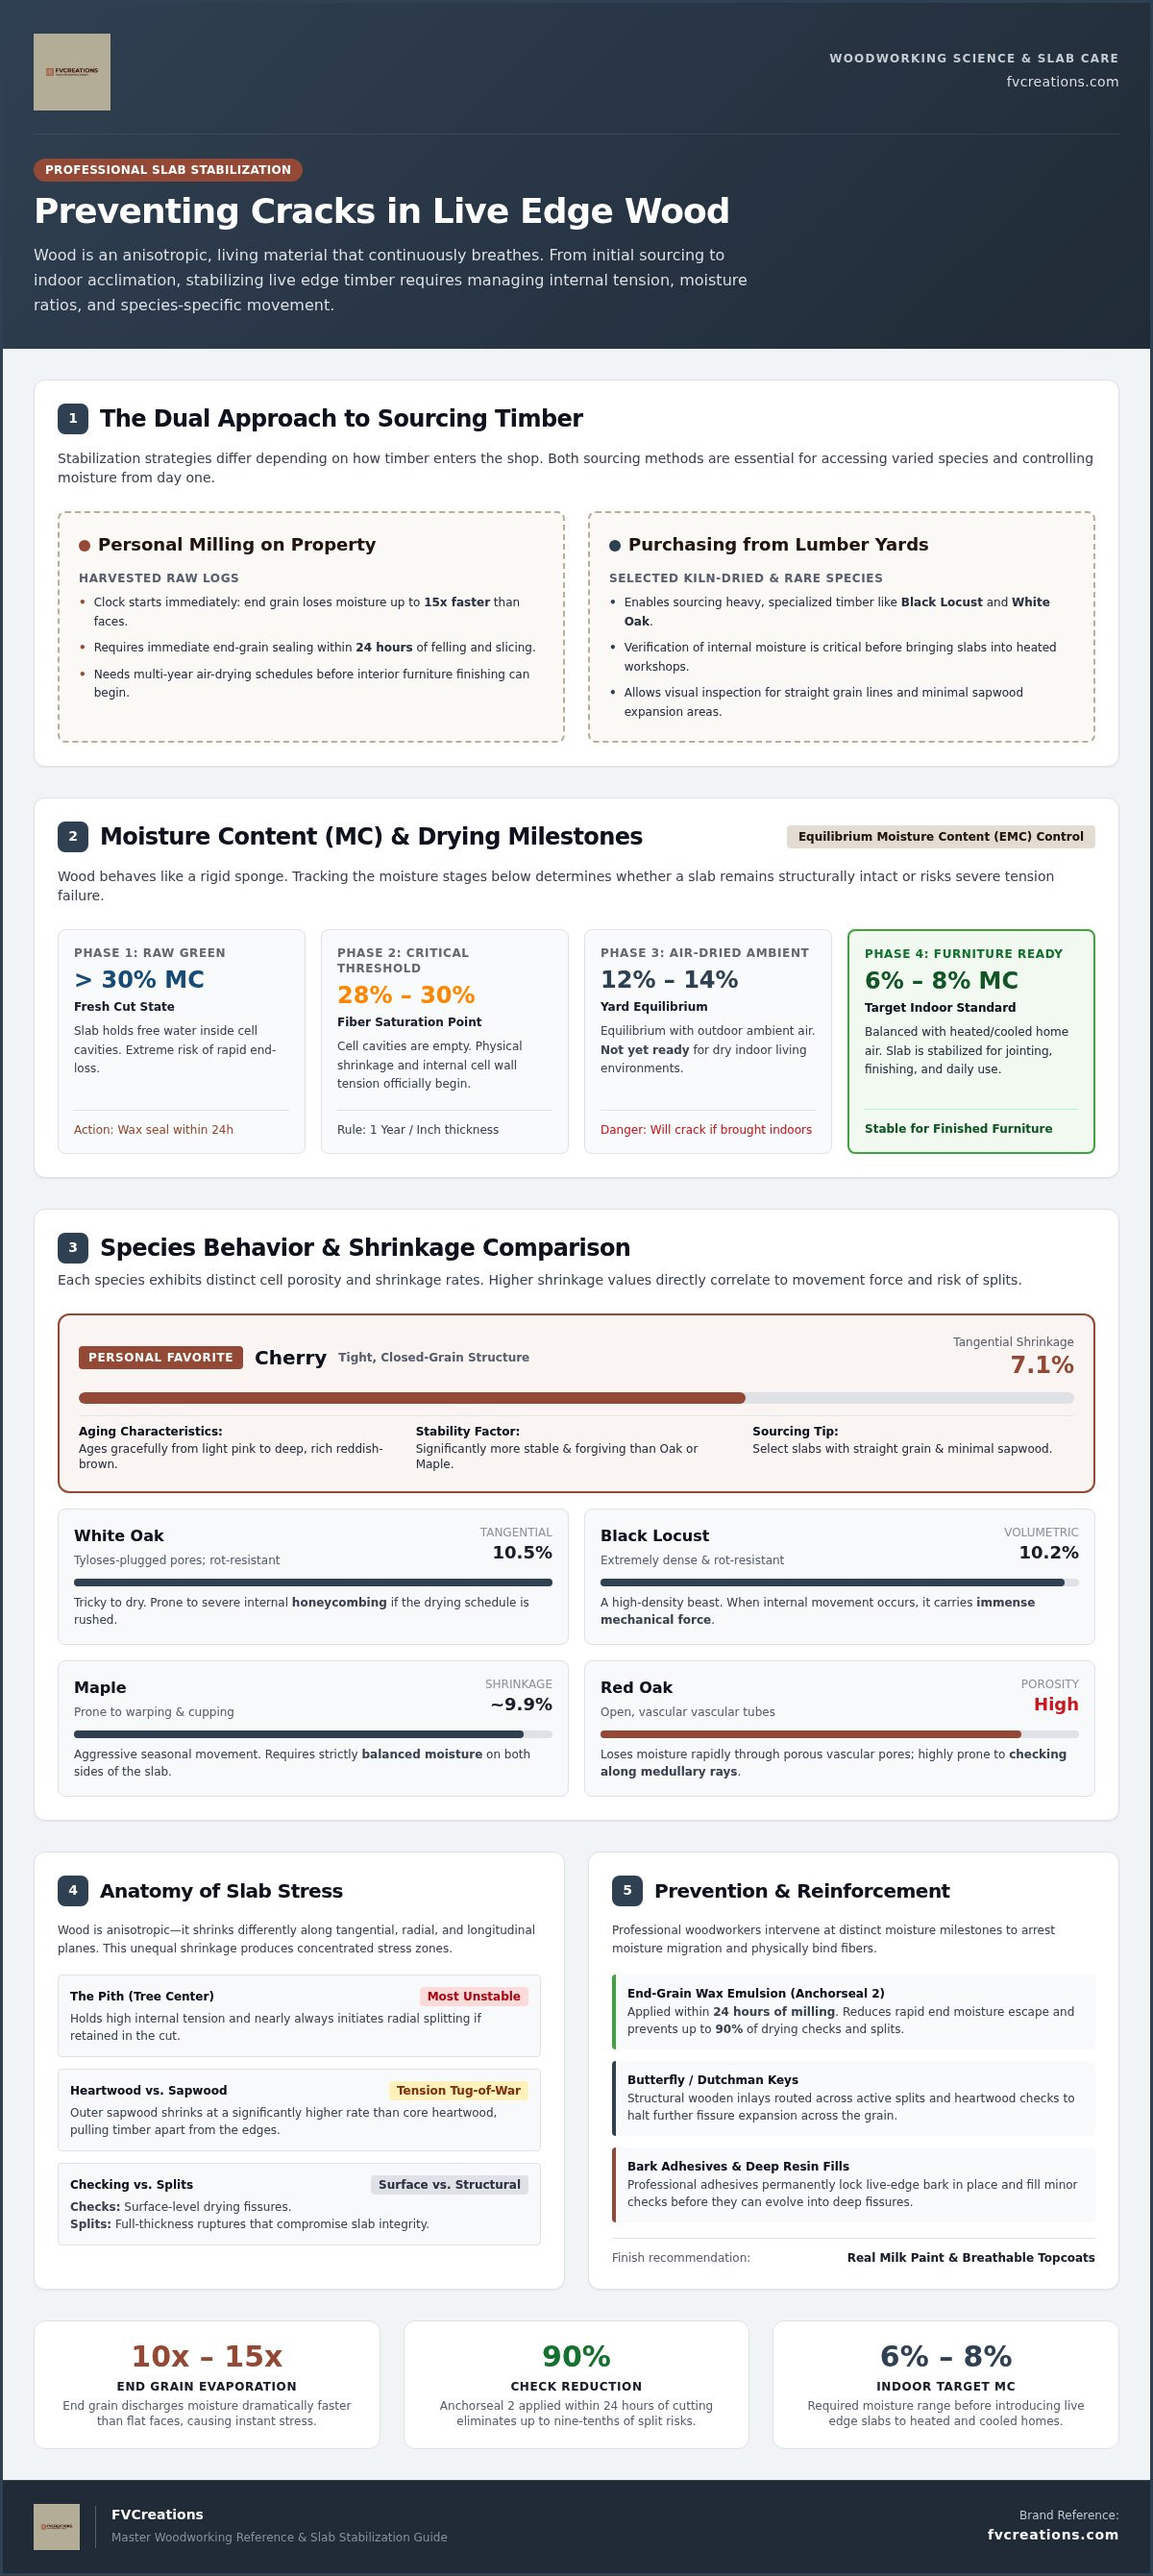
Wood is a living thing that never truly stops breathing. Even after I mill a log from my back woods or pick up a kiln-dried slab from the local yard, that piece of timber is constantly reacting to the air around it. Preventing cracks in live edge wood starts with understanding that wood is anisotropic; it shrinks and expands differently in different directions. This uneven movement is what creates the internal stress that eventually leads to a split.
You will often see checking, which are those small surface cracks that happen when the outer layers dry faster than the core. A split is more serious because it goes all the way through the slab. This usually happens because of the tension between the pith, the very center of the tree, and the sapwood on the outside. The pith is incredibly unstable and almost always wants to crack, while the sapwood shrinks much more than the heartwood. This tug-of-war creates deep fissures that woodworkers often fix with butterfly joints to keep the slab from pulling itself apart.
The air in your shop or home dictates this behavior through Equilibrium Moisture Content (EMC). Wood is like a sponge. If the air is humid, it soaks up water and swells. If the air is dry, it sheds moisture and shrinks. For indoor furniture, we aim for a moisture content of 6% to 8%. If your slab is at 12% and you bring it into a dry, heated house, it is going to move. Sometimes it moves violently.
Species-Specific Tendencies: From Oak to Maple
Each tree has its own personality. Red Oak is very porous. You can practically blow smoke through the end grain because the vascular tubes are so open. Because of this, it loses moisture quickly, making it prone to deep checking along its medullary rays. White Oak is different because its pores are plugged with tyloses. This makes it rot-resistant, but it is much trickier to dry. It has a high tangential shrinkage of 10.5%, which can lead to internal honeycombing if you rush the drying process.
Black Locust is a beast. It is incredibly dense and rot-resistant, but don't let that fool you into thinking it won't move. It has a volumetric shrinkage of 10.2%. Its sheer density means when it does move, it carries a lot of force. Maple is another one to watch. It has a high shrinkage rate near 9.9% and a tendency for aggressive movement. It likes to cup or warp if the moisture isn't balanced perfectly on both sides of the slab.
Cherry Wood: Farmer Vic’s Personal Favorite
Then there is Cherry, my absolute favorite species to work with. There is something special about the way a Cherry slab ages from a light pink to a deep, rich reddish-brown. It is relatively stable compared to Oak or Maple. It has a lower tangential shrinkage rate of 7.1%, which makes preventing cracks in live edge wood a bit easier. When I am at a lumber yard, I look for Cherry slabs with minimal sapwood and straight grain. It has a tight, closed-grain structure that takes a finish beautifully, especially when using something like Real Milk Paint finishes that let that natural color shine through.
Sourcing and Drying: The Foundation of Slab Stability
I get my wood from two very different places. Sometimes I am out on my own property, felling a tree and milling it myself. Other times, I am visiting a local lumber yard to find a specific species like Black Locust or White Oak that I don't have ready to saw. Both methods are great, but they require different steps for preventing cracks in live edge wood. The journey from a raw log to a stable table starts with how you handle that wood the moment it is cut.
The clock starts ticking as soon as the saw hits the log. End grain sheds water ten to fifteen times faster than the rest of the board. If you don't stop that moisture from escaping too quickly, the wood will shrink at the ends while the middle stays swollen, leading to immediate splits. I always apply a wax emulsion like Anchorseal 2 within 24 hours of milling. Research shows this can prevent up to 90% of drying checks and splits. It is a simple step that saves a lot of heartache later on.
Drying is a game of patience. Most folks follow the rule of thumb that you need one year of air drying for every inch of slab thickness. This gets the wood down to the ambient air equilibrium, usually around 12% to 14%. However, for indoor furniture, we need to reach an indoor target of 6% to 8%. To understand the science behind this, you can look into the USDA data on dimensional changes and moisture control. All the real physical shrinkage and tension happen once the moisture drops below the Fiber Saturation Point, which is about 28% to 30%.
The Artisan’s Approach to Property Milling
When I select a tree on my property, I look for straight trunks and avoid trees growing on steep leans, which often have high internal tension. I prefer milling my own Cherry whenever possible. It is my favorite species because of its stability and the way the color deepens over time. Milling on-site also means I don't let anything go to waste. Small scraps and offcuts that aren't fit for a board get turned into Farmer Vic’s Famous Fire Starters, keeping my shop sustainable and tidy.
Selecting Slabs from the Lumber Yard
If you are buying from a yard, ask if the wood has been kiln-dried and heat-treated. According to USDA standards, lumber should reach an internal temperature of at least 133°F for 30 minutes to kill off any wood-boring insects. When you get a slab home, don't start working it immediately. Let it acclimatize to your shop for at least two weeks. This allows the wood to settle into its new environment before you start flattening it. If you are looking for a reliable finish for your next project, my Outdoor Defense Oil is a great way to keep those fibers protected once the drying is done.
Stabilizing the Slab: Professional Reinforcement Techniques
Whether I am working on a slab I milled from a tree on my property or one I picked up from a local yard, the stabilization phase is where the real craftsmanship happens. Once you have followed the best practices for air-drying hardwood lumber, you are ready to start the build. But even perfectly seasoned wood has internal stresses. Preventing cracks in live edge wood is about identifying which checks are just "character" and which ones are structural threats. A hairline crack on the surface might look nice, but if it starts to split through the thickness of the slab, it is time to act.
Proper orientation is your first line of defense. I always look at the end grain to see how the rings are curved. Placing the slab so the "heart side" is up can help minimize cupping. For large projects like dining tables, especially when working with aggressive movers like Maple or Red Oak, I use recessed steel C-channels. These mechanical fasteners allow the wood to slide sideways as it breathes while keeping the entire surface flat. It is a modern solution that works well with traditional methods.
Using Starbond Adhesives for Crack Repair
I don't go a single day in the shop without reaching for Starbond Adhesives. They are my go-to for locking down the bark on a live edge piece. If you want that bark to stay put for decades, you need a thin CA glue that can wick deep into the fibers. It acts like a liquid nail, bonding the bark to the sapwood from the inside out. This is especially important for species like Black Locust, where the bark can be prone to separating as the wood seasons.
For visible cracks, I often use their black CA glue. Instead of trying to hide a split with wood filler that never quite matches, I embrace it. The black adhesive creates a clean, intentional line that highlights the natural history of the tree. It is a simple process: clean out any dust, fill the void with CA glue, use an accelerator to set it instantly, and sand it flush until it feels like glass.
The Art of the Bowtie Inlay
Sometimes a crack is too wide or under too much tension for glue alone. That is when I reach for a bowtie or butterfly key. These joints are mechanically designed to pull the two sides of a split together. While I love the challenge of hand-cutting them, using a router template is a great shortcut that ensures a perfect fit every time.
I enjoy using contrasting species for these. Placing a White Oak bowtie in a slab of Cherry, which is my favorite wood to work with, creates a stunning visual impact. The rich, warm tones of the Cherry contrast beautifully with the lighter Oak. It shows the customer that you didn't just build a table; you took the time to ensure it stays together for the next generation.
Finishing for Resilience: Sealing the Moisture Out
The final finish is the last line of defense in preventing cracks in live edge wood. Once the slab is dry and the structural reinforcements are in place, you have to control how that wood breathes. I have seen too many beautiful tables ruined by thick film finishes like polyurethane. Those plastic-like coatings might look tough, but they don't move with the wood. When the humidity changes, the slab expands, the finish cracks, and moisture gets trapped underneath. This leads to rot and deeper splits that are nearly impossible to fix without stripping the whole piece.
I prefer penetrating oils because they soak into the wood fibers rather than sitting on top. This allows the wood to move slightly without the finish failing. It is also vital to seal every square inch of the piece. The number one mistake I see DIYers make is finishing the top of a table but leaving the bottom raw. This causes uneven moisture transmission. The top stays dry while the bottom absorbs humidity, leading to instantaneous seasonal cupping. Whether it is a piece I milled on my property or a slab from the yard, I always apply an identical number of coats to both faces.
Real Milk Paint and Natural Finishes
I use Real Milk Paint when I want a traditional, durable look that still feels like real wood. It is non-toxic and lets the natural texture of the grain shine through. For pieces that face more extreme temperature swings, I rely on Outdoor Defense Oil. This tung oil blend is a powerhouse for saturating the fibers of dense woods like Black Locust or White Oak. It creates a breathable barrier that blocks liquid water while allowing vapor to pass through slowly. This is especially rewarding on Cherry, my favorite species. The oil highlights the warm, reddish-brown tones as they deepen with age, making the grain look almost three-dimensional.
Sanding for Success
You cannot get a good seal on a poorly sanded surface. I walk through a progressive series of grits to ensure the wood is ready to accept the oil. Using high-quality sandpaper collections makes this tedious job much faster and prevents those annoying pigtail swirls. Before the final grit, I always "water pop" the wood by wiping it with a damp cloth. This raises the grain so I can sand it back down one last time, preventing the finish from feeling fuzzy or looking blotchy. This step is crucial for Maple, which can be notoriously difficult to finish evenly without proper preparation. Pick up a bottle of Outdoor Defense Oil to give your project the professional protection it deserves.
Long-Term Care: Keeping Your Live Edge Piece Crack-Free
Wood doesn't stop being a living thing just because it's sitting in your living room. Preventing cracks in live edge wood is an ongoing commitment that continues long after the final coat of oil has dried. The biggest threat to your furniture is the air itself. In most temperate zones, I recommend keeping your home's relative humidity between 35% and 55%. If your house gets too dry in the winter, the wood will shrink and pull at its own fibers. If it gets too humid, it will swell. This constant cycling is what causes new cracks to appear over time.
If you do notice a small hairline crack opening up, don't panic. It's often just the wood settling into its new environment. You can usually fix these small issues with a drop of CA glue, just like we discussed in the stabilization section. For regular cleaning, stick to a damp cloth and a tiny bit of mild soap. Never use harsh chemical cleaners; they can strip away the natural protective oils we worked so hard to apply. Keeping the surface clean and dry is the simplest way to ensure the wood stays stable.
Caring for Small Goods and Serving Boards
I take a lot of pride in my handcrafted charcuterie boards, especially the ones made from Cherry. Since Cherry is my favorite species, I always tell folks to give these pieces a little extra love. Never soak a live edge board in water or put it in the dishwasher. The rapid moisture intake will cause the wood to warp or split almost immediately. I have a simple "re-up" routine: every few months, or whenever the wood starts to look dull, apply a fresh layer of food-grade oil. This keeps the vibrant reddish-brown tones of the Cherry looking deep and rich for years.
Outdoor Live Edge Maintenance
Maintaining outdoor furniture and benches is a whole different ballgame. These pieces face direct sun, rain, and snow. UV rays are particularly brutal because they break down the lignin in the wood, making it brittle and more prone to cracking. If you have a bench made of Maple or Red Oak, keep a close eye on the feet and the end grain. These species are less rot-resistant than White Oak or Black Locust. If you see dark staining or soft spots, it's a sign that moisture is winning. Re-applying a high-quality oil once a season will keep the moisture out and ensure your outdoor pieces remain as sturdy as the day they left my shop.
Building Heirloom Pieces That Last
Creating a live edge table or board is a journey that starts with a deep respect for the material. By understanding how wood moves and taking the right steps during drying and reinforcement, you are already ahead of most makers. Whether you are working with a slab I milled on my property or a piece you found at a local yard, the secret to preventing cracks in live edge wood is patience. From the initial end-grain seal to the final coat of oil, every detail ensures your Cherry, Oak, or Maple project stays as beautiful as the day you finished it.
I am proud to offer the same tools and materials I use every day to keep my own work stable. You can shop Farmer Vic’s approved woodworking supplies and handcrafted goods to find finishes and adhesives that I have personally vetted in my workshop. Using sustainable wood and artisan-grade supplies means you can build with total confidence. I can't wait to see what you create. Keep your tools sharp and your moisture meter handy; your next masterpiece is just a few cuts away.
Frequently Asked Questions
Can I fix a live edge slab that has already cracked?
Yes, you can absolutely repair existing splits. For small checks, I use Starbond Adhesives to wick deep into the fibers and lock them together. If the crack is structural, a bowtie inlay is the best way to bridge the gap and stop it from spreading. Preventing cracks in live edge wood is easier than fixing them, but these professional techniques can save a piece that has already started to move.
Is kiln-dried wood guaranteed not to crack?
No, kiln drying is not a lifetime guarantee against movement. While it brings the moisture content down to a stable 6% to 8%, wood remains hygroscopic. It will still swell or shrink based on the humidity in your home. If you take a dry slab and put it in a damp basement or a bone-dry room near a heater, the internal stress can still cause new cracks to form despite the initial drying schedule.
What is the best wood species for a beginner live edge project?
I always recommend Cherry for beginners. It is my personal favorite species because it is stable, easy to work with, and has a lower shrinkage rate than most hardwoods. Black Locust is also excellent if you want something incredibly durable. Avoid species like Red Oak or Maple for your first project. They have higher tangential shrinkage and are much more likely to warp or split if your home environment isn't perfectly controlled.
How long does it take for a live edge slab to fully acclimatize to a home?
You should let a slab sit in its final environment for at least two weeks before you start the final flattening or finishing. This is true whether I mill the wood on my property or you buy it from a yard. Wood needs time to reach Equilibrium Moisture Content with the local air. Rushing this step is a common mistake that leads to cupping once the project is assembled and moved into a house.
Do I need to seal the bark on a live edge piece?
If you want to keep the bark attached, you definitely need to seal it. Bark naturally wants to peel away as the sapwood dries and shrinks. I use thin Starbond CA glue to saturate the area where the bark meets the wood. This creates a permanent bond that prevents separation. If you don't seal it, the bark will likely fall off within a few years as the seasonal humidity in your home changes.
Why is my Cherry wood changing color over time?
Cherry is famous for its natural aging process, which causes it to darken when exposed to light. It naturally deepens from a pale pinkish-amber to a rich, dark reddish-brown as it is exposed to the air. This isn't a defect; it is one of the reasons it is my favorite species. You can slow the process with UV-resistant oils, but most folks prefer the character that comes with this natural aging over the decades.
Can I use regular wood glue to fill cracks in live edge wood?
Regular wood glue is meant for tight-fitting joinery and should not be used to fill cracks. It shrinks as it dries and won't take a finish the same way the surrounding wood does. For preventing cracks in live edge wood from expanding, use a high-quality CA glue or epoxy. These materials don't shrink and can be sanded flush to create a smooth surface that looks intentional rather than like a messy or cheap repair.
How often should I re-oil my live edge table?
Most indoor tables need a fresh application of oil once or twice a year. You will know it is time when the wood starts to look dull or if water stops beading on the surface. For my charcuterie boards, I recommend oiling them every few months depending on how often they are washed. Keeping the fibers saturated with a good penetrating oil is the best way to keep moisture out and prevent seasonal splitting.