

Raised Bed Vegetable Garden Layout Ideas for Every Space in 2026
What if the best garden layout isn’t the one that fits the most beds? It’s tempting to use every open patch, but crowded paths, awkward watering, or beds that shade one another can make a garden harder to enjoy. The best raised bed vegetable garden layout ideas start with how you’ll move through the space, where the sun falls, and what you want to grow.
If you’re unsure how many beds will fit or how to make an odd-shaped yard work, a little planning can make daily watering and harvesting simpler. This guide compares practical layouts for small, irregular, and larger spaces, then covers paths, sunlight, and water access. Start by measuring your space, noting its sunnier areas, and choosing a layout that fits your routine, not just your wish list.
Key Takeaways
- Choose a layout around the space you have and the way you like to garden, not simply the number of beds you hope to fit.
- Compare six adaptable raised bed vegetable garden layout ideas for small, irregular, and larger spaces.
- Check paths, reach, sunlight, and water access before settling on bed shapes or placement.
- Use a simple sketch-and-revise process to test your plan, then choose beds that fit the footprint and intended location.
- Arrange crops with their growing habits in mind, and check crop-specific guidance before finalizing the planting plan.
Raised Bed Vegetable Garden Layout Ideas: Start With Your Space and Routine
The right layout depends on your available space and the way you plan to garden. A compact spot near the kitchen may suit a few easy-to-reach beds for regular picking, while a larger area might call for more room to rotate seasonal crops and carry supplies. Sunlight, clear access, convenient water, and your daily habits all help determine where beds belong. The basic principles of raised-bed gardening are a useful starting point, but the best arrangement is the one that fits your yard.
What to measure before placing raised beds
Start with a simple sketch. Mark the boundaries, doors, fences, trees, existing paths, and the nearest practical water access. Include anything that could limit movement or cast shade, such as a shed or large shrub. Then observe the intended growing area at different times of day. Note which spots receive sun and when, rather than relying on a single glance.
Before you build, mark the proposed bed footprints on the ground with string, cardboard, or another temporary guide. Walk between them as you would while carrying a watering can or gathering vegetables. Check that you can reach the planting areas comfortably and that paths work around gates and other fixed features. If a route feels awkward now, it probably won’t feel easier once the beds are planted.
Plan for the way you actually garden
A small daily-harvest garden has different needs from a larger seasonal planting. If you’ll be picking herbs or vegetables often, place beds where you naturally pass and can water without dragging a hose through a busy walkway. If you’re tending a bigger plot less often, leave clear routes for carrying tools, compost, or harvest baskets.
Think about who will use the garden, too. Consider how far each person can comfortably reach and whether they prefer to work from a path, a seated position, or beside a raised planter. Bed size and placement should support that access, not make it a stretch. Once you’ve tested the footprint, choose beds that suit the location. Cedar planters with legs and inground raised planting beds are options from FVCreations, and custom sizes can be requested.
Light, reach, and routine should guide every garden layout. Keep those priorities in view as you compare raised bed vegetable garden layout ideas. A well-placed bed gives both the crops and the gardener room to thrive.
Six Raised Bed Vegetable Garden Layout Ideas for Different Spaces
These raised bed vegetable garden layout ideas are starting points, not rules. Choose a shape that leaves room to reach plants, move comfortably, and make use of the sunnier parts of your yard. The Old Farmer’s Almanac shares helpful guidance on the best width for raised garden beds, a useful consideration when planning access from paths.
Layouts for compact yards, patios, and narrow spaces
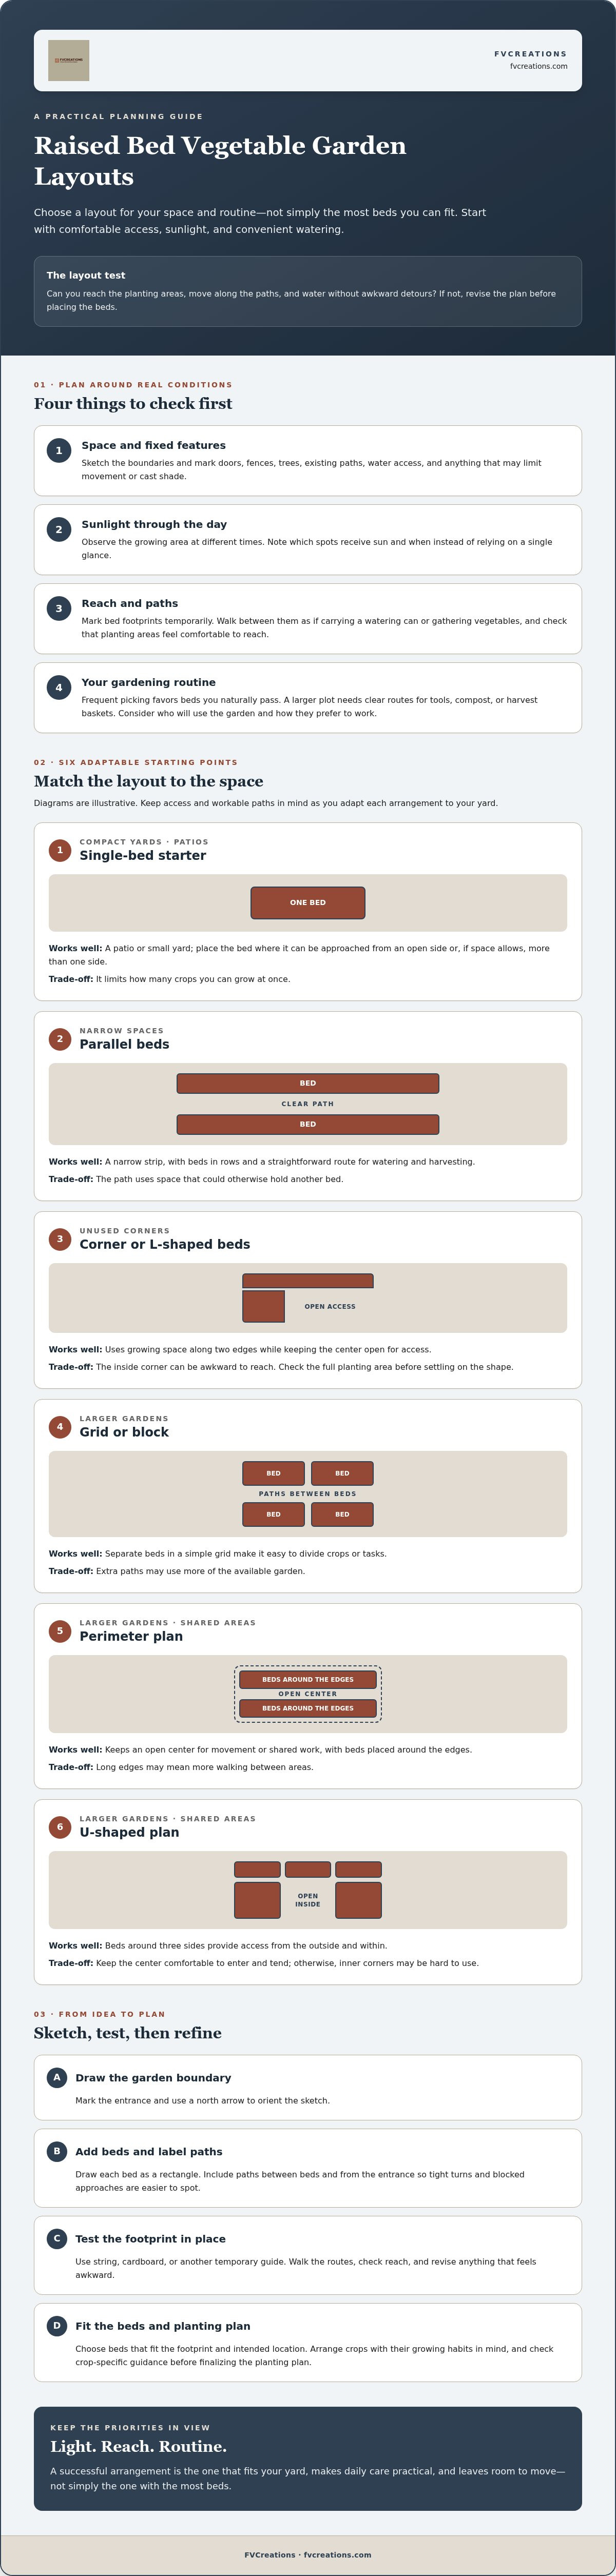
- Single-bed starter: For a patio or small yard, place one bed where you can approach it from an open side or, if space allows, from more than one side. It’s simple to tend, but limits the number of crops you can grow at once.
- Parallel beds: In a narrow strip, position beds in rows with a clear path between them. This creates a straightforward route for watering and harvesting, though the path takes up space that could otherwise hold another bed.
- Corner or L-shaped beds: Use an unused corner to fit growing space along two edges while keeping the center open for access. The trade-off is that an inside corner can be awkward to reach, so check the full planting area before settling on the shape.
Layouts for larger gardens and shared growing areas
- Grid or block: Arrange separate beds in a simple grid with paths between planting areas. It’s easy to divide crops or tasks, but extra paths may use more of the available garden.
- Perimeter plan: Place beds around the edges and keep an open center for movement or shared work. This can make the center easy to reach from planned paths, but long edges may mean more walking between areas.
- U-shaped plan: Set beds around three sides of an open interior. It offers access from the outside and within, provided the center stays comfortable to enter and tend. Otherwise, the inner corners may be hard to use.
For a quick diagram, draw the garden boundary and mark North with an arrow to orient your sketch. Add each bed as a labeled rectangle, then draw and label the paths between beds and from the entrance. This makes tight turns and blocked approaches easier to spot before you commit. If a cedar bed fits your planned footprint, view FVCreations’ cedar outdoor items as one option.
Compare Raised Bed Shapes, Paths, and Access Before You Choose
Bed shape affects more than how a garden looks. It determines which planting areas you can reach, how easily you can move a hose or watering can, and how much room remains for paths. As you compare raised bed vegetable garden layout ideas, plan access first, then fit the beds into the space left over.
| Arrangement | Access | Space use | Watering | Likely trade-off |
|---|---|---|---|---|
| Rectangular | Simple to approach from one or more sides, depending on placement. | Works well along a boundary or as a standalone bed. | A straightforward shape to water consistently. | A bed against a fence or wall may limit access to its far side. |
| Corner | Access depends on keeping the inside and outer edges reachable. | Can use an otherwise awkward corner. | Watering may take more attention if the bed wraps around an obstacle. | Deep or enclosed corners can be difficult to tend. |
| Parallel | A path between rows provides a clear route to each bed. | Fits naturally in a long, narrow space. | One route can serve multiple beds. | The path takes up room and must stay clear. |
| Grid | Paths can provide access to each planting block. | Organizes a larger garden into distinct areas. | Clear routes make it easier to plan watering by section. | More paths may mean less room for planting. |
How bed shape changes reach and usable space
Make sure every part of a bed can be reached from a planned path or accessible side. A corner bed may look efficient on paper, but an inside section that’s hard to reach can become unused space. Enclosed shapes need the same careful thought: leave a workable opening and check that the center isn’t beyond comfortable reach. Try the layout with temporary markers before building, then walk around it and mimic the tasks you’ll do there.
Bed width should suit the gardener’s comfortable reach, not an assumed standard. If a bed will sit beside a wall or fence, plan access from the open side. If you can approach from both sides, account for that when deciding how much planting area to include.
Leave room for paths, tools, and watering
Trace a route from the garden entrance to each bed, including turns where you’ll carry tools or harvest containers. Consider whether you’ll water with a hose, watering can, or another method, and make sure the route works with it. A practical garden path is clear, stable, and unobstructed. Test the planned clearance during ordinary tasks and after rain, when the ground may be slippery or soft. A little room to maneuver can make routine care more comfortable.
Arrange Vegetables in Raised Beds Around Sunlight and Growing Habits
A useful planting plan brings the garden’s conditions and your everyday care together. Before deciding what goes in each bed, follow a simple sequence: observe the sun, group crops by their needs, plan access for tending and harvesting, then review how you’ll water. These raised bed vegetable garden layout ideas work best when you check crop-specific and regional guidance before settling on exact placements.
Use sunlight and plant height to guide placement
Watch how light moves across the garden at different times, and note which beds receive sun or shade. Then check the growing recommendations for the vegetables you plan to raise. Tall crops and supports can shade nearby plants, so account for their mature height and position them with their neighbors in mind. The effect depends on the site and the crops, so avoid assuming one arrangement suits every garden.
Use seed packets or a local university extension service for regional planting advice. A quick sun-and-height sketch can help: mark sunny and shaded areas, then note where you expect tall plants or trellises to stand.
Make room for crop rotation and companion planting
Group vegetables with similar care needs where reliable crop-specific guidance supports it. For watering, check recommendations for each crop and consider whether your chosen method can serve the bed evenly. If plants in one bed have very different needs, separate them in the plan rather than assuming one watering routine will suit all of them.
Crop rotation can help you plan where crops will go in successive seasons, especially when you have more than one bed. Companion planting can also be considered as you organize a bed, but don’t treat it as a guaranteed way to prevent pests or improve growth. Check credible, crop-specific sources before relying on either practice.
Try a flexible bed-by-bed sketch. Label each bed for the current season, then leave space beside it to note possible crops for the next season. Add companion planting ideas as possibilities to verify, not fixed rules. This keeps the plan useful if you change crops or discover that a bed gets more shade than expected.
As your planting plan takes shape, compare its footprint and placement with FVCreations’ cedar outdoor planters and beds to see whether a planter option suits the space you’ve mapped.
Turn Your Layout Sketch Into a Raised Bed Garden Plan
You’ve explored raised bed vegetable garden layout ideas. Now turn the most promising option into a plan you can test. Before choosing beds, work through this checklist:
- Sketch: Mark the growing area, obstacles, paths, water access, and sunny spots.
- Test: Mark the bed footprints temporarily and walk the routes you’ll use for tending, watering, and harvesting.
- Revise: Adjust the sketch if a path feels tight, a bed is hard to reach, or placement conflicts with sunlight or watering.
- Choose: Select beds to fit the final footprint and intended placement.
That last step matters. A bed that works in one part of the garden may not suit another, especially if access is limited or the space has an unusual shape. FVCreations offers cedar planters, including planters with legs and inground raised planting beds, and accepts requests for custom sizes. Let your measured plan guide your bed choice rather than reshaping a workable garden around a bed that doesn’t fit.
Choose bed materials with sourcing and use in mind
Before choosing a bed, consider where it will sit, how you’ll access it, and what dimensions will work for the crops you plan to grow. If a standard footprint won’t suit your sketch, compare custom-size options. Think about the finish you want, too, and check that the product details match the intended use. FVCreations handcrafts wooden items from wood sourced from the owner’s property and offers custom sizes and finishes.
Make the plan fit your garden, not the other way around
Before settling on a bed, revisit the practical details: Can you reach the planting areas? Do paths stay clear? Does the placement suit the light you observed? Can you water without awkward detours? A final walk-through with your sketch in hand can reveal small changes that make the garden more comfortable to use.
If cedar fits your plan, take a look at FVCreations’ outdoor wooden items for planter options. You can also consider whether a custom size would better match the footprint you’ve mapped.
Put Your Garden Plan Into Practice
The most workable raised bed vegetable garden layout ideas begin with your actual space, not a fixed template. Check sunlight, paths, reach, and water access, then test the bed footprints before you commit. A simple sketch can help you spot awkward corners or crowded routes while changes are still easy to make.
Keep your planting plan flexible, too. Account for crop height and care needs, and check reliable, crop-specific guidance before deciding where vegetables belong. A layout that’s comfortable to tend is more likely to fit the way you really garden.
Once your footprint and placement are clear, choose beds to suit them. FVCreations offers handcrafted cedar planters and inground raised planting beds, with custom sizes and finishes available by request. The wood is sourced from the owner’s property.
Explore FVCreations’ outdoor items and choose a planter that fits your measured garden plan.
Frequently Asked Questions
What is the best layout for a raised bed vegetable garden?
The best arrangement depends on your available space, sunlight, access, and gardening routine. Among raised bed vegetable garden layout ideas, a single bed can suit a compact space, parallel beds can work well in a narrow area, and a grid can organize a larger garden. Sketch obstacles, paths, and water access first. Mark proposed bed footprints and test the routes before building, then check crop-specific guidance before planting.
How far apart should raised garden beds be?
There’s no single spacing that works for every garden. Leave enough room to reach each bed comfortably, carry the tools you use, and water without stepping into growing areas. The space you need depends on who gardens, the path surface, and any equipment you move between beds. Draw the beds and paths to scale if helpful, then walk the proposed routes before construction. Verify any specific measurement with reliable gardening guidance.
Should raised beds be in rows or a grid?
Rows offer a straightforward arrangement with a path between beds, while a grid can divide a larger garden into distinct growing sections. Neither is automatically the better choice. Consider the shape of your space, where sunlight falls, how you’ll reach each bed, and how you plan to water. Sketch both options if you’re unsure. A temporary ground layout can help you test turns and paths before committing to either arrangement.
How do I arrange vegetables in raised beds for sunlight?
Observe how sunlight moves across the garden, then consider each crop’s light needs and mature height. Taller plants or supports may shade nearby vegetables, so account for their placement in your sketch. Sun requirements vary by crop and growing conditions, so consult reliable, crop-specific guidance before assigning plants to beds. Keep access in mind as you plan, since you’ll need to reach each area for routine care and harvesting.
Can you put raised garden beds in partial shade?
Yes, some vegetables may tolerate less direct sunlight than others, but suitable choices depend on the crop and the conditions in your garden. Observe the area through the day and note where and when shade falls. Then check reliable crop-specific guidance for those light conditions before placing beds or choosing plants. Don’t assume every vegetable will thrive in partial shade; use what you observe to guide a flexible planting plan.
What should I put between raised garden beds?
Choose a path surface that suits your garden and makes it practical to reach beds, carry tools, and water without stepping into growing areas. Consider drainage, upkeep, and comfort underfoot before deciding what to use. Mark path locations on your sketch, then test the layout by walking the routes and carrying the items you’ll use in the garden. For material-specific recommendations, check reliable guidance that fits your conditions and intended use.