

Real Milk Paint: Artisan's Guide to Natural Finishes (2026)
You've probably spent hours sanding back a "modern" finish that started peeling after just two years, only to fill your workshop with the sharp, chemical sting of VOCs. It's a common frustration for makers who just want their hard work to last. I've spent years in my shop working with everything from black locust I milled myself to white oak sourced from the local yard, and I've learned that synthetic coatings often hide the very character we're trying to highlight. If you're looking for a way to protect your work without the toxins, using real milk paint for furniture is the most honest choice you can make for your home and your craft.
I agree that a finish should feel like a part of the wood, not just a plastic layer sitting on top. In this guide, I'll show you how to master real milk paint to achieve that breathtaking, velvet-matte look that actually cures harder over time. We'll walk through how to get perfect adhesion on species like maple or red oak, and I'll share special tips for finishing my absolute favorite wood, cherry. You'll learn the nuances of working with both property-milled and yard-purchased lumber to ensure your 2026 projects are safe, durable, and beautiful.
Key Takeaways
- Discover why real milk paint for furniture is the ultimate non-toxic choice for creating breathable finishes that won't peel or crack.
- Learn how to adjust your technique for different wood densities, whether you're working with property-milled black locust or white oak from the lumber yard.
- Master the "slaking" secret and the perfect 1:1 mixing ratio to achieve a smooth, professional consistency every time.
- Get my personal tips for finishing cherry wood, my absolute favorite species, to highlight its natural warmth and grain.
- Understand why sealing your porous milk paint finish with a natural oil is essential for long-lasting durability in any environment.
What is Real Milk Paint and Why Does It Belong on Fine Furniture?
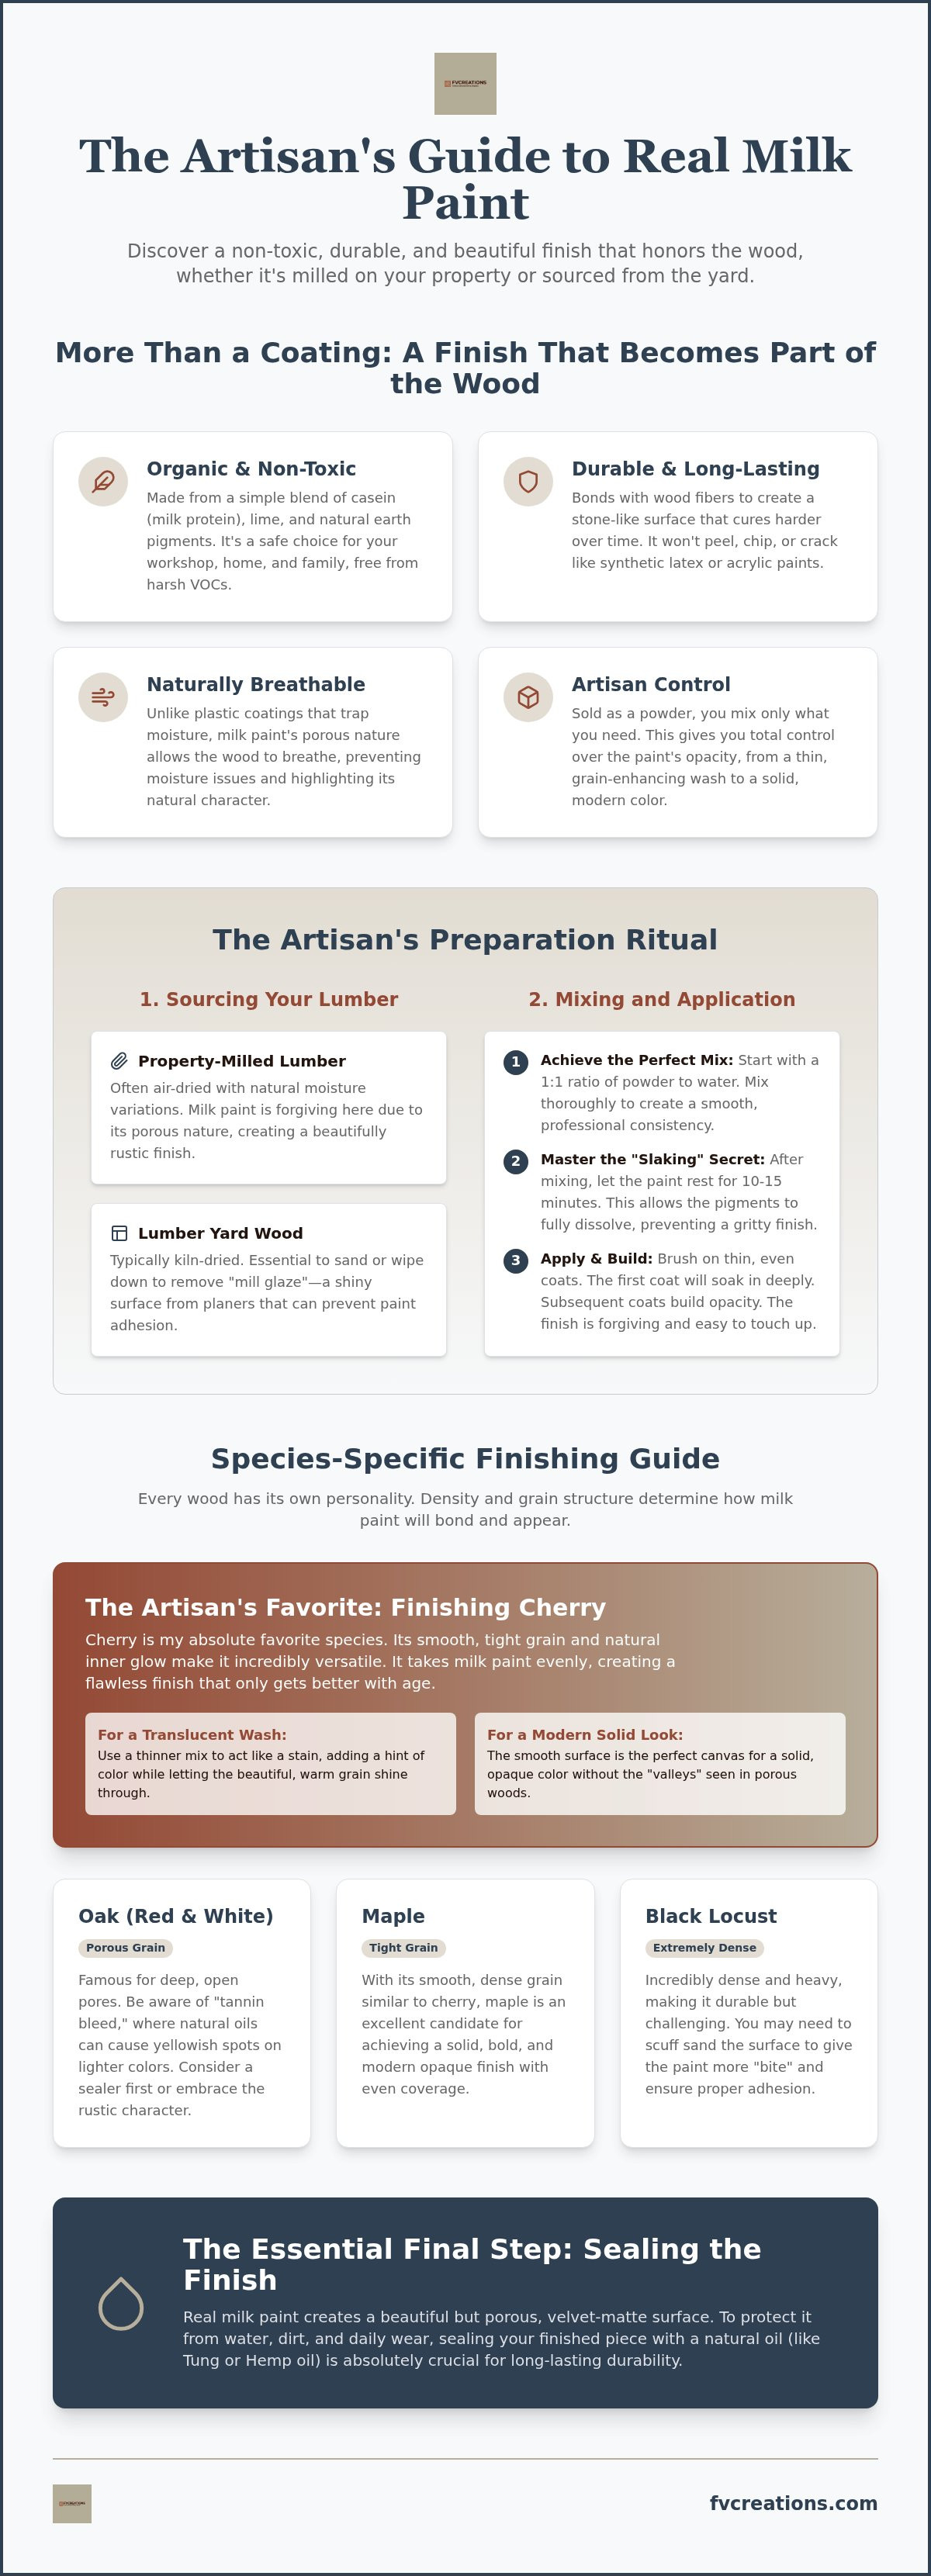
I've spent many mornings in my shop, surrounded by the smell of fresh shavings from a white oak log I just milled. When I finish a piece, I want a coating that respects the wood's journey. Using real milk paint for furniture isn't like applying the plastic-feeling stuff you find at big-box stores. It’s an organic blend of casein, lime, and earth pigments. If you're wondering What is Milk Paint, it's essentially a stone-like finish that dates back centuries. It doesn't just sit on the surface. It bonds deeply, allowing the wood to breathe. This means it won't trap moisture or peel off in sheets like latex paints often do. In 2026, keeping a non-toxic shop is more important than ever. I use these finishes because they're safe for my family and yours.
Whether I'm working with a slab of black locust from my own property or some maple from the local yard, the preparation changes. I handle everything from red oak to my absolute favorite wood, cherry. Each species reacts differently to the lime and pigment, and that’s the beauty of it. It’s a finish that highlights the grain rather than hiding it under a layer of plastic.
The Artisan Difference: Powder vs. Pre-Mixed
I always reach for the powder form of Real Milk Paint. Mixing it myself gives me total control over the opacity. If I want a thin wash to show off the warm, glowing grain of a nice piece of cherry, I can do that. If I need a solid, bold color for a maple desk, I just add less water. Powdered paint also has an incredible shelf life. You don't have to worry about it spoiling on the shelf like liquid "milk-style" paints. Those are often loaded with chemical biocides and preservatives just to stay liquid in the can. By mixing only what I need, I keep my shop clean and my materials fresh.
Property-Milled vs. Kiln-Dried Surfaces
There’s a real difference between wood I’ve harvested myself and lumber from a yard. Property-milled wood, even when air-dried, has natural moisture variations that can be tricky for synthetic paints. Milk paint is forgiving here because it’s porous. When I buy kiln-dried white oak or red oak from a yard, I make sure to wipe it down well to remove mill glaze. This is a shiny layer caused by high-speed planers that can block the paint from soaking in. Once that’s gone, the organic bond of the paint reaches deep into the fibers. It creates a finish that’s truly part of the furniture, providing a tactile, grounded feel you just can't get with modern sprays.
Species-Specific Guide: How Milk Paint Reacts to Different Woods
When you're choosing real milk paint for furniture, you've got to look at the wood grain first. Every species has its own personality. I've spent plenty of time watching how paint sinks into a porous piece of red oak versus how it sits on top of a dense board of black locust I pulled off my own sawmill. Density is everything. If the wood is tight-grained, the paint won't dive in as deep, which changes how you handle your Artisan’s Mixing and Preparation. If you're working with property-harvested lumber that hasn't been kiln-dried, you'll also notice it takes the paint differently than the boards you'd find at a commercial yard.
White oak and red oak are famous for their deep, open pores. If you aren't careful, those natural tannins can bleed through lighter paint colors, leaving yellow or brown spots on your finish. I usually suggest a sealer if you're worried about it, but sometimes that raw, rustic look is exactly what a bespoke piece needs. The key is understanding that real milk paint for furniture isn't just a covering. It's a partnership with the wood itself.
Farmer Vic’s Favorite: Finishing Cherry Wood
I'll be honest. Cherry is my absolute favorite species to work with. It has this natural, inner glow that actually gets better as it ages. When I'm using milk paint on cherry, I often go for a thin wash. It acts more like a stain, letting that beautiful grain peek through while adding a hint of color. Because cherry has such a smooth, tight grain, it’s also the best candidate for a modern, solid finish. It takes the paint evenly without the deep "valleys" you see in oak. Whether it's a yard-purchased board or a slab I've air-dried myself, cherry never lets me down.
Oak, Maple, and Black Locust Considerations
Working with black locust is a different beast entirely. It’s incredibly dense and heavy, which makes it durable but challenging to finish. To get milk paint to "bite" into it, you might need to leave the surface a bit rougher than you would for other woods. Maple can be just as finicky, often turning blotchy if your sanding isn't consistent across the whole piece. I always recommend using quality sandpaper to ensure the surface is uniform before that first coat hits the wood.
Red oak has much larger pores than white oak, which can make a solid finish look textured or "pitted" if you don't plan for it. If you want a perfectly flat surface, you'll need more coats or a dedicated grain filler. For those outdoor projects like my cedar planters, I stick to durable finishes that can handle the weather, but for indoor heirlooms, matching the paint to the species is where the magic happens. If you're ready to start your next project, you can find the same Real Milk Paint I use in my workshop right here.
The Artisan’s Mixing and Preparation Ritual
Mixing a fresh batch of Real Milk Paint is the first step in bringing a piece to life. I usually start with a simple 1:1 ratio of powder to room-temperature water. This creates a consistency similar to heavy cream, which is the gold standard for getting a smooth, durable coat on your work. If you're working on a dense piece of black locust I've pulled off the sawmill or a smooth board of cherry from the yard, this thickness ensures the paint has enough body to cover without running. One thing I've learned is that you can't rush the chemistry. In a 2026 climate-controlled shop, the open time for mixed real milk paint for furniture is generally around 24 hours before the proteins begin to break down.
The real secret that many beginners skip is "slaking." You need to let the mixture sit for at least 15 minutes after the initial stir. This allows the lime and casein to fully dissolve and bond with the water. Without this pause, you'll end up with tiny, gritty bits of lime that ruin the finish. It’s a non-negotiable step in my workshop, whether I’m prepping a custom commission or finishing a simple charcuterie board for a neighbor.
Mixing for Depth and Texture
I always use a small whisk or a mechanical mixer to get the lumps out. If I'm looking for a "color wash" to let the grain of some property-milled white oak show through, I'll add a bit more water to the mix. For a solid, modern look on maple or red oak, I keep it thick. If you're planning on using a sprayer for an ultra-smooth finish, my personal trick is to run the paint through a fine mesh filter first. This catches any tiny particles that might clog your nozzle and ensures a professional result every time.
Sanding and Grain Raising
Preparation is where the finish is won or lost. I always "pop the grain" by wiping the wood down with a damp cloth and letting it dry before my final sand. This raises the tiny fibers so you can knock them down, preventing the paint from feeling fuzzy later. When choosing your sandpaper, don't over-sand. If you go beyond 180 grit, you actually polish the wood too much, making it harder for the paint to stick. This is especially true for yard-purchased lumber that might already have mill glaze. Once you're done, clean the surface with a vacuum or a lint-free cloth. Avoid tack cloths that contain wax; they leave a residue that prevents real milk paint for furniture from bonding properly with the wood fibers.
Mastering the Look: From Modern Solid to Authentic Chippy
Achieving the right look with real milk paint for furniture is where your personal style as a maker really shines. Whether I'm finishing a sleek contemporary desk made from yard-purchased maple or a rustic cabinet built from black locust I milled myself, the approach changes based on the desired outcome. For a Modern Solid finish, the goal is a flawless, uniform color. This works beautifully on cherry wood, my favorite species, because the smooth surface allows the paint to lay down perfectly flat. On the other hand, the "Chippy" aesthetic is what people often think of when they hear about milk paint. It’s an authentically aged look that happens naturally on property-harvested wood pieces where the paint might resist certain areas of the grain. You can see how these different looks play out on our handcrafted outdoor benches.
I often layer colors to create a piece that feels like an heirloom. By painting a base coat in a dark earth tone and a top coat in a lighter shade, I can sand through the edges to reveal the "history" of the piece. This two-tone technique mimics the way paint wears away over a century of use. It’s a great way to add depth to red oak or white oak furniture that might otherwise feel a bit plain. If you're ready to try these looks yourself, you can grab the same Real Milk Paint I use for all my shop projects.
The Role of Ultra-Bond
When I'm working with a piece that already has a finish or a very dense, yard-purchased board, I sometimes use a bonding agent. This helps the paint stick to non-porous surfaces. However, I almost always skip the bond on my raw, property-milled furniture. I want that paint to penetrate as deep as possible into the fibers of the wood. To be sure about your adhesion, always perform a scratch test. Once the paint is dry, try to mar it with your fingernail in an inconspicuous spot. If it stays put, you're golden. If it flakes off too easily, you'll know you need that extra bond for the next coat.
Distressing and Burnishing
The feel of a milk paint finish is just as important as the look. I love wet-sanding with a bit of finishing oil to create a silky, stone-like texture that’s a joy to touch. When it comes to distressing, think about where a piece of furniture naturally wears over decades. Focus on the corners, the edges of drawers, and the areas around handles. I often use fine sandpaper for controlled removal, but steel wool is my go-to for burnishing the high points of the grain on species like red oak. It gives the wood a subtle sheen that looks like a hundred years of honest use.
Once you've spent the time achieving that perfect "chippy" or "modern solid" look, you can't just leave the wood bare. Real milk paint for furniture is naturally porous because of the lime and casein. It’s a stone-like finish that will soak up every fingerprint or water ring if you don't seal it properly. I've found that the best way to protect my work, whether it’s a red oak table from the lumber yard or a black locust bench I milled myself, is to use a natural oil that works with the paint instead of just sitting on top. For items that see a lot of action, like a kitchen table made of white oak or maple, I always lean toward a hardening oil. If it's a decorative piece, a simple wax might do, but I prefer the depth an oil provides. I use Outdoor Defense Oil on almost everything these days. It’s not just for the cedar planters I build for the garden. It’s a durable, non-toxic shield that brings out the best in indoor furniture too.Tung Oil: The Gold Standard for Milk Paint
Pure Tung oil is the gold standard for sealing these finishes. It saturates the paint, changing the color from a chalky pastel to a deep, rich tone. I use a "wet-on-wet" method, especially for property-harvested wood that might be a bit thirstier than kiln-dried stock. You apply the oil, let it soak, and apply more while it's still wet until the wood stops drinking. I never use polyurethane or other "plastic" topcoats. Why would I spend weeks handcrafting a piece of cherry, which is my absolute favorite wood for its natural glow, just to wrap it in a layer of synthetic film? Tung oil gives you a waterproof, matte barrier that still feels like real wood under your hand.
Long-Term Care and Re-Oiling
In 2026, we're all more conscious of the environment in our workshops and our homes. Maintaining a natural finish is a simple ritual. You don't need harsh chemicals. A damp cloth and a bit of mild soap are all you need to clean your milk-painted surfaces without damaging those natural pigments. Every few years, or whenever the wood looks a bit parched, just wipe on a fresh, thin coat of oil. It’s an investment in your home’s health and the longevity of your furniture. When you treat the wood with respect, from the initial milling to the final oiling, it will last for generations.
Creating a beautiful environment also means paying attention to the walls that surround your fine furniture. For those seeking high-quality gypsum boards and interior finishing solutions, click here to learn more about Gyp Artisan's offerings.
This mindful approach to our craft often extends to how we support the world around us. For makers who want to ensure their charitable efforts reach the most reliable grassroots organizations, you can explore Educational Materials and Nonprofit Consulting to find and support vetted animal rescues.
Bring Your Woodwork to Life with a Natural Finish
Mastering the use of real milk paint for furniture is about more than just picking a color. It's about respecting the material. Whether you're working with a slab of black locust you milled yourself or a piece of white oak from the lumber yard, you now have the tools to create a finish that lasts. Remember to let your paint slake for fifteen minutes and always choose a natural oil to seal in that velvet-matte texture. This approach works beautifully on every species, from red oak and white oak to maple, and especially on my personal favorite, cherry wood.
I use these exact finishes on all my FVCreations custom furniture commissions because they are 100% non-toxic and VOC-free. I've tested them extensively on both property-harvested and yard-purchased lumber to ensure they stand up to real-world use. When you choose these materials, you're choosing a safer workshop and a healthier home. If you're ready to transform your next project, you can Shop Farmer Vic’s Favorite Real Milk Paint Colors. I can't wait to see what you create in your own shop. Happy building.
Frequently Asked Questions
Is real milk paint durable enough for high-traffic furniture like dining tables?
Yes, it's incredibly durable once you seal it with a hardening oil like Tung oil. I use this combination on custom dining tables made from yard-purchased maple all the time. The paint itself cures very hard over time. Unlike film finishes that can scratch or flake, this setup allows for easy spot repairs. It's a reliable choice for any piece that sees daily use in a busy home.
Do I need to use a primer before applying milk paint to raw wood?
You don't need a separate primer when you apply real milk paint for furniture to raw wood. The first coat actually acts as its own primer by soaking deep into the fibers. Whether it's a black locust post I milled myself or a white oak board from the yard, the paint creates a permanent bond. This organic connection is why milk paint won't peel away like modern latex or acrylic paints.
How do I prevent milk paint from chipping if I want a solid look?
To get a solid, non-chippy look, make sure the wood surface is clean and slightly porous. If you're painting over an old finish or a very dense wood like maple, adding an adhesion promoter like Ultra Bond to your first coat is a smart move. I also recommend sanding to no more than 150 or 180 grit. This leaves enough "tooth" for the paint to grab onto the wood.
Can I use milk paint on outdoor furniture like cedar planters?
Milk paint is a great choice for outdoor items like my cedar planters. Since the paint is breathable, it won't trap moisture inside the wood, which helps prevent rot. However, you must seal it with a high-quality exterior oil. I always use Outdoor Defense Oil for these projects. It provides the UV protection and water resistance needed to keep the finish looking sharp through the changing seasons.
What is the best way to seal milk paint for a waterproof finish?
Pure Tung oil is the best sealer for a waterproof, food-safe finish. It saturates the porous milk paint and cures into a tough, matte barrier. I use this method on every charcuterie board and kitchen table that leaves my shop. It’s a natural synergy that highlights the grain of species like cherry, my favorite wood, while providing the protection needed for surfaces that get wet.
How many coats of milk paint are usually required for full coverage?
Most projects require two to three coats for full, opaque coverage. The first coat often looks a bit streaky as it soaks into the wood, but don't let that worry you. By the second coat, the color really starts to build. If I'm working with a dark wood like walnut or a property-milled red oak, I might add a third thin coat just to ensure the hue is perfectly even.
Does milk paint smell, and is it safe to use indoors?
Real milk paint has a very faint, earthy scent that reminds me of wet grass or fresh milk. It's completely non-toxic and contains zero VOCs, making it perfectly safe to use inside your home or a closed workshop. You won't need to wear a respirator or worry about harmful fumes around your family. It's one of the few finishes I feel truly comfortable using in any environment.
How do I choose between Red Oak and White Oak for a painted finish?
If you want a smoother finish, White Oak is usually better because its pores are often plugged with tyloses. Red Oak has much larger, open pores that will show through the paint as tiny pits or texture. I prefer White Oak for outdoor benches due to its natural rot resistance. For indoor pieces where I want a more rustic, textured feel, the open grain of Red Oak works wonders.