

Choosing the Right Special Finish and Sanding Bundles for Woodworking Projects (2026)
Last Tuesday, a neighbor stopped by my workshop with a beautiful piece of cherry he’d been working on, but he was completely stuck. He was worried about using a finish that wasn't food-safe for his kitchen and didn't know which special finish and sanding bundles would actually give him a professional result. It's a common hurdle that can turn a labor of love into a source of stress. You want that buttery-smooth feel, but buying individual supplies that don't always work together often leads to overspending and a lot of second-guessing.
I’ve spent years testing every oil and abrasive on the lumber I mill here on the property, as well as the oak, maple, and black locust I source from local yards. I’ve learned that a finish is only as good as the sanding that happens first. This guide will help you select the perfect curated kit to maintain and protect your wooden treasures while staying ahead of the latest safety standards. We’ll look at how these bundles take the guesswork out of grit sequences and non-toxic durability, giving you the confidence to finish your projects with the same care I put into my own work, especially when it comes to my personal favorite, cherry.
Key Takeaways
- Learn how to avoid the frustration of blotchy surfaces by using special finish and sanding bundles that synchronize the right grit sequence with the perfect artisan oil.
- Discover how to tell the difference between a project that just needs a thirsty maintenance coat and one that requires a full refinish to remove deep scratches or old stains.
- Get specific tips for finishing different species, including taming the tannins in White Oak and bringing out the natural warmth in my favorite wood, Cherry.
- Find out why using hand-vetted supplies tested on my own property-milled and yard-sourced lumber ensures your project is both beautiful and safe for your family.
- Master the Farmer Vic method for surface preparation and sanding with the grain to eliminate those pesky pigtail marks for a truly professional result.
Why Special Finish and Sanding Bundles Are Essential for Wood Longevity
I spend a good portion of my week moving between the sawmill and the workbench. Whether I am milling a fallen tree harvested right here on the property or hand-picking a few slabs of White Oak from a local lumber yard, the goal is always the same. I want a finish that honors the wood's history and stands the test of time. A lot of folks think finishing is just about slapping on some oil at the end, but it's actually a coordinated dance between your tools and your materials. That is where special finish and sanding bundles come into play. These are not just random boxes of supplies; they are curated toolkits that include the exact grit sequences and compatible finishes I use in my own shop every day.
Using a bundle eliminates the guesswork that often leads to "blotchy" results, especially on tricky species like Maple or my personal favorite, Cherry. If your sandpaper and your oil aren't on the same page, you'll end up with visible swirl marks or a finish that feels rough to the touch. When you use a system where the glue, the abrasives, and the oils are designed to work together, you ensure that every layer supports the next. It’s about creating a professional-grade workshop in a box that guarantees your project—whether it's a Black Locust bench or a set of charcuterie boards—gets the treatment it deserves.
The Science of the Sanding Sequence
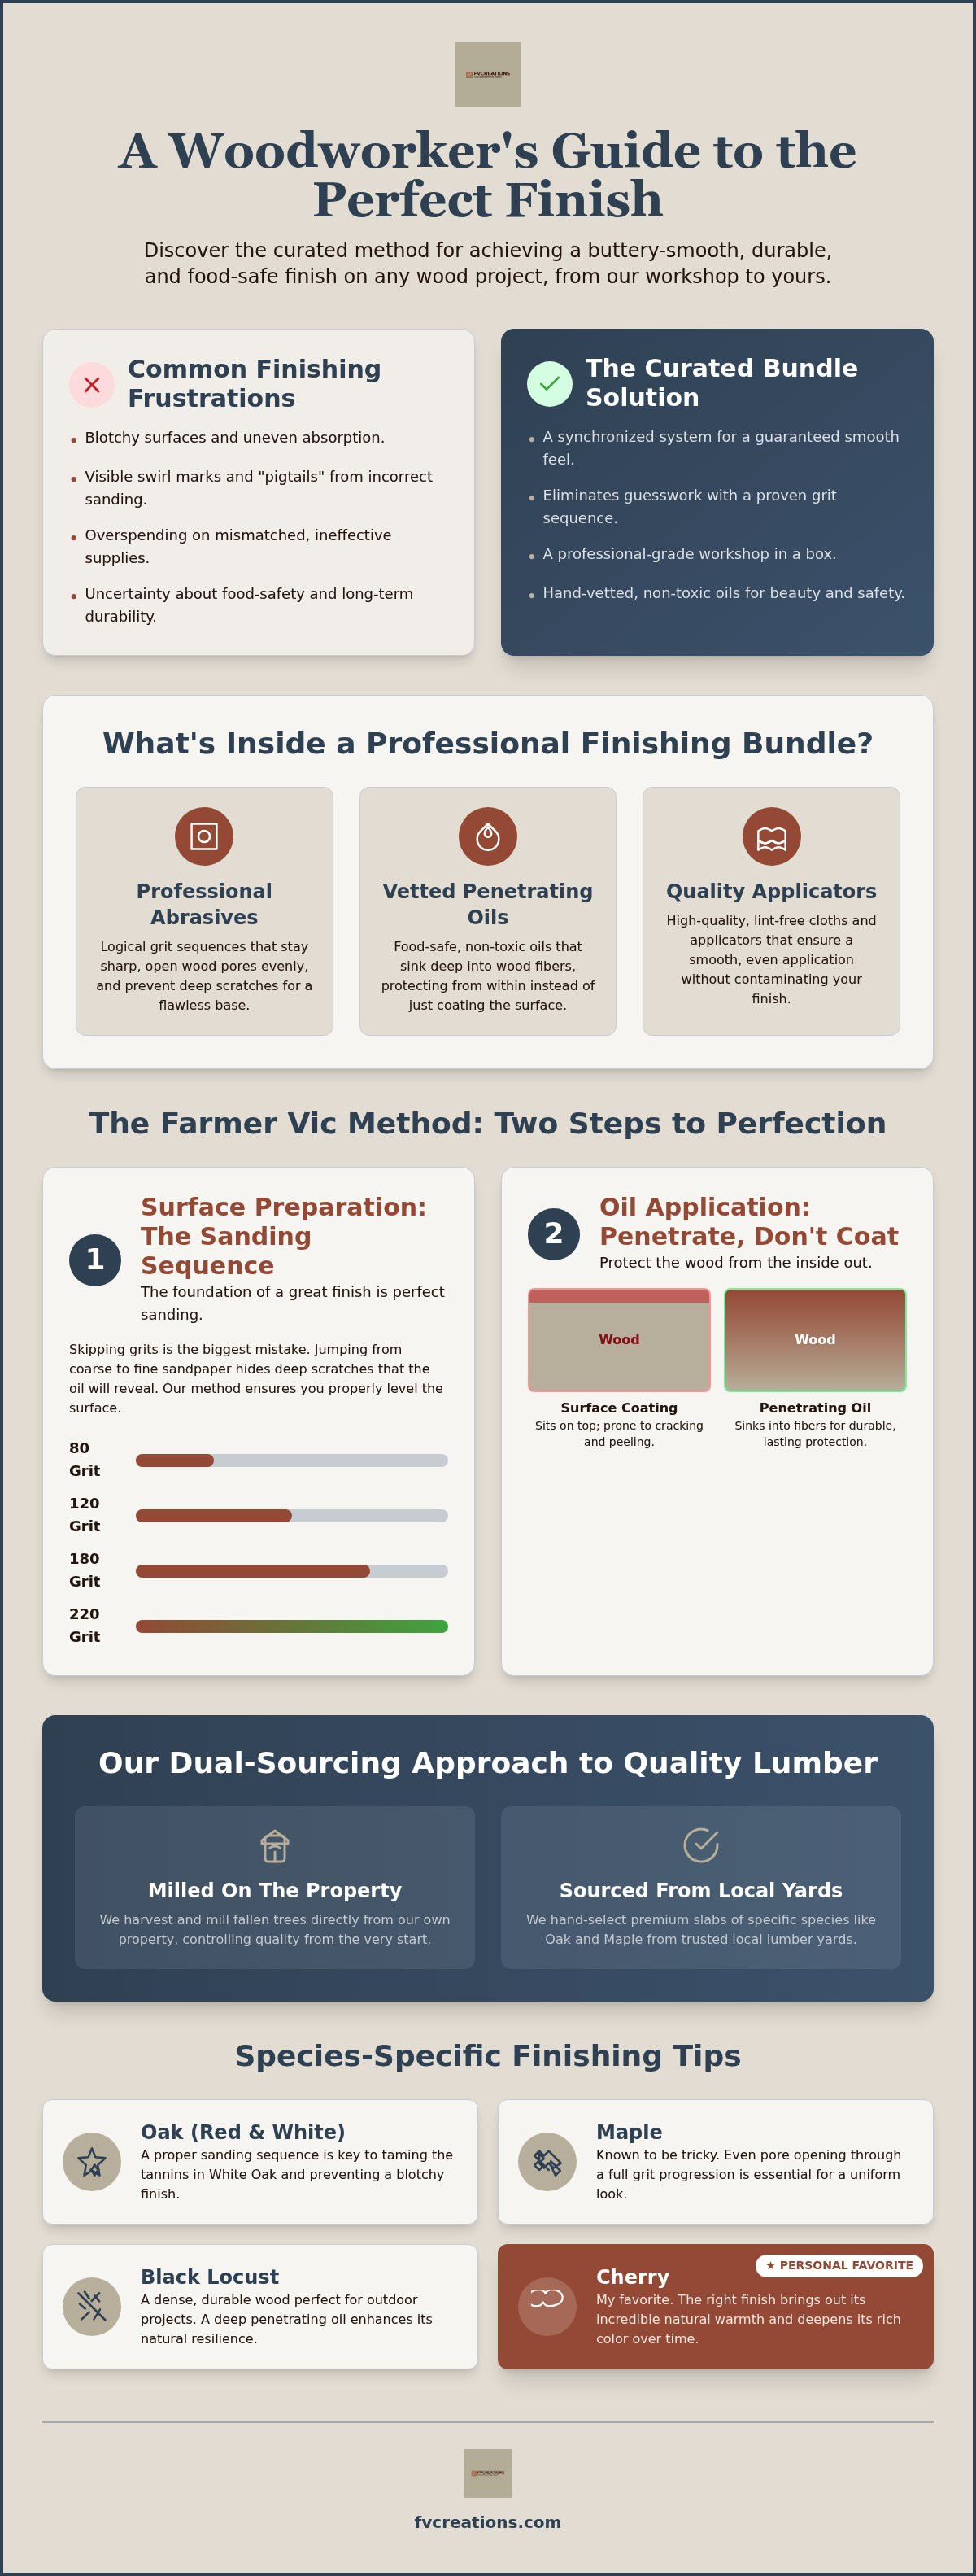
The biggest mistake I see is skipping steps in the sanding process. If you jump straight from a coarse 80-grit to a fine 220-grit, you aren't actually smoothing the wood; you're just hiding deep scratches that will show up the second you apply oil. The sandpaper collections we include in our bundles are chosen because they follow a logical progression. This sequence is vital for opening the wood pores evenly. Professional-grade abrasives stay sharp longer than the stuff you find at a big-box hardware store, which means you spend less time working and get a more uniform surface for deep oil penetration. For a comprehensive guide to wood finishing, you'll find that proper surface preparation is always the most critical stage.
The Importance of Vetted Finishes
I don't sell anything I don't use on my own projects. Our special finish and sanding bundles feature Real Milk Paint products because they are penetrating oils rather than cheap surface-level coatings. A surface coating just sits on top and eventually peels or cracks. A penetrating oil sinks deep into the fibers of the Red Oak or Maple, protecting it from the inside out. This is especially important for kitchenware. You need to know, without a doubt, that the finish on your cutting board is food-safe and durable enough to handle daily use. By using vetted supplies, you get a finish that is safe for your family and tough enough for the long haul.
Decoding the Components: What Is Inside a Professional Finishing Bundle?
When I pull together one of my special finish and sanding bundles, I am thinking about the exact steps I take when I'm working on a fresh slab of Cherry. It isn't just about having a box of supplies on hand. It is about having the right tools that won't let you down halfway through a project. Every bundle is a reflection of my own shop setup, whether I am cleaning up a piece of property-milled Black Locust or prepping a yard-sourced White Oak board. I've found that having everything in one place keeps the momentum going and ensures the final result looks exactly how you pictured it.
The foundation of any good finish is the prep work. In any beginner's guide to woodworking, you will see that sanding is non-negotiable. That is why I include specific sandpaper collections in these kits. These aren't your typical hardware store sheets that clog up after three passes. They are professional-grade abrasives designed to stay sharp through multiple grits, ensuring your surface is perfectly leveled before the oil even touches the wood. I also include high-quality applicators and lint-free cloths, because a stray piece of dust or a loose thread can ruin an otherwise perfect coat of oil.
Tung Oil vs. Board Oil: Know Your Finish
Choosing between oils can be confusing, so I have narrowed it down to what actually works. Real Milk Paint Tung Oil is my gold standard for items that need to stand up to the elements or heavy use. It provides incredible water resistance. On the other hand, my Board Oil is specifically for those daily-use kitchen items like cutting boards. It is simple, safe, and keeps the wood from drying out. If you're working with a lighter wood and want to add some immediate, rich depth, Dark Tung Oil is a fantastic choice. It gives that "aged" look without the need for messy stains. I love how it makes the grain of my favorite wood, Cherry, absolutely pop with warmth.
Adhesives and Repair Supplies
Sometimes the wood has its own ideas. You might find a small knot or a hairline crack in a piece of Red Oak you just brought home from the yard. That is why I include Starbond adhesives and BOSSDOG glues in my repair-focused bundles. Starbond is perfect for filling those tiny voids so they become part of the character rather than a flaw. For structural work, BOSSDOG Glue is what I trust to hold things together for a lifetime. When you bundle these with the right sanding supplies, you can make repairs that are practically invisible. If you're looking to start your next project right, you can check out our curated finishes to see which one fits your wood species best.
Maintenance vs. Refinishing: Which Bundle Matches Your Project?
I've spent plenty of time watching how different woods age, whether it's a slab of Maple I milled from a fallen tree on my property or a piece of White Oak I picked up from a local yard. Every piece of wood has a lifecycle. Sometimes a board just looks a bit "thirsty" or dull after a few months of heavy use. Other times, you might find an old family heirloom or a weathered piece of handcrafted wood furniture that has deep scratches and a peeling finish. Deciding which of our special finish and sanding bundles you need comes down to honest assessment of the wood's current state.
Knowing when to reach for a maintenance kit versus a full restoration kit saves you both time and money. If the wood still feels smooth but has lost its luster, you're likely in the maintenance stage. If you can feel snags, see water rings, or notice the grain starting to raise, it is time to talk about refinishing. I always tell my neighbors that it's better to stay ahead of the wear and tear. Plus, if you're already investing in one of my wood creations, you can grab these bundles at a 10% discount to keep your piece looking like it just left my workshop. For those specifically working on vintage furniture restorations, you can check out The Mid Century Design Co. for their insights on authentic mid-century features like tapered legs.
The Cutting Board Maintenance Bundle
For the smaller items that live in your kitchen, like our artisan charcuterie boards, routine care is the secret to longevity. This bundle is designed for that "refresh" stage. It includes food-safe oils and high-grit sandpaper that won't strip away the wood's character but will smooth out those light knife marks. I recommend using this kit every few months, or whenever the wood starts to feel dry to the touch. Regular oiling prevents the fibers from becoming brittle, which is the main reason boards eventually crack or warp. It's a simple habit that keeps my favorite wood, Cherry, looking rich and vibrant for years.
The Full Refinishing Bundle
When a project needs more than just a quick wipe-down, you need the heavy hitters. Our full refinishing special finish and sanding bundles are built for total restoration. These are the kits I use for property-harvested raw wood or furniture that has seen better days. They include a wider grit range, starting at an aggressive 80-grit to level out stains and deep gouges, moving all the way up to a smooth 220-grit finish. For items that spend their lives on the porch or in the garden, these bundles often feature Outdoor Defense Oil. This provides a much deeper level of protection against moisture and sun than a standard board oil ever could.
Species-Specific Finishing: Matching Bundles to Oak, Maple, and Cherry
I’ve spent countless hours in my shop working with a wide variety of hardwoods. Some days I am running a log of Black Locust through my sawmill here on the property. Other days, I am picking up a few choice slabs of White Oak from a local yard. I’ve learned the hard way that a one-size-fits-all approach to finishing just doesn't work. Each species has a unique cell structure that dictates how it absorbs oil. That’s exactly why I’ve put together different special finish and sanding bundles. You need the right combination of abrasives and oils to bring out the best in the specific board you’re holding.
Property-harvested wood often presents a different challenge than lumber you buy at a yard. Raw wood straight from the mill usually has more surface irregularities and mill marks. This means your initial sanding stage needs to be more thorough and aggressive. Yard-sourced lumber is often surfaced on two sides already, but it still requires a careful grit sequence to ensure the finish doesn't look blotchy. Understanding these nuances is the difference between a project that looks okay and one that looks like a masterpiece.
Finishing Farmer Vic’s Favorite: Cherry Wood
If you’ve followed my work for any length of time, you know that Cherry is my absolute favorite species. It has a warmth and a soul that other woods just can't match. However, Cherry is notorious for being temperamental. It is prone to burning if you stay in one spot too long with your sander. I always recommend using light-colored oils, like our standard Tung Oil refinish kit, to let the wood's natural darkening process happen over time. This keeps the grain clear and glowing without the muddy look that heavy stains can cause. It's about working with the wood, not against it.
Hardwood Challenges: Oak and Black Locust
When we talk about Oaks, we are really talking about two different animals. White Oak has a closed-cell structure and high tannin content, making it naturally rot-resistant. I love using Dark Tung Oil on White Oak because the pigment settles into the grain for a beautiful, aged contrast. Red Oak, on the other hand, has a very open grain. If you don't sand it properly, the finish will just sink right in and leave the surface looking uneven. Then there is Black Locust. This is one of the hardest, most durable woods I mill. It is so dense that it requires a very patient sanding approach to ensure the oil can actually penetrate the fibers. If you're ready to get started on your own hardwood project, you can find my hand-vetted finish and sanding bundles here to ensure you have the right tools for the job.
How to Get the Most Out of Your Farmer Vic Bundle
Once you have one of my special finish and sanding bundles on your workbench, the real fun begins. I’ve spent years refining this process on everything from property-milled Black Locust to yard-sourced White Oak, and I can tell you that the secret isn't just in the bottle. It is in the preparation. Before a single piece of sandpaper touches the wood, make sure the surface is clean. Any stray oils or dirt can get ground into the fibers, especially on porous woods like Red Oak, and ruin your finish before you even start. I like to wipe everything down with a clean, dry cloth just to be sure I am starting with a fresh canvas.
My method is simple: always sand with the grain. If you are using a random orbit sander, keep a close eye out for "pigtails." These are those tiny little swirl marks that show up if you move too fast or if a piece of grit gets trapped under the pad. I like to use a bright light held at a low angle to spot them early. It’s extra important on my favorite wood, Cherry, because its smooth, tight texture shows every single flaw. If you take your time here and don't rush the process, the Real Milk Paint or oils will go on like a dream, soaking in evenly across the entire surface.
Step-by-Step Bundle Application
Don't be tempted to skip a grit. My bundles are sequenced from 80 to 220 for a very specific reason. Each step is designed to remove the scratches left behind by the previous one. If you jump from 80 to 220, you'll just be polishing the tops of deep canyons. After each grit, I use a vacuum or a tack cloth to get every speck of dust off. When it’s time for the oil, I use a "wet-on-wet" technique. I apply a generous coat, let it soak in for about 15 minutes, and then apply more to any spots that look thirsty. This ensures maximum absorption and a streak-free look. Just remember that patience is a tool, too. Curing takes time, but that wait is what makes the finish durable enough for a lifetime of use.
Ready to Restore? Shop the Collection
I’ve hand-vetted every item in these kits because I want you to have the same confidence in your workshop that I have in mine. Whether you are prepping a dense Maple board or refinishing a family heirloom, these special finish and sanding bundles are designed to give you professional results without the overspending. Don't forget that you get a 10% discount on these supplies when you pair them with any of my wood creations. Plus, I offer free shipping on all bundles within the United States. If you're ready to start your next project with the right supplies, browse our Special Finish and Sanding Bundles here.
Bring Your Next Woodworking Project to Life
Taking a raw slab of property-milled Black Locust or yard-sourced White Oak and turning it into something beautiful is one of the most rewarding things I get to do. We've covered why the right sequence of abrasives is the foundation of every great piece and how matching your oil to the wood species prevents those frustrating blotches. Whether you're working with the density of Maple or the natural warmth of my favorite wood, Cherry, having the right supplies makes all the difference. My special finish and sanding bundles are curated from the exact tools I trust in my workshop every day.
Every bundle is hand-vetted and tested to ensure your project gets the professional results it deserves. You'll get free shipping on all US orders; plus, you can even take advantage of a 10% discount when you combine these supplies with any of my handcrafted wood items. It's about giving you a professional-grade workshop in a box so you can focus on the joy of creating. I can't wait to see what you build next—and if you're looking for a way to celebrate your latest creation, you can learn more about Il Forno Restobar & Lounge to discover a dining experience that values craftsmanship as much as we do.
Shop Farmer Vic’s Special Finish and Sanding Bundles
Frequently Asked Questions
Do these bundles include enough sandpaper for a large dining table?
Our current bundles provide enough abrasives for several smaller projects or a single medium-sized item like a coffee table. For a large dining table, you'll likely need to pick up some extra sandpaper sheets to cover that much surface area. I've sized these kits to be a perfect solution for the typical items I build, such as charcuterie boards or smaller benches.
Are the oils in the cutting board bundles 100% food safe?
Yes, every oil included in our maintenance and refinishing kits is 100% food safe once it has fully cured. I use these exact same finishes on the charcuterie boards I create from property-milled Cherry and yard-sourced Maple. You can feel confident using these special finish and sanding bundles on any wooden surface that comes into contact with your family's meals.
Can I use the Dark Tung Oil bundle on light woods like Maple?
You certainly can, and it's a fantastic way to give light-colored woods an aged, antique appearance. The dark pigment in the oil settles into the grain, providing a beautiful contrast that highlights the wood's natural character. It is a popular choice for folks who want to add immediate depth to a project without the mess of using traditional stains.
How long does the finish take to cure after using a bundle?
Most of the penetrating oils we provide reach a partial cure within 7 to 15 days, but a full cure takes about 30 days. While the wood will feel dry to the touch much sooner, I recommend waiting for that full 30-day window before heavy use. This patience ensures the finish is as durable and water-resistant as possible for the long haul.
Do I need a power sander to use these bundles, or can I sand by hand?
You can use these bundles for both hand sanding and power sanding depending on your preference. The sandpaper sheets are professional-grade and work exceptionally well if you prefer the tactile feel of hand-sanding your project. However, if you're working on a dense species like Black Locust, using a random orbit sander will save you a lot of effort during the initial stages.
What happens if I skip a grit in the sanding sequence?
Skipping a grit leaves deep scratches from the previous stage that the finer paper simply cannot reach or smooth out. These marks often stay hidden until you apply the oil, at which point they become very visible and distracting. Following the full 80-120-180-220 sequence in our special finish and sanding bundles is the only way to ensure a professional result.
Does the 10% discount apply if I buy a bundle and a charcuterie board together?
Yes, the 10% discount applies automatically whenever you pair a supply bundle with one of our handcrafted wood creations. Whether you're picking up a new charcuterie board or one of our cedar planters, adding a maintenance kit is a smart way to save. It's my way of helping you keep your new piece looking its best for years to come.
Is shipping really free for all bundles in the US?
We offer free shipping on every single bundle order within the United States with no hidden fees or minimum purchase requirements. I want to make it as easy as possible for you to get the hand-vetted supplies you need delivered right to your workshop door. It's part of my commitment to being a helpful resource for fellow makers in our community.