

How to Choose Quality Wood at the Lumberyard: A Pro Guide
You stand at the gate of the local yard, truck idling, staring at a sea of stacks and feeling like a total outsider while forklifts zip past. It's a common feeling for many woodworkers. I'm here to tell you that the secret to getting the best material isn't about having a secret handshake. Learning how to buy good lumber from a lumberyard; is about knowing exactly what your project needs before you step onto the gravel. Whether I'm milling timber on my property or heading into town to supplement my stock, the vetting process is the same. I know how frustrating it is to get a board home only to watch it twist into a propeller because you missed a subtle defect.
I want to give you the confidence to order by phone or stand your ground in the stacks. We'll break down the jargon that makes people overpay and look at how to distinguish between species like Black Locust or the differences in Red and White Oak. I'll also share why Cherry remains my favorite species and how to spot the 2026 FAS grade boards that are worth the investment. By the time we're done, you'll know how to inspect for hidden tension and select the perfect Maple or Oak for your next build.
Key Takeaways
- Learn why professional woodworkers prefer kiln-dried, furniture-grade material over big box options and how to buy good lumber from a lumberyard; it is about quality control from the very first board.
- Master the "lumber-ese" of thicknesses like 4/4 and 8/4 to ensure you order exactly what your project requires without wasting money on incorrect measurements.
- Discover the best uses for species like rot-resistant White Oak, versatile Maple, or durable Black Locust, and see why Cherry remains my personal favorite for its rich, aging color.
- Practice the "sighting" technique to spot defects like twist and bow, a skill I use for every piece I build, whether the wood is from the yard or milled on my property.
- Understand the essential steps for stacking and acclimating your lumber to keep boards flat and stable once they arrive in your workshop.
Stepping Into the Yard: Why Artisans Skip the Big Box Stores
Walking into a professional lumberyard can feel like you've accidentally wandered onto a busy movie set. Forklifts zip past with tall stacks of oak, the air smells thick with fresh sawdust, and everyone seems to be in a hurry. It is worlds away from the climate-controlled, quiet aisles of a big box store, and that is exactly why I prefer it. I've spent years figuring out how to buy good lumber from a lumberyard; specifically, I look for moisture stability and grain orientation that retail chains just don't prioritize. These yards cater to builders and artisans who need wood that stays flat long after the project is finished.
Big box stores mostly stock "construction-grade" lumber. This wood is often grown fast and harvested young, meant for the hidden framing of a house where a little twist won't hurt anything. Furniture-grade lumber is a different beast entirely. It is dried more slowly and sorted according to official timber grading standards to ensure you're getting clear, usable material. If you want your dining table to stay level, you need wood that has been handled with care from the forest to the rack.
The Quality Gap: Big Box vs. Professional Yard
Retail chains love to sell S4S lumber, which means the board is surfaced on four sides. While it looks ready to use, these boards are often planed to specific dimensions before the wood has finished moving. By the time you get them home, they've likely bowed or cupped because the internal tension wasn't accounted for. Professional yards offer rough-sawn options. This allows me to mill the wood to my own exact specifications in my shop, which preserves the stability of the grain. You'll also find a variety there that retail chains simply don't carry. You aren't limited to construction pine. You can choose between the rot-resistance of White Oak, the density of Black Locust, or the clean lines of Hard Maple. This level of material selection is also what sets professional custom home builders vancouver apart when constructing high-end residential properties.
My Sourcing Philosophy: Milling and Buying
I take a dual approach to my materials. Many of the unique pieces I create, like my charcuterie boards, start with timber I mill directly from my own property. This gives me access to incredible character and history that you just can't buy. However, for larger furniture projects or specific species like Cherry, which is my absolute favorite to work with, I head to the yard. I love the way Cherry ages into a deep, rich red over time.
Building a relationship with your yard manager is the best pro tip I can give. Once they know you're an artisan who values quality, they'll often point you toward a hidden gem in the stacks. Learning the ropes of how to buy good lumber from a lumberyard; can change your entire perspective on woodworking, turning a simple trip for supplies into a partnership in your craft.
Cracking the Code: Understanding ‘Lumber-ese’ and Board Feet
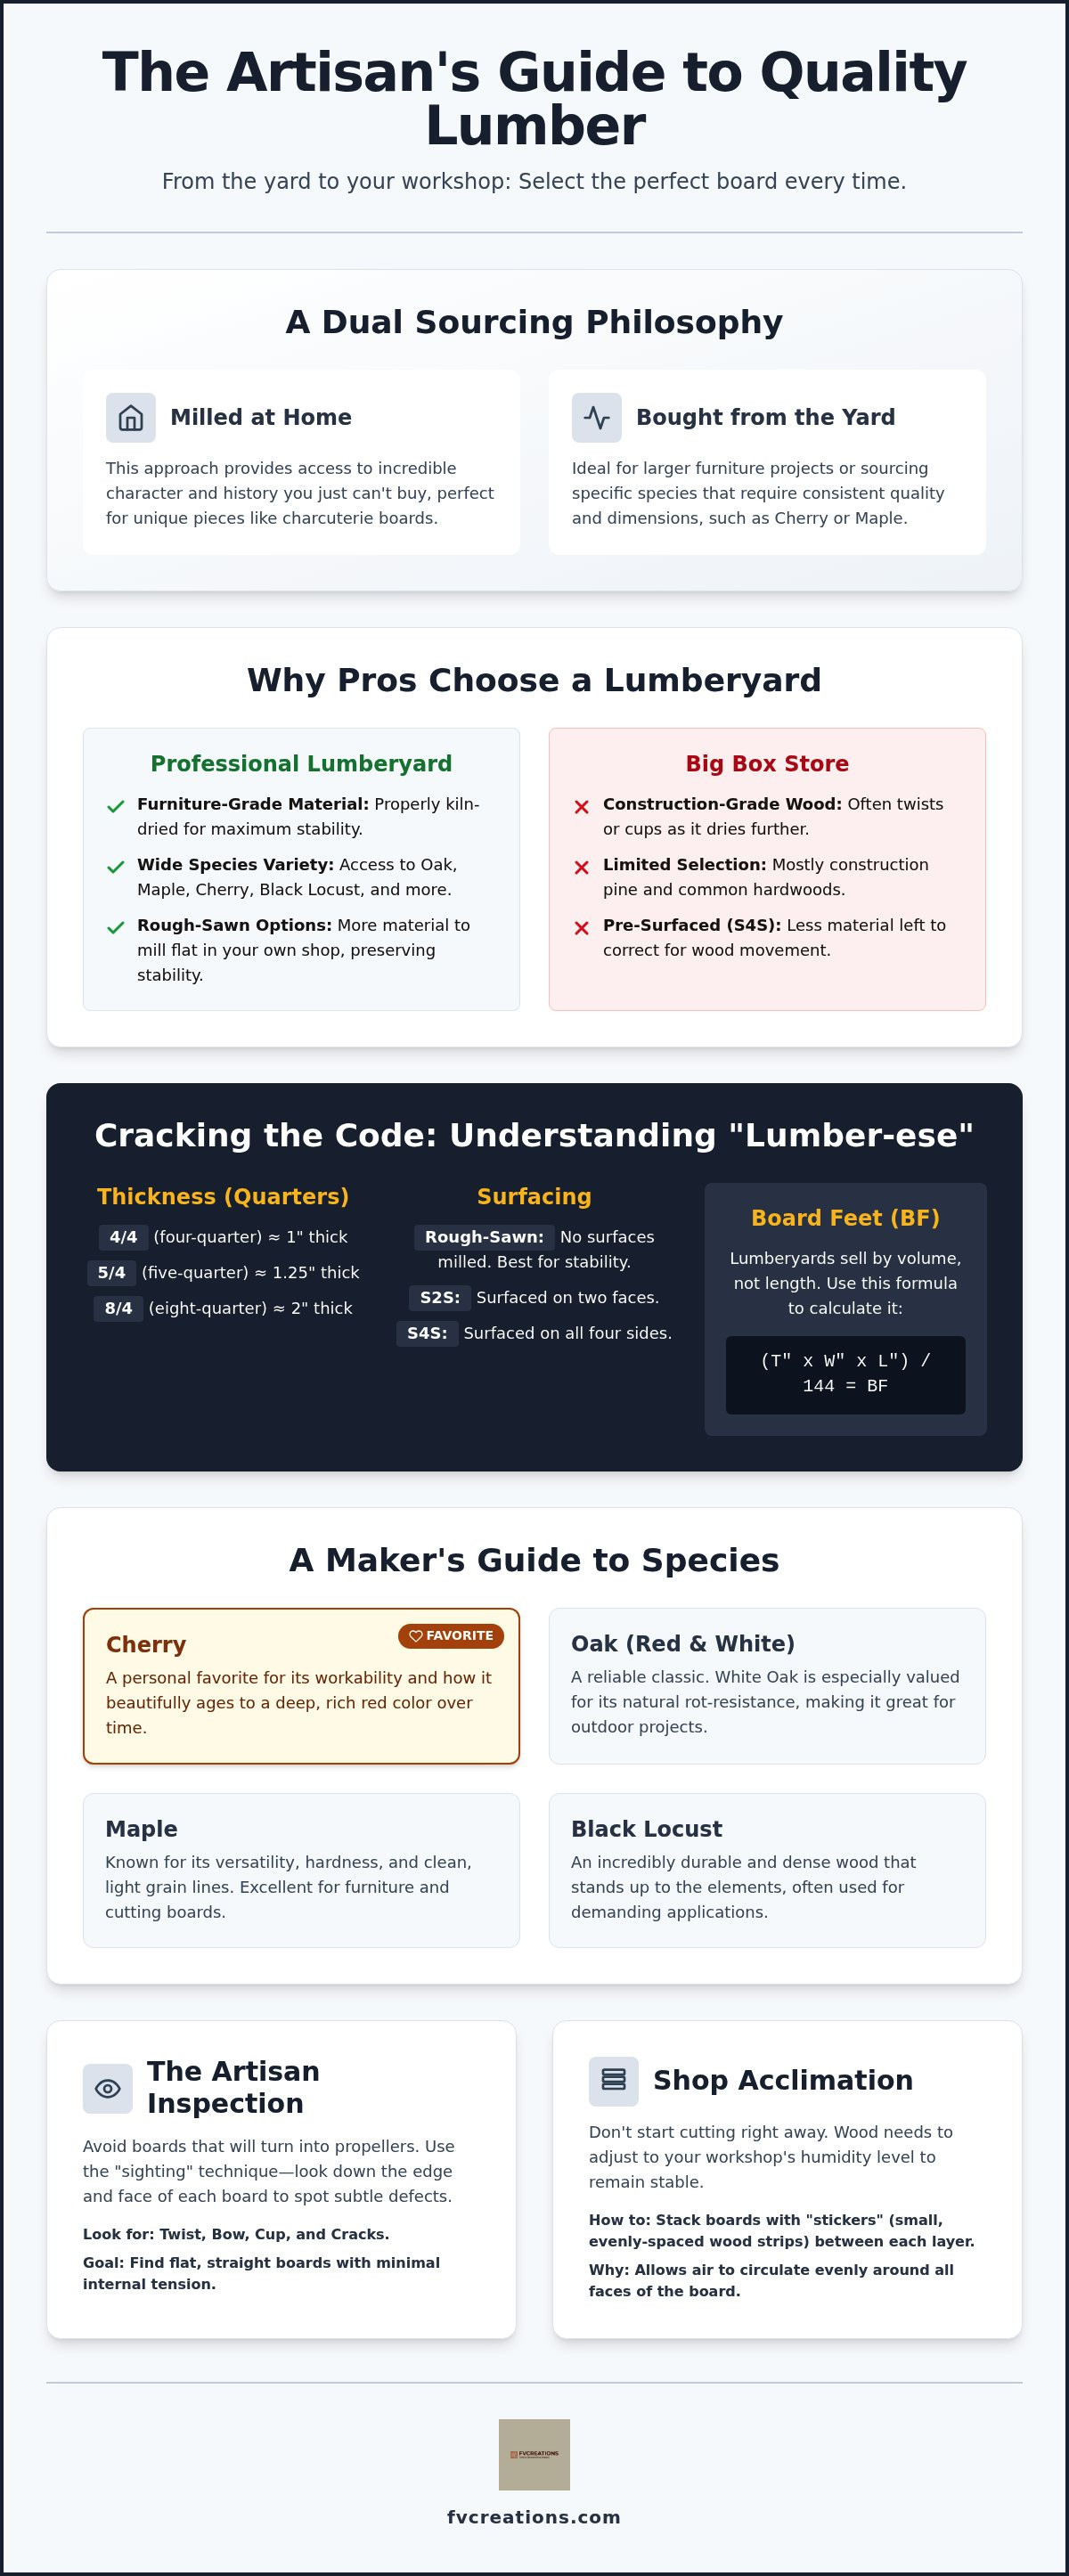
If you want to master how to buy good lumber from a lumberyard; you have to learn the language. It isn't just about feet and inches like you'd find at a typical hardware store. Hardwood yards use a "quarter" system to describe thickness. A standard one inch board is called 4/4 (four-quarter). A slightly thicker board for a heavy table top might be 5/4 or 8/4. This might seem like extra math, but it's how the pros talk. When I'm milling wood on my property, I think in these same increments because they translate perfectly to the shop tools I use every day.
You also need to understand surfacing before you pull a single board. You'll see labels like S2S (surfaced on two sides) or S4S (surfaced on four). I generally recommend buying rough-sawn or S2S. This gives you more material to work with when you're trying to get a board perfectly flat in your own shop. If you buy S4S, the yard has already taken off a lot of wood. This leaves you very little room for error if the board decides to move or twist once it gets to your workshop. Whether you're hunting for the density of Black Locust or the clean look of Maple, starting with a thicker, rougher board is usually the safer bet.
Calculating Board Feet Without the Headache
Unlike retail stores where you buy by the linear foot, professional yards sell by volume. Board feet (BF) measures how much wood is actually in the board: (Thickness in inches x Width in inches x Length in inches) / 144. This is the only math you truly need. Keep in mind that 4/4 lumber isn't exactly one inch thick after it's been planed. It usually finishes around 3/4 of an inch. I always buy 15 to 20 percent more than my plan requires. Between knots, cracks, or a simple mistake at the saw, you'll be glad you have that extra Cherry or Maple on hand.
Grain Patterns and Project Stability
The way a board is cut from the log determines how it will behave in your home. Flat-sawn boards show those beautiful "cathedral" arches. They look stunning on a table top, especially in a species like Cherry, which is my personal favorite for its warm, aging character. However, for outdoor items, quarter-sawn wood is the gold standard. The grain runs vertically through the thickness, making it much less likely to cup or twist when the humidity changes. When I'm selecting White Oak for a build, I look for rift or quarter-sawn grain for the legs to ensure they stay straight for decades. If you're building something for the elements, finishing it with Outdoor Defense Oil is the best way to protect that carefully chosen grain.
A Maker’s Guide to Species: From Reliable Oak to My Favorite Cherry
Once you understand the math and the jargon, the real fun begins. Choosing the right species is where your project starts to take on its own personality. I often mill timber directly from my own property, which gives me a deep connection to the grain, but I also know how to buy good lumber from a lumberyard; when I need specific properties or dimensions. Every tree has a story, and as a maker, it's your job to pick the one that fits the life of the piece you're building. Whether you are looking for durability or aesthetics, the species you choose dictates how the wood will move and age in your home.
The Oak Debate: Red vs. White
Oak is a staple in my shop, but Red and White Oak are very different characters. White Oak is the workhorse for anything that might see a bit of moisture. It has a unique cellular structure that essentially plugs its own pores, making it incredibly rot-resistant. This is why I use it for the heavy support structures in my cedar planters. Red Oak, on the other hand, has open pores. If you blow into one end of a short Red Oak board, you can actually see bubbles come out the other side in a bucket of water. It's beautiful for indoor furniture and takes stain very well, but it will rot quickly if left outside. You can tell them apart by looking at the end grain; White Oak will look "clogged" with a substance called tyloses, while Red Oak looks like a bundle of tiny open straw holes.
Farmer Vic’s Favorite: The Magic of Cherry Wood
If you ask me what my absolute favorite wood is, the answer is always Cherry. There's just something special about the way it behaves under a hand plane. It has a tight, consistent grain that makes it a dream to sand and finish. What I love most is how it changes over time. Cherry is photosensitive; it literally "tans" in the sunlight. A piece that starts as a pale salmon color will deepen into a rich, dark reddish-brown within a year. I find that matching these warm natural tones with traditional finishes like Real Milk Paint creates a look that feels both historic and timeless. It's a species that rewards patience.
Black Locust and Hard Maple
When you need something truly indestructible, look for Black Locust. It's a sustainable, naturally rot-resistant alternative to pressure-treated lumber. It's incredibly dense and will likely outlast the person who built the project. For high-use interior pieces like handcrafted wood desks, Hard Maple is my go-to. It's tough enough to handle daily wear without denting easily. Just a heads-up when you're machining it: Maple is prone to burn marks if your saw blades are dull or your feed rate is too slow. Keep your tools sharp and keep the wood moving to maintain that clean, creamy look.
The Artisan Inspection: How to Spot a Good Board (and Avoid the Duds)
I've stood in the dusty aisles of a lumberyard more times than I can count, and I still get a little thrill when I find a hidden gem in a stack of rough-cut Oak. Whether I am milling timber on my property or picking through a fresh delivery at the yard, the inspection process is exactly the same. You have to use your eyes and your hands to tell the story of the tree. Knowing how to buy good lumber from a lumberyard; involves a bit of detective work. You are looking for a board that wants to stay flat, not one that is fighting to turn back into a tree branch the moment you cut it.
The "Sighting" technique is your most valuable tool. Pick up one end of the board, hold it up to your eye like a telescope, and look down the length toward the other end. You are looking for the "Big Four" warps that can ruin a project. A cup happens across the width of the board. A bow is a curve along the flat face. A crook is a bend along the edge. The twist is the worst of them all; it looks like a propeller and is almost impossible to mill out without losing most of your thickness. If the board looks like a roller coaster, put it back in the stack.
Consistency matters just as much as flatness. Look at the difference between sapwood and heartwood. Sapwood is the lighter, living outer layer of the tree, while heartwood is the darker, denser center. In my favorite species, Cherry, the contrast between the creamy sapwood and the deep red heartwood is beautiful, but it can be a headache if you don't plan your cuts around it. For a uniform finish on a tabletop, you want heartwood consistency across all your boards.
The Defect Checklist
Always check the ends of the boards for "checking." These are small cracks that form as the wood dries. If you see a three inch crack at the end, plan on losing at least six inches of that board to be safe. You should also watch out for knots. A tight, "live" knot can be a beautiful character feature in a rustic piece, but a "dead" knot with a black ring around it will eventually fall out. Most importantly, look for "tension wood." If the grain looks fuzzy or distorted, it might be reactive wood that will pinch your saw blade and move unpredictably when you cut it.
Fixing Minor Imperfections
Don't be afraid of a little "rough" if the price and the grain are right. Small cracks, voids, or knots aren't always dealbreakers. I often use Starbond adhesives to stabilize these minor imperfections. A bit of thin CA glue can turn a potential defect into a permanent, stable part of the design. Once you've stabilized the wood, using high-quality sandpaper is essential to reveal the true potential of the grain. A good sanding session often shows that a board you almost passed on is actually the star of the show. If you want to make sure your hard-earned lumber stays in top shape, check out our professional-grade adhesives to keep your joinery rock solid.
From the Yard to Your Shop: Acclimating and Preparing Your Wood
You’ve just unloaded a beautiful stack of White Oak or perhaps some of that creamy Hard Maple I mentioned earlier. You are excited to start. But if you want to truly master how to buy good lumber from a lumberyard; you have to respect the rest period. Wood is a living, breathing material. It’s essentially a bundle of straws that wants to reach Equilibrium Moisture Content (EMC) with its new environment. If your shop is drier than the kiln where the wood was processed, the boards will shrink. If you cut them before they stabilize, your joinery will fail within a season.
When I bring wood home, I never just lean it against a workshop wall. That is a recipe for a bowed board. I use a technique called stickering. I lay the boards flat on a level surface and place small, uniform scraps of wood, which we call stickers, between every layer. This allows air to circulate around all four sides of each board. Whether it is a piece of property-milled Black Locust or a prime slab of Cherry, the goal is uniform drying to prevent internal tension from pulling the board out of square.
The Acclimation Process
How long you wait depends on the species and the thickness of the material. For standard 4/4 boards, I usually give them at least one to two weeks in the shop. Thicker 8/4 slabs might need even longer to settle. The worst place you can store your new lumber is a drafty garage or a sunroom with huge temperature swings. You want the wood to get used to the conditions where the finished piece will actually live. I always use a moisture meter to verify that the core of the wood matches the surface before I make my first cut. It’s the only way to be sure.
Sealing and Protecting Your Investment
The ends of a board are like the open ends of straws. Moisture leaves the end grain much faster than the faces, which causes the ends to shrink and crack. Sealing the end grain is the secret to preventing those "seasonal movement" cracks that can ruin a fine piece of Cherry. For my outdoor projects, I often apply Outdoor Defense Oil early in the process to help regulate moisture during the resting phase. This extra step ensures the longevity of the wood before the building even begins.
If you are planning a traditional finish, preparing the surface is the next critical step. A clean, stable surface is necessary for a successful Real Milk Paint application. Taking the time to let your wood rest ensures that your hard work won't be undone by a board that decides to move after the paint has dried. Patience is the hallmark of a true artisan, and it starts the moment you get back from the yard.
Master the Stacks and Build with Confidence
Sourcing the right material is the foundation of every project I build. Whether I am milling a fallen tree from my property or hunting for the perfect 8/4 Cherry at the yard, the standards never change. You now have the tools to decode the quarter system, spot a hidden twist before it hits your bench, and give your wood the time it needs to settle into your shop. These steps ensure your Hard Maple or White Oak pieces stay stable for generations.
Learning how to buy good lumber from a lumberyard; transforms you from a casual buyer into a true maker. Once you have that perfect board, you need the right supplies to finish the job. I only recommend products that I personally vet and use in my own handcrafted furniture. These are professional grade supplies for DIYers who care about quality and longevity. You've got the knowledge; now it's time to get your hands dusty and start creating.
Ready to get started? Shop Farmer Vic's Artisan Woodworking Supplies today and use the same materials I trust in my workshop every day.
Frequently Asked Questions
What is the difference between S2S and S4S lumber?
S2S means the board is surfaced on two sides, while S4S is surfaced on all four. I usually prefer S2S because it leaves the edges rough. This gives me more material to work with when I am squaring up a board in my own shop. S4S is convenient for quick projects, but it often leaves you with very little thickness to spare if the wood moves. Knowing these terms is essential for how to buy good lumber from a lumberyard; without surprises.
How do I calculate how much lumber I need for a project?
You calculate board feet by multiplying the thickness, width, and length in inches and then dividing by 144. I always tell folks to buy 15 to 20 percent more than their cut list requires. This extra waste factor covers you for knots, sapwood, or the occasional mistake at the saw. It is much better to have a few extra pieces of Maple or Cherry left over than to run back to the yard mid-project.
Is it okay to buy lumber with knots?
It really depends on the look you want and where the knot is located. Tight live knots add beautiful character to pieces like charcuterie boards. However, dead knots with black rings around them will eventually shrink and fall out. If you find a small crack or a loose knot in an otherwise perfect board, you can often stabilize it with Starbond adhesives. Just avoid knots in structural areas like table legs or chair rails.
What is the best wood for outdoor furniture like planters?
White Oak and Black Locust are the gold standards for anything living outdoors. White Oak has a closed cellular structure that naturally blocks water, which is why I use it for the support frames on my cedar planters. Black Locust is even denser and stays rot-resistant for decades without any chemical treatments. Both species are far superior to standard pine or poplar when you need a project to survive the rain and soil.
How long should I let my lumber acclimate before building?
I recommend letting your lumber rest in your shop for at least one to two weeks before you make your first cut. This gives the wood time to reach equilibrium with the humidity in your workspace. If you start building the same day you get home, your joinery might shift or crack as the wood moves. I always stack my boards flat with stickers between them to ensure even airflow throughout the entire resting phase.
Can I use Red Oak for outdoor projects if I seal it well?
I strongly advise against using Red Oak for outdoor furniture. While it is a tough wood for indoor tables, its open pores act like tiny straws that pull moisture deep into the grain. This leads to rot and fungal growth very quickly, even if you apply a heavy sealer. For projects that stay outside, you are much better off choosing White Oak or Black Locust. These species have the natural defenses that Red Oak simply lacks.
What does FAS stand for in lumber grading?
FAS stands for First and Seconds, which is the top grade for hardwood lumber according to 2026 industry standards. This grade guarantees you are getting the highest quality boards with the fewest defects. To meet FAS standards, a board must be at least six inches wide and eight feet long, providing a high percentage of clear wood. When you are figuring out how to buy good lumber from a lumberyard; for fine furniture, asking for FAS ensures you get the best grain possible.
Why is Cherry wood more expensive than Pine or Poplar?
Cherry is a premium hardwood that offers a level of beauty and stability you just won't find in Pine or Poplar. It is my absolute favorite species because of its smooth grain and the way it tans into a deep, rich red in the sunlight. While Pine is fine for basic construction, Cherry is a legacy material. Its durability and the way it responds to a hand plane make it worth the higher price for heirloom pieces.