

How to Identify Wood Finish by Testing Its Surface
A glossy surface can hide a very different finish underneath. Learning how to identify wood finish starts with testing a discreet spot rather than guessing from shine alone. Denatured alcohol can dissolve shellac, lacquer thinner can soften lacquer, and a finish that resists these solvent tests may be varnish or polyurethane. Small, separate tests help narrow down the possibilities without marking a visible area.
Wax or penetrating oil can be mistaken for a clear surface coating, and the difference matters before you clean, repair, or apply another finish. This guide explains how to spot clues for wax and common penetrating finishes, test for a surface film, and distinguish polyurethane, shellac, varnish, and lacquer. The goal is a careful, practical way to assess the wood and choose your next step with more confidence.
Key Takeaways
- Test an inconspicuous spot first, since a small surface reaction can help distinguish wax from a clear coating.
- Look for how the wood responds to oil: absorption can point to a penetrating finish, while beading suggests a surface coating.
- Use acetone results as clues, not a guess based on shine alone; different finishes soften, bead, or dissolve in distinct ways.
- A careful scrape in a hidden area can help reveal whether the finish forms a film on top of the wood.
- Once you understand the existing surface, choose a compatible finish for the piece; FVCreations offers Real Milk Paint Co. Finishes.
Recognizing wax and testing for its presence
Test a hidden patch before cleaning or recoating furniture. A light scratch and careful solvent checks can help distinguish wax from other finishes.
-
Choose a discreet test area
Start on the inside of a leg or another hidden spot. Brush away loose dust, then examine the existing finish before applying anything. On an old or antique piece, even a hidden patch may have original color or a delicate coating. Solvents can soften or remove that finish, so keep each test small and stop if the surface changes unexpectedly.
For a low-impact check, use a clean cotton swab and just a little test liquid. Work in a well-ventilated area, wearing chemical-resistant gloves and safety glasses when using solvents. Keep liquids away from open flames and surrounding surfaces. To identify a finish while minimizing the risk of damage, start in a discreet spot and use the least aggressive test that can answer your question.
-
Scratch-test for wax
Gently drag a fingernail across an inconspicuous patch, such as the underside of a table edge. Look for a visible scratch or change in sheen. A mark from this light scrape can indicate wax, which sits on the surface rather than forming a hard coating like polyurethane.
Use light pressure; don’t use a knife or dig into the wood. A scratch is a clue, not a complete identification, so compare it with the surface feel and other test results. On an antique chair or cabinet, skip this step if even a small mark would be unacceptable. Testing in a hidden spot reduces the chance of visible damage.
-
Apply denatured alcohol or xylene
Dampen a cotton swab with denatured alcohol and touch it to a hidden patch. Shellac dissolves quickly and may transfer to the swab; varnish reacts more slowly. Use a fresh swab for each test, and don’t rub over a broad area. If the finish softens or color transfers, stop rather than repeating the test somewhere visible.
A small xylene test may make a water-based finish gummy, while oil-based urethanes and varnishes should remain unaffected. Xylene and denatured alcohol are solvents, so work in a well-ventilated area and wear chemical-resistant gloves and safety glasses. On an older finish, test only a tiny patch because a solvent reaction can permanently change its appearance.
-
Compare water and mineral spirits
Interpret results cautiously: water or mineral spirits alone can’t reliably distinguish an oil-based finish from a water-based one. Mineral spirits can help test for wax. Put a few drops on a hidden patch and cover it with a shot glass. After a few minutes, wipe gently. Softened or removed residue may indicate wax, but won’t identify the finish underneath.
To check for a penetrating oil finish, put a little linseed oil on an inconspicuous spot. Absorption suggests an oil finish, while beading suggests a surface coating such as shellac, lacquer, varnish, or polyurethane. Xylene offers another clue for water-based finishes because it may make them gummy. Keep tests separate, and don’t apply another coating until you understand how the existing finish behaves.
Common penetrating finish types
Penetrating finishes soak into wood rather than building a thick coating on top. Use these steps to assess the surface, then consider its intended use before choosing how to care for it or apply a new finish.
-
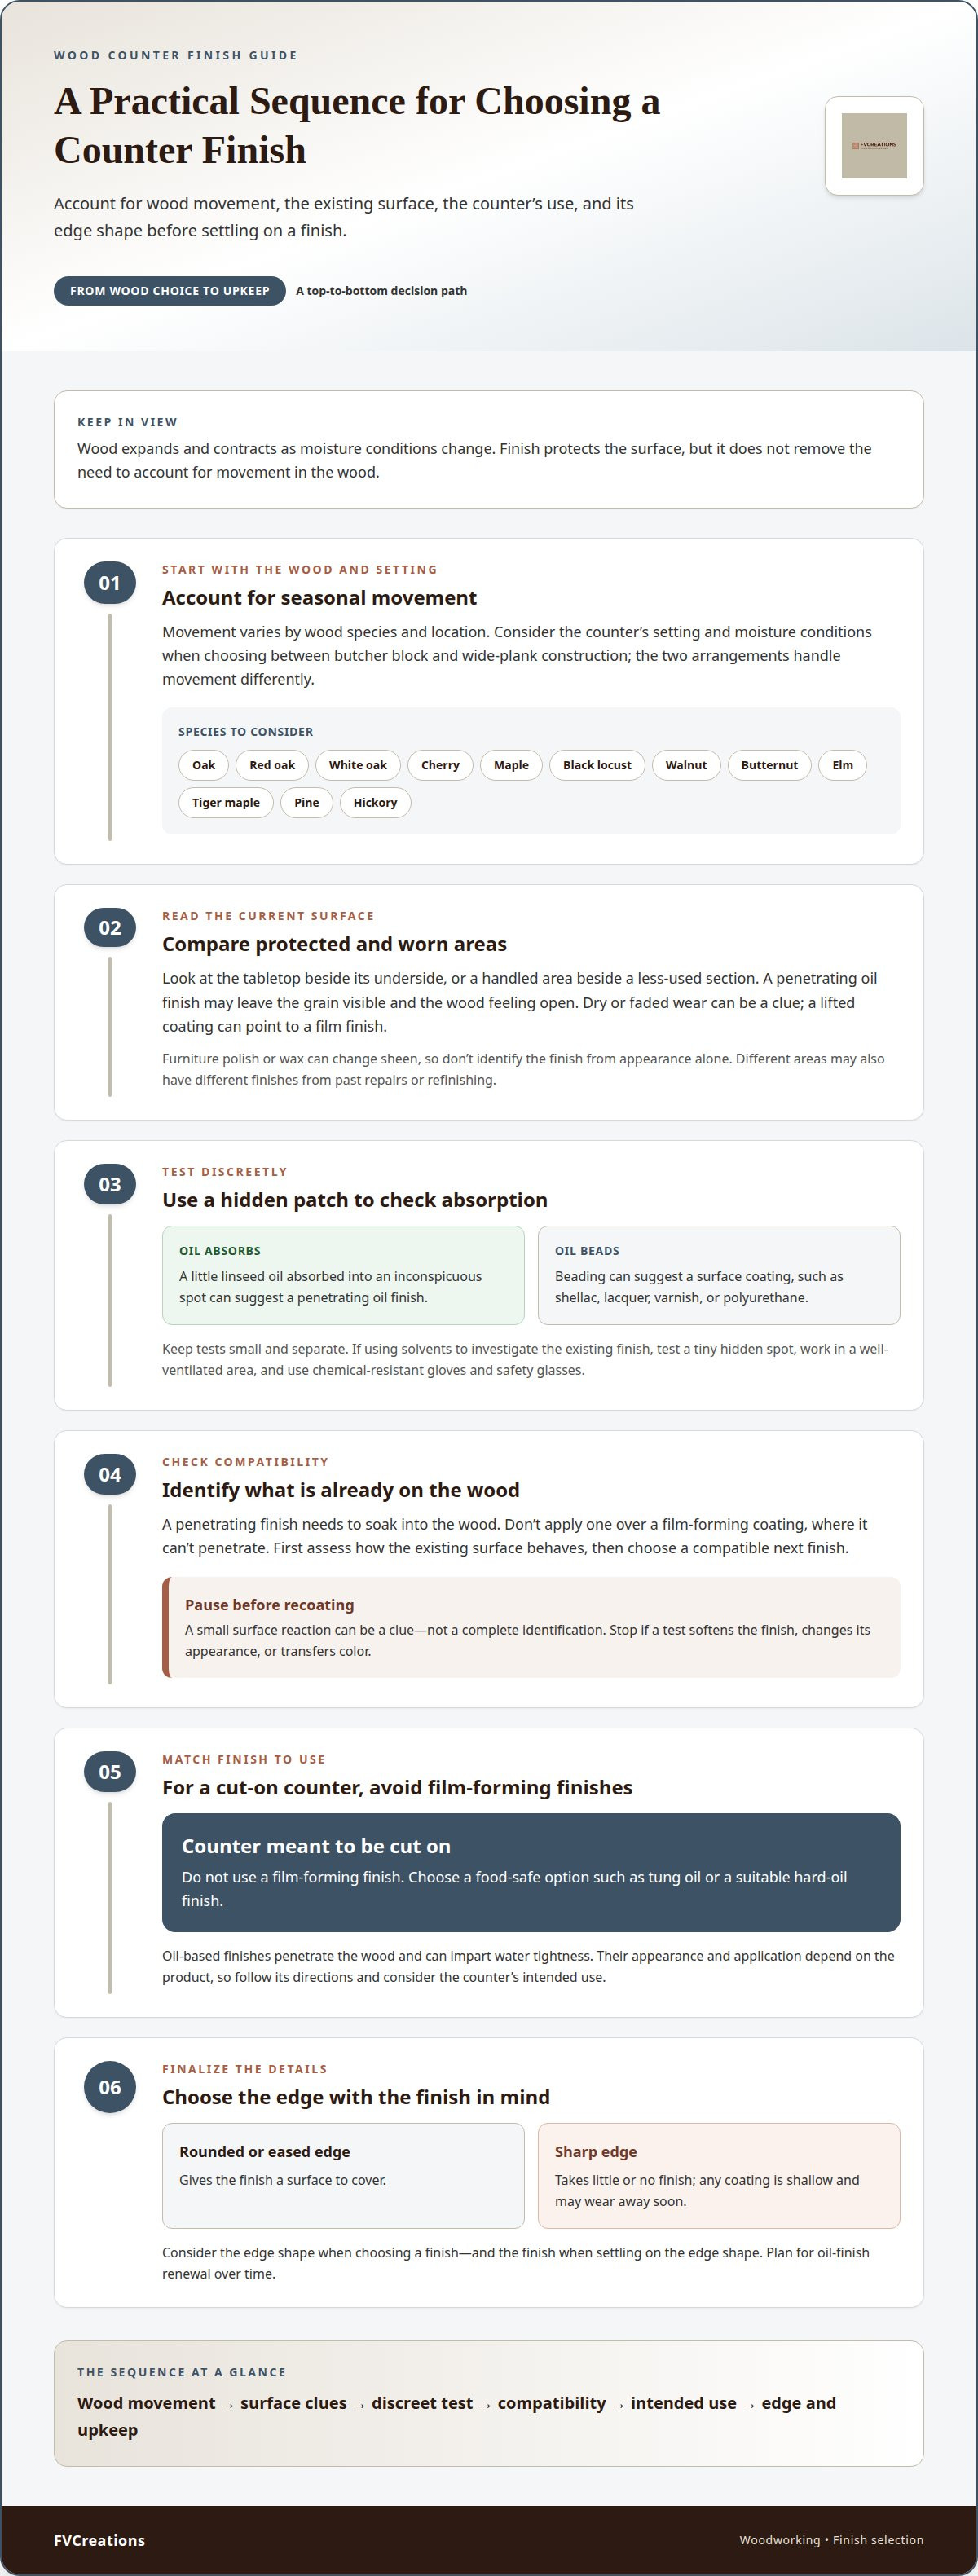
Compare the wood’s surface in protected and worn areas. Look at a tabletop beside its underside, or a chair arm beside a less-handled section. A penetrating oil finish can leave the grain visible and the wood feeling open, without a distinct coating edge where wear has occurred. Furniture polish or wax can change the sheen, so look beyond appearance alone.
Check whether wear looks like a dry or faded patch in the wood rather than a lifted coating. This difference can help distinguish a penetrating finish from a film finish. Note what you see in each spot before applying a product; repairs or past refinishing can leave different areas with different finishes.
-
Factor seasonal movement into the counter’s construction. Wood expands and contracts as moisture conditions change, and the amount varies by species and location. Oak, cherry, and maple can respond differently in a dry home than in a humid one. Account for these conditions when choosing between butcher block and wide-plank construction, since the two arrangements handle movement differently.
Consider the counter’s setting and how its wood is assembled before selecting a penetrating finish. An oil-based finish can help protect wood, but its performance and upkeep depend on the product and how the surface is used. The finish offers protection; it doesn’t remove the need to account for movement in the wood itself.
-
Match the edge profile to the finish and intended use. A rounded or eased counter edge gives the finish a surface to cover, while a sharp edge takes little or no finish. Any coating on a sharp edge is shallow and may wear away soon. Consider the edge shape when choosing a finish, and the finish when settling on the edge shape.
For a counter meant to be cut on, don’t use a film-forming finish. Choose a food-safe option, such as tung oil or a suitable hard-oil finish. The edge shape affects how well a finish holds up, so account for it before settling on the counter’s final profile.
-
Choose an oil finish with its upkeep in mind. Linseed oil and tung oil are examples of penetrating oils; some hard-oil finishes also soak into wood. Their appearance and application depend on the product, so read its directions and consider the surface’s intended use. An oil-based finish can impart water tightness, but it needs renewal over time.
Don’t apply a penetrating finish over a film-forming coating, where it can’t soak into the wood. First identify what’s already on the surface, then match your care approach to that finish. For a counter, also consider food contact, cutting use, seasonal movement, and edge shape before choosing a product.
Identifying polyurethane, shellac, varnish, and lacquer with acetone
Acetone can help narrow down a finish by showing whether it beads, turns tacky, or dissolves the coating. It can’t identify every finish on its own, so compare the reaction with another small test.
-
Test a hidden patch with acetone. Use a cotton swab to touch a small, discreet area. Watch the surface instead of rubbing hard. A finish that turns tacky may be shellac or varnish, while beading suggests polyurethane. If the coating dissolves, lacquer is one possibility, but acetone can also dissolve shellac or some water-based finishes.
That overlap matters. Treat the result as a clue, not a final answer, especially if the furniture has an unknown repair or several finish layers. Stop if color transfers or the finish changes noticeably. Limit the test to one hidden spot, then compare its reaction with what you see elsewhere on the piece.
-
Read the reaction alongside the furniture’s history. Shellac was a popular furniture finish before about 1920, so an older piece may have it. Age alone doesn’t prove the finish type, since furniture can be refinished or repaired. A tacky acetone response still needs another clue to separate shellac from varnish.
Compare a protected area, such as the underside of a drawer front, with a worn edge. Different reactions may point to a repair, polish, or multiple coatings. Don’t use the acetone result to choose a new finish until you understand these differences.
-
Use lacquer thinner as a follow-up test for lacquer. Touch a tiny amount to a separate hidden patch with a cotton swab. Lacquer thinner can dissolve lacquer, making the coating wipe away almost immediately. If the finish softens enough to nearly flow, that also points toward lacquer.
Keep this separate from the acetone test. A surface that reacts to acetone may be lacquer, shellac, or water-based, so the first reaction doesn’t settle the question. If lacquer thinner makes the coating tacky without dissolving it, don’t identify it as lacquer based on that result alone.
-
Compare the clues before deciding. Beading with acetone supports polyurethane; tackiness leaves shellac and varnish in consideration; quick dissolution suggests lacquer, shellac, or a water-based finish. A separate lacquer-thinner test can help distinguish lacquer from the other possibilities.
Use good ventilation, chemical-resistant gloves, and safety glasses for solvent testing. Keep acetone and lacquer thinner away from flames, and don’t soak the wood. If a valuable or antique surface changes during a test, stop. More solvent can remove original finish, color, or evidence of earlier repairs.
Scraping to test for a surface film
A surface film sits on top of the wood, while stain changes the wood’s color without necessarily leaving a coating. A careful scrape in a hidden spot can show whether the finish forms a separate layer.
-
Scrape the surface gently
Choose an inconspicuous area, such as the underside of a table edge, and use a sharp blade. Hold it nearly flat and make one light scrape. Aim to lift a trace of material, not cut into the wood or leave a visible gouge.
Watch the blade as it moves. A clear or translucent shaving can indicate a film finish, such as polyurethane, varnish, shellac, or lacquer. If the blade catches or exposes fresh wood, stop; pressing harder can damage both the coating and the surface beneath it.
Examine the scraped spot in good light. A distinct layer sitting above the grain supports the presence of a film, while a shallow mark without a separate shaving may point to another type of finish. Repeat only in another hidden location if the first result is unclear, and avoid testing valuable furniture where even a small mark matters.
Don’t use a blade on delicate veneer, loose finish, or carved detail. These surfaces can chip or lift under pressure. Use a sharp tool only for a controlled surface check, not to remove enough finish to dissolve it or identify its ingredients.
-
Check for a finish or stain
Compare the scraped patch with an untouched area beside it. If scraping lifts a distinct coating and changes the surface sheen, the wood likely has a film-forming finish. Polyurethane and varnish are common finishes that form a layer above the grain.
A stain, by contrast, colors the wood itself. Scraping may expose a lighter area, but it won’t necessarily produce a separate, clear shaving. Unfinished wood also lacks a distinct coating layer, though dirt, polish, or previous care products can make the surface harder to assess.
Use the grain as a reference. On a stained oak panel, color may remain visible within the grain even where a thin surface layer has been disturbed. On a coated tabletop, a lifted shaving can look different from the wood beneath it. These clues help distinguish a surface film from color that has soaked into the wood.
Consider the furniture’s history before acting on the result. An older cabinet may have stain beneath varnish, or a repaired patch may have a different coating. One scrape reveals only what’s at that spot. Compare several discreet areas, then avoid applying a new finish until you understand whether a film, stain, or both are present.
If scraping reveals no clear layer, that doesn’t prove the wood is completely unfinished. A thin or worn coating may be hard to lift, and stain can remain in the grain. Treat the blade test as one piece of evidence alongside the surface’s appearance and other test results.
Checking for wax with a fingernail
A fingernail check is a quick clue, not a complete finish identification. Compare the surface mark with how a separate test spot responds to linseed oil.
-
Choose an inconspicuous patch and use light pressure. Try the underside of a table edge or the inside face of a furniture leg. Gently drag your fingernail across the surface once rather than digging in. A visible scratch can indicate wax, which sits on the surface. Stop if the wood dents or the coating begins to lift.
Look closely at the mark in steady light. A faint line or change in sheen is more useful than a deep groove. Don’t test a prominent tabletop, delicate veneer, or fragile antique surface; even a small mark can remain visible. If the patch looks damaged, don’t repeat the test elsewhere.
-
Compare the test spot with nearby wood. Check whether the surface feels slick or has a soft, buffed sheen, then compare it with an adjacent area that sees less handling. Wax or furniture polish may build up differently on a frequently touched table edge than underneath the top. That difference can help explain why one patch scratches more easily.
Don’t treat gloss as proof of wax. Shellac, lacquer, varnish, and polyurethane can also look shiny, while wear and cleaning can make their surfaces uneven. A fingernail mark is one clue; it can’t identify the coating beneath wax or polish.
-
Use linseed oil as a separate comparison. Apply a small amount to another discreet spot and watch the surface. An oil finish absorbs linseed oil, while beading suggests a surface finish such as shellac, lacquer, varnish, or polyurethane. Keep this test separate from the fingernail scratch so the mark doesn’t affect your observations.
Wax or polish on top can complicate the comparison by changing how liquid behaves. If the oil beads, don’t immediately conclude that the wood has a film finish. Consider the fingernail clue and the condition of each test area together before deciding how to care for the surface.
-
Decide whether another test is worth the risk. On a sturdy, low-value piece, a small hidden test can provide useful evidence. On an antique or fragile finish, skip further scratching if the first mark changes the surface. Solvents can also soften or remove coatings, so use them only with good ventilation, chemical-resistant gloves, and safety glasses.
Choose a solvent test only when the result will guide your next step, and keep it small. Wood finish solvents can help with testing, but they may alter a delicate finish. Stop if color transfers or the surface turns tacky.
FVCreations: Real Milk Paint Co. Finishes
FVCreations offers specialized finishes for projects where a new surface treatment is the next step. Identifying the existing finish first can help you avoid applying a product over wax, polish, or a coating that may prevent it from bonding or soaking in.
Use what you learned from the surface tests to guide your choice. Penetrating and film-forming finishes behave differently, and the right option depends on the wood, its use, and the look you want. For a surface that will be cut on, choose a food-safe finish suited to that purpose rather than a film-forming coating.
If you’re considering a finish for your project, contact FVCreations to talk it through.
Make your next finish choice with care
Before changing a piece, decide how you want the surface to perform in everyday use. A dining table, display cabinet, and counter each face different wear, so the right finish depends on the job as well as the wood. For a counter used for cutting, choose a food-safe finish rather than a film-forming coating.
Keep a short note of what you tested and what happened. That record gives you a practical starting point if you return to the piece later or choose a compatible finish. Learning how to identify wood finish is useful beyond one repair; it helps you make considered care choices and preserve the character of furniture you value.
If you’d like to talk through a finish choice for your project, contact FVCreations about your wood finish. Take your time, trust what the surface shows, and choose the next step with care.
Frequently Asked Questions
What Finish Is That Anyway?
When learning how to identify wood finish, start by deciding what you need to do next: clean, repair, or recoat the piece. That determines how precise your identification needs to be. For routine dusting, knowing whether wax or polish is present may be enough. Before refinishing a family heirloom, identifying layered coatings can help prevent an incompatible new finish.
What are the common types of wood finish?
Common finishes include oil, wax, shellac, lacquer, varnish, and polyurethane. They differ in appearance, feel, maintenance, and protection. A dining table and a decorative cabinet, for example, may need different care because they face different wear. A finish’s name alone doesn’t tell you whether it suits a particular use; consider the furniture’s purpose and the condition of its surface.
How can you identify whether wood is finished with oil, wax, shellac, lacquer, varnish, or polyurethane?
No single visual feature reliably distinguishes all six, especially if furniture has been repaired or treated with polish. Compare the finish across several parts of the piece, such as a drawer front and its interior edge, and note whether they look alike. If they differ, record the locations and results separately. Treating the entire item as one uniform coating could lead to a poor refinishing choice.
How do you test a wood finish in an inconspicuous spot?
Choose a hidden area made from the same wood and finished alongside the visible surface, such as the underside of a removable shelf. Avoid a replacement panel or unfinished interior, since it may not match the exterior. Note the test location and what changed. This helps prevent repeating a damaging test and makes your observations useful for later maintenance.
How can denatured alcohol help identify shellac?
Shellac dissolves in denatured alcohol, making the alcohol’s effect a useful clue. Treat a reaction as a reason to pause before cleaning or recoating, not as permission to wipe the whole piece. Alcohol can remove shellac and alter the surface. On furniture with sentimental or antique value, avoid applying it broadly and preserve the existing finish until you’ve planned its care.
How can you tell whether a wood finish is oil-based or water-based?
To identify wood finish by its base, start with old project records or the product label if the original container remains. These details can help distinguish an oil-based product from a water-based one more reliably than appearance alone. If neither is available, treat the coating as unidentified when planning a repair. The distinction matters because a new coat must be compatible with the existing finish.