

How to Remove Stains From a Wood Cutting Board With Household Ingredients
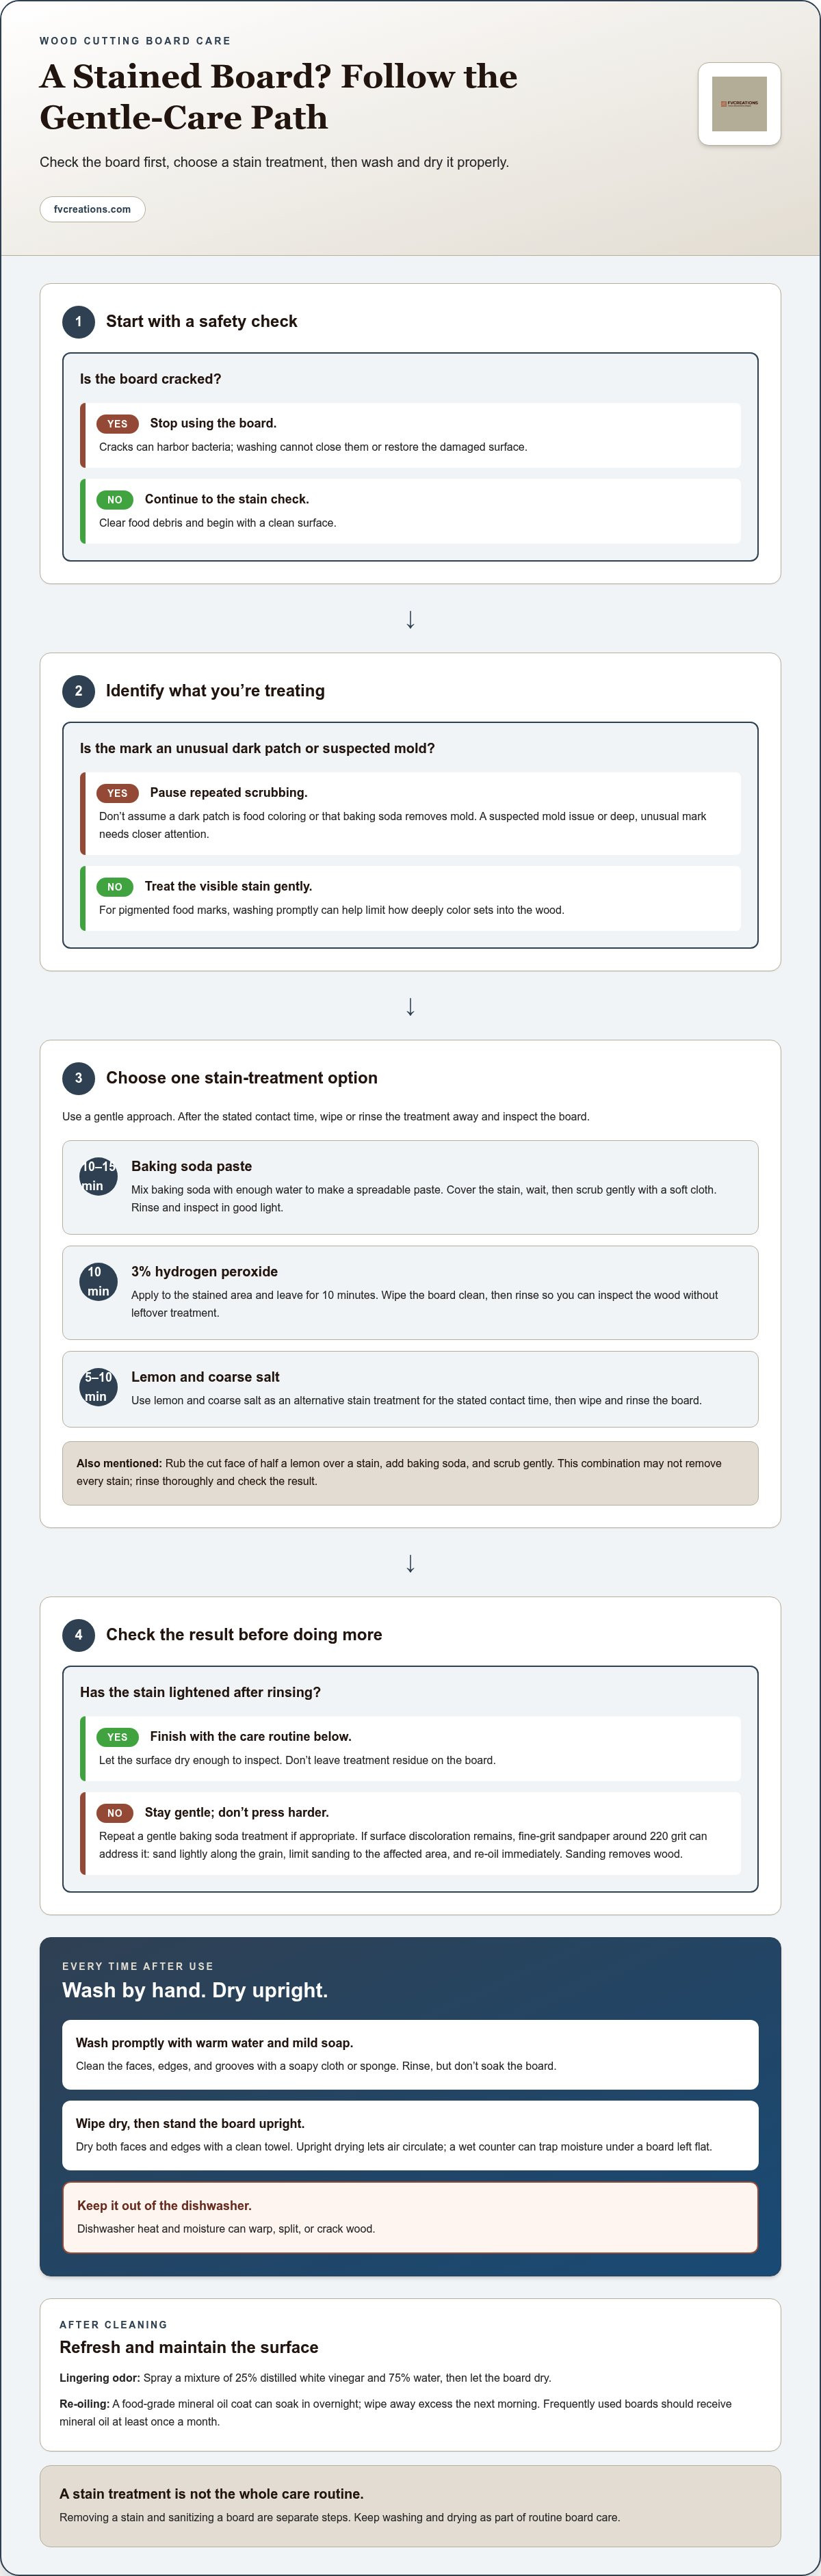
A stain doesn’t automatically mean a wood cutting board is beyond saving. For removing stains from a wood cutting board, try a baking soda paste for 10-15 minutes, 3% hydrogen peroxide for 10 minutes, or lemon and coarse salt for 5-10 minutes, then wipe and rinse. Hand-wash the board rather than putting it in the dishwasher, and dry it promptly.
It’s natural to wonder whether cleaning a mark also sanitizes the board, but stain treatment and routine washing are separate steps. Here, you’ll find practical instructions for household methods, how to wash and dry the board, and how different options performed on maple. Use these results to choose a gentle approach and care for the wood after the stain is gone.
Key Takeaways
- Try a baking soda paste on persistent marks, letting it sit for 10-15 minutes before gently scrubbing.
- Use 3% hydrogen peroxide or a lemon-and-coarse-salt scrub as alternative stain treatments, following the recommended contact times.
- Hand-wash wooden boards with warm water and mild soap, dry them promptly, and let them finish drying upright.
- Compare methods thoughtfully: tests on maple showed that some household combinations lightened stains while others didn’t.
- Remember that removing a stain and sanitizing a board are separate parts of board care.
Baking soda paste for persistent stains
For a persistent mark, apply baking soda paste, let it sit for 10-15 minutes, then scrub gently. Work on a clean board and rinse away the residue before judging whether the stain has lightened.
-
Make a Baking Soda Paste
Mix baking soda with enough water to form a spreadable paste, then cover the stain. Leave it in place for 10-15 minutes before gently scrubbing with a soft cloth. Avoid hard pressure or rough scouring tools; the aim is to work on the mark without needlessly abrading the wood. Rinse the area and inspect it in good light.
-
Treat Stains with Baking Soda and Lemon
To try baking soda and lemon, rub the cut face of half a lemon over the stain, then add baking soda and scrub gently. This combination may not remove every stain. Treat it as a cautious trial, not a dependable fix. Rinse thoroughly and check the result before deciding whether to repeat.
-
Target Food, Mold, and Dark Stains
For turmeric, beet, or berry marks, start with a baking soda paste and assess the stain after rinsing. Strongly pigmented foods can leave visible color, so wash the board promptly after use to limit how deeply marks set. A persistent dark patch may not be a surface food stain. Don’t assume baking soda removes mold or try to disguise a dark area without identifying it.
Use this sequence to keep the treatment controlled:
- Clear away food debris so the paste contacts the stained wood, not scraps on the surface.
- Dampen the baking soda gradually. A paste stays where you apply it, unlike a thin mixture that runs across the board.
- Cover only the marked area first. That makes it easier to see whether the treatment changes the stain.
- Wait 10-15 minutes, then scrub gently. Rinse off the paste instead of leaving a powdery layer behind.
- Let the surface dry enough to inspect. If color remains, repeat the gentle treatment rather than pressing harder.
If a stubborn stain remains after cleaning, fine-grit sandpaper around 220 grit can address surface discoloration. Sand along the grain, then re-oil the board immediately. Sanding removes wood, so keep it light and limited to the affected area. A deep mark, unusual dark patch, or suspected mold calls for more than repeated scrubbing; don’t treat every dark stain as food coloring. This measured approach helps distinguish a surface mark from a problem that needs closer attention.
Hand-washing wooden cutting boards
Wash a wooden board by hand after use with warm water, mild soap, and a clean towel, then let it air-dry upright. A dishwasher’s heat and moisture can warp, split, or crack the wood.
- Wash promptly after pigmented foods. Rinse the board soon after cutting beets, berries, turmeric, or other strongly colored foods. A quick wash helps keep pigments from setting deeply. Scrape away scraps first so you can clean the stained surface without rubbing food residue across the grain.
- Use warm water and mild soap. Wet the board and wash its faces, edges, and grooves with a soapy cloth or sponge. Rinse with warm water to remove soap and loosened food. Don’t soak the board in a sink; prolonged moisture can penetrate the wood rather than simply clean its surface.
- Dry the board right away. After rinsing, wipe both faces and the edges with a clean towel. Then stand the board upright so air can circulate around it. Leaving it flat on a wet counter can trap moisture underneath, while upright drying helps the surface dry evenly.
- Keep the dishwasher out of the routine. A dishwasher exposes a wooden board to sustained heat and moisture, which can cause warping, splitting, or cracking. Hand-washing avoids that combination. For a deep groove, clean inside it with a cloth instead of relying on a dishwasher cycle to clear food from the cut.
- Address lingering odors and restore the surface. For odor treatment, spray a mixture of 25% distilled white vinegar and 75% water, then let the board dry. After cleaning, a food-grade mineral oil coat can soak in overnight; wipe away excess oil the next morning. Frequently used boards should receive mineral oil at least once a month.
A stain alone doesn’t mean a board needs replacing. But avoid using a cracked board, because cracks can harbor bacteria; washing can’t close them or make the damaged surface whole. For an everyday board that’s still intact, consistent hand-washing and drying are the practical routine. If you’re choosing a wooden board for serving and food preparation, explore wooden cutting boards as another option for the kitchen.
Treat cleaning as a simple sequence: wash the board by hand, then give it room to dry. Hand-washing is preferable to putting a wooden cutting board in the dishwasher, since dishwasher heat and moisture can warp, split, or crack the wood. If the board has just been used for pigmented foods, washing it soon afterward helps keep stains from setting deeply. Once it is clean, standing it upright lets air circulate and helps prevent moisture from settling into the wood. Keeping these steps together makes the board’s care easy to follow after food preparation.
In the author’s care process, the board was washed, wiped with vinegar, left to air-dry, then treated with wood polish and conditioner. This adds a finishing step after cleaning and drying. Keeping the board upright while it dries allows air to circulate around it.
Hydrogen peroxide treatment
Use 3% hydrogen peroxide on a stained area, leave it for 10 minutes, then wipe the board clean. Apply it carefully and rinse afterward so you can inspect the wood without leftover treatment.
- Start with a clean surface. Remove food scraps and wash the stained spot with mild soap and water. Dry it with a clean towel before applying hydrogen peroxide. A clean surface lets the liquid contact the mark directly, rather than mixing with beet juice, berry pulp, or other food residue.
- Use 3% hydrogen peroxide. Check the bottle label before treating the board; the recommended strength for this stain method is 3%. Apply the liquid to a clean cloth or directly to the stained area. Keep the treatment focused on the mark, especially if the board has a large unstained surface.
- Let it sit for 10 minutes. Start a timer so the treatment doesn’t stay on longer than the stated contact time. Keep the board level while the hydrogen peroxide rests on the stain. If the liquid runs toward the edge, reposition the board or blot the run rather than spreading it over clean wood.
- Wipe the area clean. After 10 minutes, use a clean, damp cloth to remove the hydrogen peroxide and loosened residue. Rinse the cloth as needed, then wipe again until the treated spot feels clean. Don’t scrub hard during this step; wiping lets you see the stain without adding abrasion.
- Inspect the dry wood. Let the board air-dry, then compare the treated patch with the surrounding maple or other wood. A wet surface can make color difficult to judge. If a food stain remains visible after drying, repeat the same measured treatment instead of extending the original 10-minute wait.
- Finish with ordinary board care. Wash away residue with warm water and mild soap, dry the board promptly, and stand it upright to air-dry. This clears the surface after stain treatment and avoids trapping moisture beneath the board. Use it for food preparation again only once it’s clean and dry.
Hydrogen peroxide is one option for a distinct stain, not a replacement for washing the whole board. For example, after treating a berry mark, still clean the full surface, including the opposite face and edges. Keep the sequence simple: clean first, apply 3% hydrogen peroxide for 10 minutes, wipe, rinse, and inspect after drying. That makes it easier to judge the result and avoid unnecessary scrubbing.
For a dark stain, clean and dry the spot, apply 3% hydrogen peroxide, and leave it for 10 minutes. Wipe it with a clean damp cloth, rinse, and let the board dry before checking the result; repeat the measured treatment if the stain remains.
Lemon and coarse salt scrubbing
Use half a lemon and coarse salt as a focused scrub for a food mark. Leave the mixture on the stain for 5-10 minutes, then wipe and rinse the board.
- Clear the board first. Remove crumbs and food residue so the lemon and salt can reach the mark. Wipe away any beet juice or berry pulp before starting. Treating a clean patch also makes it easier to see whether the stain changes.
- Choose coarse salt and half a lemon. Sprinkle coarse salt over the stained spot, then cut a lemon in half. The larger salt crystals provide a textured surface to work with. Keep the salt on the mark rather than scattering it across the board.
- Scrub with the cut lemon. Press the lemon’s cut side onto the salt and move it gently over the stain. Use short strokes and modest pressure, especially on a smooth maple board. Avoid grinding salt into the grain; the aim is controlled scrubbing, not aggressive abrasion.
- Let the lemon-and-salt mixture sit. Leave it on the stain for 5-10 minutes. Set a timer so the contact time stays within that range. This gives the treatment time on the marked area without leaving lemon and salt sitting indefinitely on the wood.
- Wipe, then rinse. Use a damp cloth to lift away the salt and lemon residue. Rinse the cloth as needed, then wipe the board again with clean water. Check grooves and edges where coarse crystals can collect, and remove any grit before drying.
- Inspect the dry surface. Dry the board with a clean towel and check the stain once the wood is no longer wet. A berry mark that looks lighter while damp may look different after drying. If color remains, don’t scrub harder; try another gentle stain treatment instead.
- Keep the method focused on food stains. Lemon and coarse salt can be tried on a visible surface mark, such as discoloration left by cut fruit. They can’t identify or treat every dark patch. If a spot looks like mold or the wood is damaged, don’t simply cover it with another scrub.
After this treatment, return to the regular hand-washing routine: clean the board, dry it promptly, and let it finish drying upright. Use the 5-10-minute contact time as directed, then judge the result on dry wood rather than repeating the scrub with extra force.
Testing DIY stain-removal methods on a maple cutting board
A test on a maple board shows why it’s worth trying a gentle method before stronger treatment. Results differed: baking soda and kosher salt lightened stains, while lemon and baking soda did not remove them.
-
Remove Stains Without Drying the Wood
Test one gentle method on the stained area, then rinse and inspect the dry maple before trying another. In one test, baking soda and kosher salt scrubbed with a microfiber cloth lightened the marks. Dawn dish soap left on the stain for a few minutes worked less well, while half a lemon with baking soda didn’t remove it. Avoid forceful scrubbing that abrades the surface.
-
Decide Whether to Sand Stubborn Stains
Sand only when a stain remains after cleaning and appears to sit at the surface. For a stubborn mark, use about 220-grit sandpaper, moving along the grain, then re-oil immediately. Deep gouges may call for starting with 80-grit before progressing finer; badly scarred boards may need a staged approach. Keep sanding localized, since it removes wood rather than simply cleaning it.
-
Dry and Re-Oil the Board
After stain treatment, wipe the board clean, dry it with a towel, and stand it upright. Let the wood air-dry fully before applying food-grade mineral oil. Leave the oil to soak overnight, then wipe away excess the next morning. Frequently used boards need mineral oil at least once a month to help maintain their surface.
-
Avoid Unsuitable Cleaning Methods
Skip bleach on a wooden cutting board; it can damage wood fibers, strip natural oils, and potentially cause cracks. For an odor or grease mark, a cloth dampened with white vinegar can sit on the stain for 15-20 minutes; vinegar is especially effective for grease or oil. Rinse and dry afterward, and don’t confuse odor treatment with stain removal.
Use the maple test as a practical guide, not a promise that every stain will respond alike. Start with a gentle cleaner, compare the board only after it dries, and change methods rather than increasing pressure. If sanding is needed, work along the grain and restore the oil afterward. For a wood board made for serving, explore wooden cutting boards.
The comparison distinguishes a method that made a visible difference from one that was less successful. Baking soda and kosher salt, scrubbed with a microfiber cloth, lightened the stains; Dawn dish soap left on the mark for a few minutes worked less well. Judge each attempt by what changed on the board instead of assuming a familiar household cleaner will work. Keep treatment localized and check the surface after cleaning, so your next step responds to the stain rather than a guess.
If a gentle attempt only partly improves the stain, stop and reassess before applying more pressure. A lighter mark shows that something changed, but doesn’t prove the stain is gone. One maple-board test cannot guarantee the same result on every board or mark. Use what you observe to decide whether cleaning is enough or whether a remaining surface stain warrants careful sanding. This avoids escalating treatment just because the first method didn’t fully work.
Carry thoughtful wood care into your next project
A patient approach to removing stains from a wood cutting board can also inform how you care for wooden pieces you use every day. Think about the tools and habits that make your kitchen feel inviting, then consider what would make the space work better. FVCreations can create a handcrafted table or another custom furniture piece around your room, routine, and personal taste.
FVCreations also offers custom outdoor planters and premium wood finishes for projects beyond the kitchen. If you’re considering a custom wood piece for your home, contact FVCreations to discuss your project. Keep learning, care for the wood you use, and enjoy making your space your own.
Frequently Asked Questions
What about sanitizing your board?
Sanitizing is separate from making a stain less visible. A faded mark doesn’t show whether the board has been sanitized, and stain treatments aren’t automatically sanitizers. For everyday cleaning, pay attention to grooves and cuts where food residue can remain. To sanitize the board, use a product labeled for food-contact surfaces and follow its directions for wooden boards.
Can hydrogen peroxide remove stains from a wood cutting board safely?
3% hydrogen peroxide is a recommended option for treating a stain: leave it on the spot for 10 minutes, then wipe it clean. Use that measured approach rather than treating the peroxide step as proof of sanitizing. Afterward, wash the board, remove any residue, and let it dry before using it for food. Judge the stain once the wood is dry.
How do you clean and sanitize a stained wooden cutting board?
First remove food residue with warm water and mild soap, paying attention to grooves and both sides. Wipe the board dry, then stand it upright to air-dry. These steps clean the wood, but removing a stain doesn’t establish that the board is sanitized. To sanitize it, use a product labeled for food-contact surfaces and wooden boards, and follow its instructions rather than guessing at a mixture or contact time.