

Real Milk Paint: The Artisan’s Guide to Traditional Wood Finishing
Why would you spend days carefully milling a slab of local cherry just to smother it in a plastic coating that smells like a chemical plant? It's a question I ask myself every time I step into my shop to finish a new piece. You want a finish that respects the grain of the wood, whether it's a piece of white oak I've sourced from the yard or a bit of black locust harvested right here on the property. If you're tired of the dizzying fumes of modern stains and those "milk-style" acrylics that just sit on the surface, you've come to the right place. Using real milk paint is about more than just color; it's about creating a living, breathable bond that won't peel or chip away when life happens.
I know how frustrating it is to worry if a finish is truly safe for your kids or pets. You deserve a workspace that doesn't require a respirator and a finished product that looks better with age. In this guide, I'll show you how to master this traditional artisan finish to achieve that perfect historic matte look. We'll cover everything from choosing the right wood species to the step-by-step application process. This will give you the confidence to turn your next woodworking project into a timeless heirloom that's as durable as it is beautiful.
Key Takeaways
- Distinguish between authentic casein-based powders and synthetic "milk-style" paints to get the historic finish your craft deserves.
- See how different species like white oak, maple, and black locust absorb pigments, whether the wood is property-harvested or bought from a yard.
- Master the art of mixing real milk paint by following the 1:1 rule and allowing for a proper resting period in the shop.
- Learn why breathability is the secret to a long-lasting finish that moves with the wood instead of cracking like plastic.
- Explore the best ways to seal your work with natural oils to protect against moisture while highlighting the natural beauty of my favorite wood, cherry.
What is Real Milk Paint? Understanding the Organic Difference
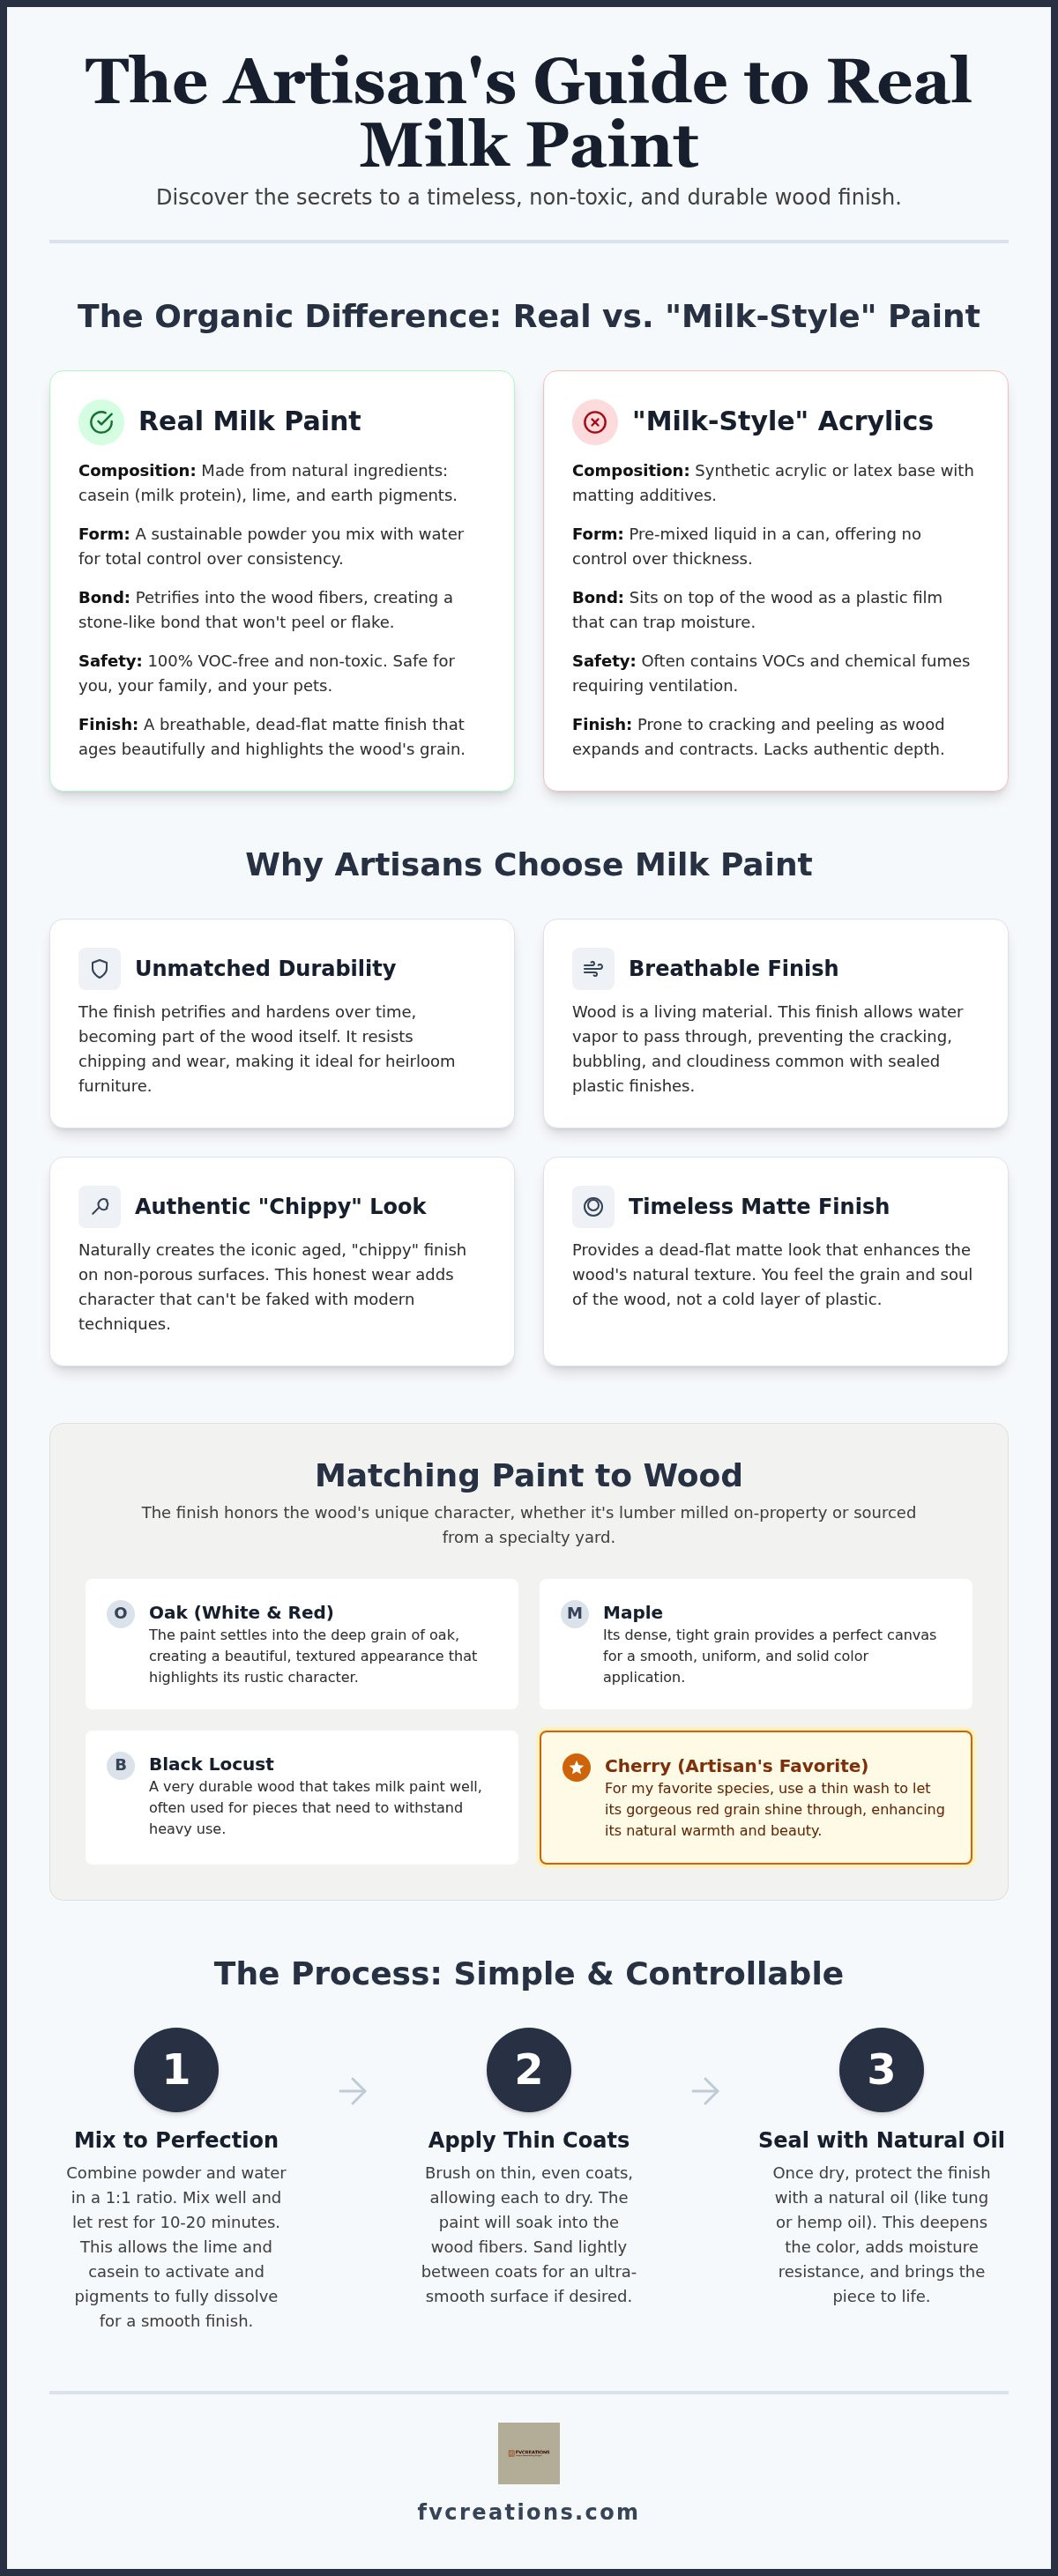
I remember the first time I cracked open a bag of real milk paint in my shop. It didn't have that sharp, dizzying smell of modern finishes; it just smelled earthy and honest. Real milk paint is a traditional finish made from three basic, natural ingredients: casein (milk protein), lime, and earth pigments. It arrives as a dry powder, which is a major departure from the "milk-style" paints you find at big-box stores. Those products are typically just standard acrylic or latex paints with a matte additive. They might look the part for a few months, but they lack the organic soul and durability of the real thing.
Using a powder-based finish is a choice for sustainability and quality. Because it's VOC-free and non-toxic, I don't have to worry about my health or my pets when I'm working late into the evening. It's a safe, approachable way to finish everything from a small charcuterie board to a large dining table. Whether I'm working with a piece of white oak I bought at the yard or a slab of black locust I milled myself, this finish honors the material instead of masking it.
The Simple Chemistry of Casein and Lime
The beauty of this finish lies in its chemistry. When you mix the powder with water, the lime reacts with the milk protein to create a natural binder. This mixture doesn't just rest on top of the wood like a plastic film. Instead, it petrifies within the wood fibers, creating a stone-like bond that prevents the paint from ever truly peeling or flaking off. It becomes part of the wood itself. Because the colors come from earth pigments, they possess an archival quality that resists fading; this ensures your project looks just as vibrant decades from now as it does today.
Powder vs. Liquid: Why We Mix Our Own
I prefer mixing my own finish because it gives me total control over the final look. If I'm working on a piece made of cherry, which is my absolute favorite species, I might want a very thin wash to let that gorgeous red grain shine through. For other projects, like a sturdy maple bench, I might want a thicker, more opaque application. Mixing your own allows for that level of artisan precision. There is also a practical side to it; powder has a much longer shelf life than liquid paint, and we aren't wasting energy shipping water weight around. I personally use and sell the same milk paint powder in my shop that I use on my own handcrafted furniture, so I know exactly how it performs on every species of wood.
Why Artisans Choose Milk Paint for Fine Furniture
When I run my hand over a finished piece, I want to feel the soul of the wood, not a cold layer of plastic. That's the real magic of using real milk paint. It provides a dead-flat matte finish that looks like it has been part of the grain for a century. Unlike modern stains or films that simply sit on the surface, this finish petrifies over time. It actually gets harder and tougher as the years go by. It's a incredibly durable choice for a heavy maple desk or a set of white oak chairs. You have the freedom to go for a clean, modern solid color or lean into that famous vintage character that only this medium can provide. For those who admire this aesthetic but aren't ready to build their own, Consignment Crush offers a beautiful selection of vintage furniture and unique collectibles that embody this same artisan spirit.
I've used this finish on everything from property-harvested black locust to fine cherry wood I've sourced from local yards. Because it's an artisan product, it reacts differently to every species. It doesn't mask the wood; it highlights the unique texture and story of the lumber. It's a way to honor the work I put into milling and shaping every board.
The Breathable Finish Advantage
Wood is a living material. It breathes, expands, and contracts with the seasons. If you seal a piece of solid furniture with a thick polyurethane, you're essentially wrapping it in a plastic bag. Moisture can get trapped underneath, which often leads to the finish cracking or unsightly cloudy spots appearing. Real milk paint is naturally breathable. It allows water vapor to pass through the finish without compromising the bond. This is exactly why I use it on many of my handcrafted wood furniture pieces. It moves with the wood, ensuring the finish stays intact through summer heat and winter dry spells.
Creating the Iconic Chippy Look
Sometimes, you don't want a perfect, factory-smooth surface. You want a piece that tells a story through "honest wear." On non-porous surfaces or woods with high oil content, real milk paint can naturally flake or "chip" in certain areas as it dries. This creates an authentic aged look that you just can't fake with spray cans. If you want a more controlled, solid look, you can add a bonding agent to the mix. However, I often prefer the character of natural adhesion. I usually grab some sandpaper to lightly distress the edges where wear would naturally happen over decades of use. It's an easy way to give a new project an instant sense of history.
If you're looking to bring this same level of character to your own workshop, you can find the supplies I personally use right here in the shop.
Matching Milk Paint to Different Wood Species
In my workshop, the story of a piece starts with the tree itself. I take a dual approach to sourcing my materials because every project has different needs. Some days, I'm using lumber I've sustainably harvested and milled right here on the property. Other times, I'm heading to local lumber yards to pick up specific boards I can't find in my own woods. Understanding the wood species is just as important as the finish you choose. Using real milk paint isn't a one-size-fits-all process; it's a partnership between the liquid and the fiber. Open-grain woods have deep, hungry pores that drink up the pigment, while closed-grain species offer a much smoother, more uniform surface for the paint to rest on.
I can't stress this enough: always test your mix on a scrap piece from the same batch of wood. Even two boards from the same yard can react differently based on their moisture content or how they were dried. Testing helps you decide if you need a thick, opaque coat or a translucent wash that lets the natural character peek through. It's the only way to be sure the final color matches the vision in your head before you commit to the entire piece.
Painting Oak, Maple, and Black Locust
Oak is a classic choice, but red oak and white oak aren't the same under a brush. Red oak has massive, open pores. If you want a perfectly smooth finish, you'll need to work the paint into those valleys or embrace the textured, woody look. White oak is slightly tighter but still very thirsty. Maple, on the other hand, is a dream for solid, vibrant colors. Its grain is so tight and even that the paint settles into a crisp, modern surface without much fuss. Then there's black locust. It's one of the hardest, most rot-resistant woods I handle. Because it's so dense and naturally oily, it can be stubborn. You'll often need a bit more surface prep and a thinner first coat to ensure the bond takes hold properly.
Farmer Vic’s Favorite: The Magic of Cherry Wood
If you've spent any time around my shop, you know that cherry is my absolute favorite species. There's just something about its soul that other woods can't match. I get genuinely excited when a cherry project hits the bench. The wood has a naturally smooth, almost buttery texture that provides the most professional-looking surface for real milk paint. I often prefer using a thin wash on cherry. This approach doesn't hide the wood; instead, it complements the way cherry naturally darkens and richens over time. As the wood deepens into that famous reddish-brown patina, the milk paint ages right along with it, creating a depth of color that looks like it belongs in a museum.
The Workshop Guide: Mixing and Applying Like a Pro
Mixing real milk paint is more of a workshop ritual than a simple chore. It's the moment where you transition from the heavy labor of milling and sanding to the artistic side of the craft. I always start with a basic 1:1 ratio of powder to lukewarm water. It's a solid baseline for most of my projects, whether I'm finishing a white oak bench or a piece of property-harvested black locust. If I want a thinner wash to let the grain of a cherry slab shine through, I'll add a bit more water. If I'm looking for a heavy, textured look on a rustic maple chest, I'll use a little less. I always mix just what I need for the day to keep it fresh. Since it's an organic product, it doesn't have the indefinite shelf life of a plastic-based paint once it's in liquid form.
The process requires patience. You aren't just stirring a can; you're hydrating a living finish. Taking the time to do it right ensures that the paint petrifies into the wood exactly how it should. This step is critical for ensuring the longevity of the piece, especially for furniture that will see daily use in a busy home.
The Mixing Ritual
Start by pouring your water into a clean container, then slowly add the powder. I use a small whisk for most of my daily work, but if I'm prepping a large batch for a set of outdoor items, a mechanical mixer on a drill saves a lot of arm ache. You're looking for a smooth, creamy consistency. Once it's mixed, you must let it sit for at least 15 to 20 minutes. This resting period allows the lime to fully react with the milk protein. After it rests, give it another stir and strain it through a paint sock or a fine mesh. This extra step ensures a professional application that won't leave grit on your smooth cherry surfaces.
Surface Prep for Lasting Adhesion
Your finish is only as good as the prep work underneath. When I'm working with tight-grained woods like maple or my personal favorite, cherry, I'm careful not to sand too fine. If you go beyond 150 or 180 grit before painting, you might burnish the wood and prevent the paint from soaking in. You want the fibers open and ready to bond. I always make sure to remove every speck of dust and any natural oils with a clean cloth. If I find a small crack or a knot hole that needs filling during the prep stage, I reach for Starbond adhesives to stabilize the area before that first coat goes on. It's all about building a foundation that lasts for generations.
Ready to start your own workshop ritual? You can pick up the same real milk paint powders I use on all my handcrafted goods right here in the shop.
Sealing the Deal: Protecting Your Milk Paint Finish
Once you've applied your real milk paint, you'll notice it dries to a very flat, chalky texture. It's beautiful. However, it's also incredibly thirsty. If you leave it raw, a single drop of water or oil from a coffee cup will leave a permanent mark on your hard work. Sealing isn't just about protection. It's about the final transformation of the piece. When you apply a natural oil, the colors of the paint deepen and the wood grain underneath, whether it's property-milled white oak or yard-sourced maple, suddenly pops with life. I consider our preferred oils and waxes to be the essential final step for any project leaving my shop.
The Power of Citrus Half & Half
I've tried a lot of finishes over the years, but Citrus Half & Half Tung Oil is the shop favorite for a reason. It gives the wood a natural, healthy glow without that plastic look of a film finish. To get a streak-free topcoat, I apply it liberally with a clean rag, let it soak into the paint for about fifteen minutes, and then buff away the excess. It smells like a fresh orange grove, which is a nice change from the usual workshop dust. If I'm finishing a black locust bench or a cedar planter that's heading to the patio, I'll switch to Outdoor Defense Oil. It provides that extra layer of protection against the sun and rain that real milk paint needs to stay vibrant in the elements.
Long-Term Care for Your Artisan Pieces
I always tell my customers that their handcrafted furniture is a legacy piece. It's meant to be used, not just looked at. Cleaning a milk-painted surface is simple; just use a damp cloth with a little mild soap. Avoid harsh chemicals that can strip the natural oil. Every few years, you might notice the finish looking a bit dry, especially on a high-use item like a cherry dining table. Cherry is my favorite wood to maintain because it just gets better with age. When it needs a refresh, just give it a light cleaning and rub in a fresh coat of oil. It'll hide minor scratches and bring back that deep, rich luster immediately. This process allows the piece to age gracefully alongside your family for generations.
Bring Your Woodworking Vision to Life
I've spent years in my workshop learning how to honor every board, whether it’s a piece of white oak sourced from a local yard or a slab of my favorite cherry wood I milled myself. Using real milk paint is the only way I’ve found to truly respect the wood while keeping my shop a safe environment for my family and pets. By choosing an organic, powder-based finish, you aren't just painting a surface; you're creating a durable, breathable bond that synthetic alternatives simply can't match. I personally vet every supply used at FVCreations to ensure it meets my standards for quality and sustainability.
Now that you understand the "resting period" ritual and how to seal your work with natural oils, you have everything you need to succeed. These eco-friendly, non-toxic finishes will give your next project a depth of character that lasts for generations. Whether you're finishing property-harvested black locust or a fine maple piece, the results will speak for themselves. It’s about more than just a coating; it’s about the connection between the maker, the material, and the final product.
Shop the Real Milk Paint colors I use in my workshop and bring a historic, artisan touch to your own bench. I'm excited to see the legacy pieces you'll build.
Frequently Asked Questions
Is real milk paint actually made from milk?
It certainly is. The primary binder in real milk paint is casein, which is the protein found in milk. When you combine this with lime and natural earth pigments, you get a finish that has been used for thousands of years. It is about as traditional as it gets. I use it on everything from my property-harvested black locust to my favorite cherry wood because it is entirely non-toxic and safe for the home.
How long does it take for milk paint to dry and cure?
It dries remarkably fast, usually within 30 minutes to an hour depending on the humidity in your shop. However, drying isn't the same as curing. While you can handle the piece quickly, it takes about 30 days for the paint to fully petrify and reach its maximum hardness. I always wait at least 24 hours before applying a topcoat of oil or wax to ensure the moisture has evaporated.
Can I use milk paint on top of an existing finish or old paint?
You can, but you will need to do some prep work first. Since real milk paint is designed to soak into raw wood fibers, it won't naturally bond to a sealed surface like polyurethane. You should sand the old finish thoroughly to give it some "tooth." For the best results, I recommend adding an ultra-adhesion product to your first coat to ensure it sticks firmly to those non-porous surfaces.
Does milk paint smell bad like modern oil-based paints?
Not at all. In fact, it has a very faint, earthy scent that reminds me of a fresh glass of milk or a damp garden. You won't find any of those harsh, dizzying chemical fumes common in modern stains or "milk-style" acrylics. It is one of the reasons I love using it in my workshop; I can finish a project without needing a respirator or worrying about my pets' health.
How do I stop milk paint from chipping if I want a solid look?
The key to a solid look is ensuring the wood is porous and clean. If the wood is too smooth or has a lingering old finish, the paint might flake off as it dries. If I am working with a dense wood like maple and want total coverage, I add a bonding agent to the first coat. This ensures a uniform, modern appearance while still keeping that beautiful matte texture I expect. For homeowners who want to achieve this look throughout their space, you can explore Sale and Installation of Shaker Cabinets to find high-quality options that perfectly match this clean aesthetic.
Is milk paint waterproof enough for a kitchen table or cutting board?
On its own, milk paint is water-resistant but not waterproof. Because it is a porous finish, standing water can eventually soak through and leave a mark. For items like kitchen tables or charcuterie boards, you must seal the paint with a food-safe oil. I personally use Tung oil on my cherry wood projects to create a durable barrier that stands up to spills while deepening the color.
What happens if I don’t seal my milk paint with oil or wax?
If you leave it unsealed, the finish will remain very porous and susceptible to stains from water or oils. It also has a chalky feel that can rub off slightly onto your clothes. While some people like the raw, historic look for decorative pieces, any furniture that gets handled needs a sealer. Without it, you will lose that rich depth of color that a good oil brings out in the pigments.
Can I mix different milk paint colors together to create custom shades?
Absolutely. One of the best parts of using real milk paint is playing the role of a chemist. Since it comes in powder form, you can mix different colors while they are dry to create a perfectly custom shade. I often blend colors to match the specific tones of the red oak or white oak I am using. It gives you total creative control that you just can't get with pre-mixed paints.